This is the multi-page printable view of this section. .
Management
- 1: Overview of the cloud object hierarchy
- 2: Projects
- 3: Clusters
- 4: Authorization
- 5: Backup & Restore
- 6: Upgrade
- 7: API Keys
- 8: Terraform Integration Overview with VectorChord Cloud
- 9: Regions
- 10: Workflow
1 - Overview of the cloud object hierarchy
Managing your VectorChord Cloud project requires an understanding of the object hierarchy. The following diagram shows how objects in cloud are related. See below for a description of each object.
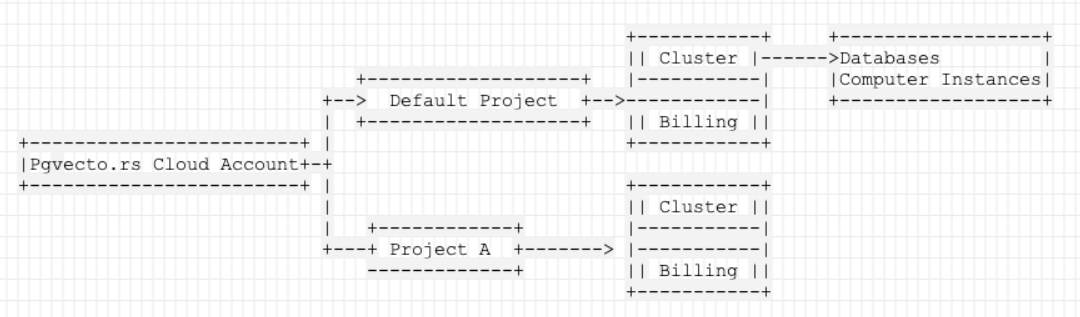
VectorChord Cloud Account
This is the account you used to sign up with VectorChord Cloud. Now supports signing up with an GitHub account.
Projects
A project is the top-level object in the hierarchy. It is a container for all clusters in the project and billing information. For more information, see Projects.
Clusters
A project can contain one or more clusters. A cluster is a collection of nodes that run one Postgres cluster. For more information, see Clusters.
Compute Instances
A cluster can contain one or more compute instances. A compute instance is a virtual machine that runs a Postgres instance.
Databases
Every cluster contains two default databases: postgres and a database what you named when you created the cluster. You can create additional databases in a cluster with psql after the cluster is ready.
2 - Projects
With VectorChord Cloud, everything starts with the project. It is the top-level object in the hierarchy. A project can hold as many Postgres clusters as needed. The maximum number of projects you can create and join is 5.
Learn more about projects and how to manage them in these sections:
Project Setting
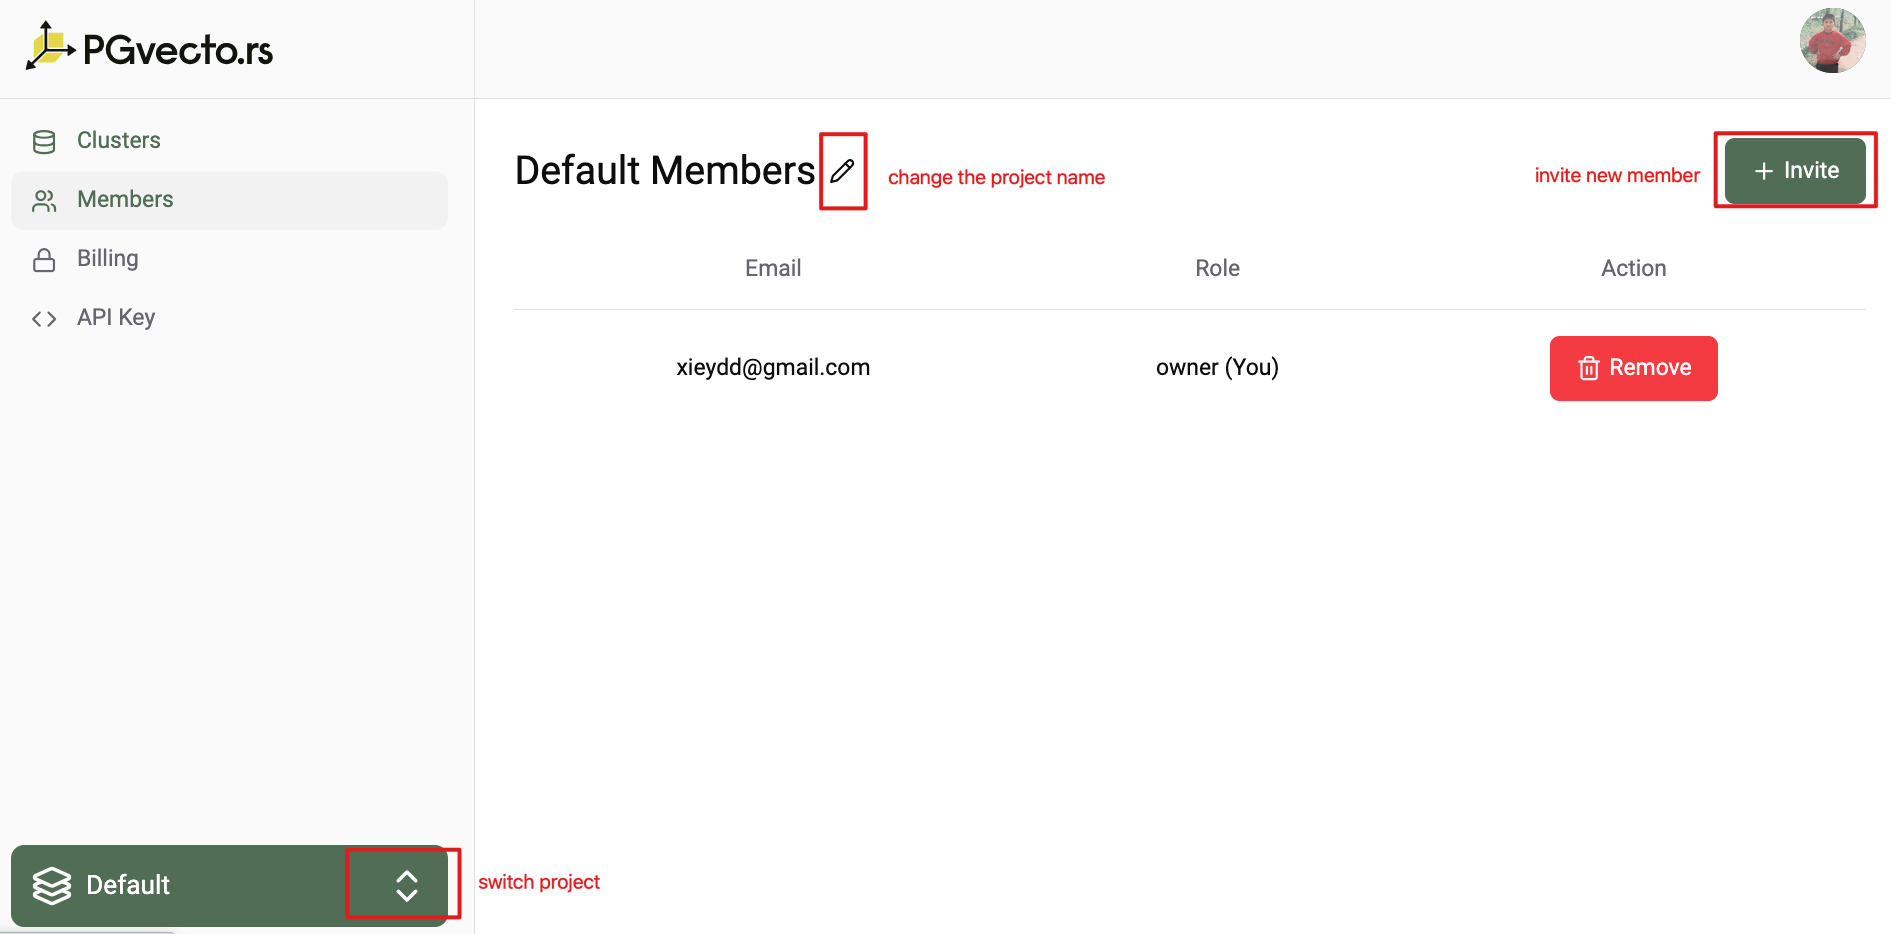
In project setting, you can view and edit the project information. You can switch to another project by clicking the project name in the bottom left corner of the page. The default project is the first project we created for you when you signed up. In below diagram, you can change the name, invite members to the project, and leave the project.
Project Permissions
You can invite other users to your project by clicking the Invite button. You can invite users by their email address. The invited user will receive an email with an invitation link. The invited user can accept the invitation by clicking the link.
If the invited user does not have a VectorChord Cloud account, they will need to sign up for an account before they can accept the invitation.
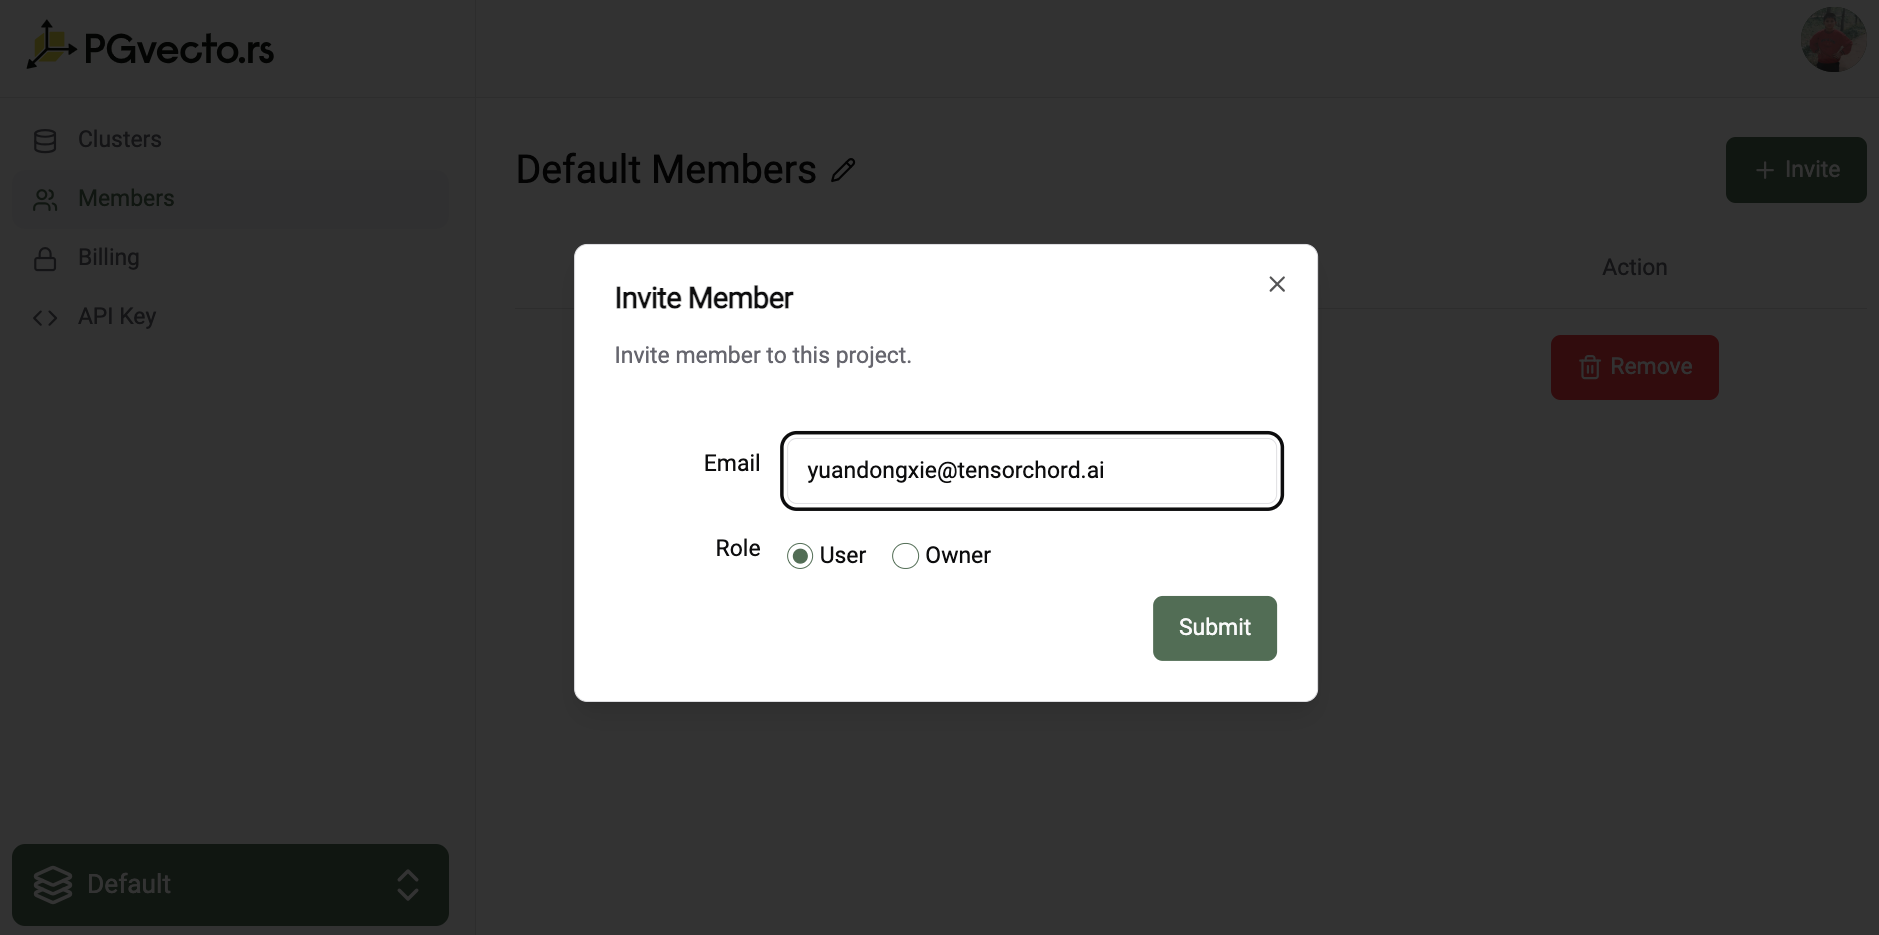
For more information on access levels of each role, see Authorization.
Project Billing
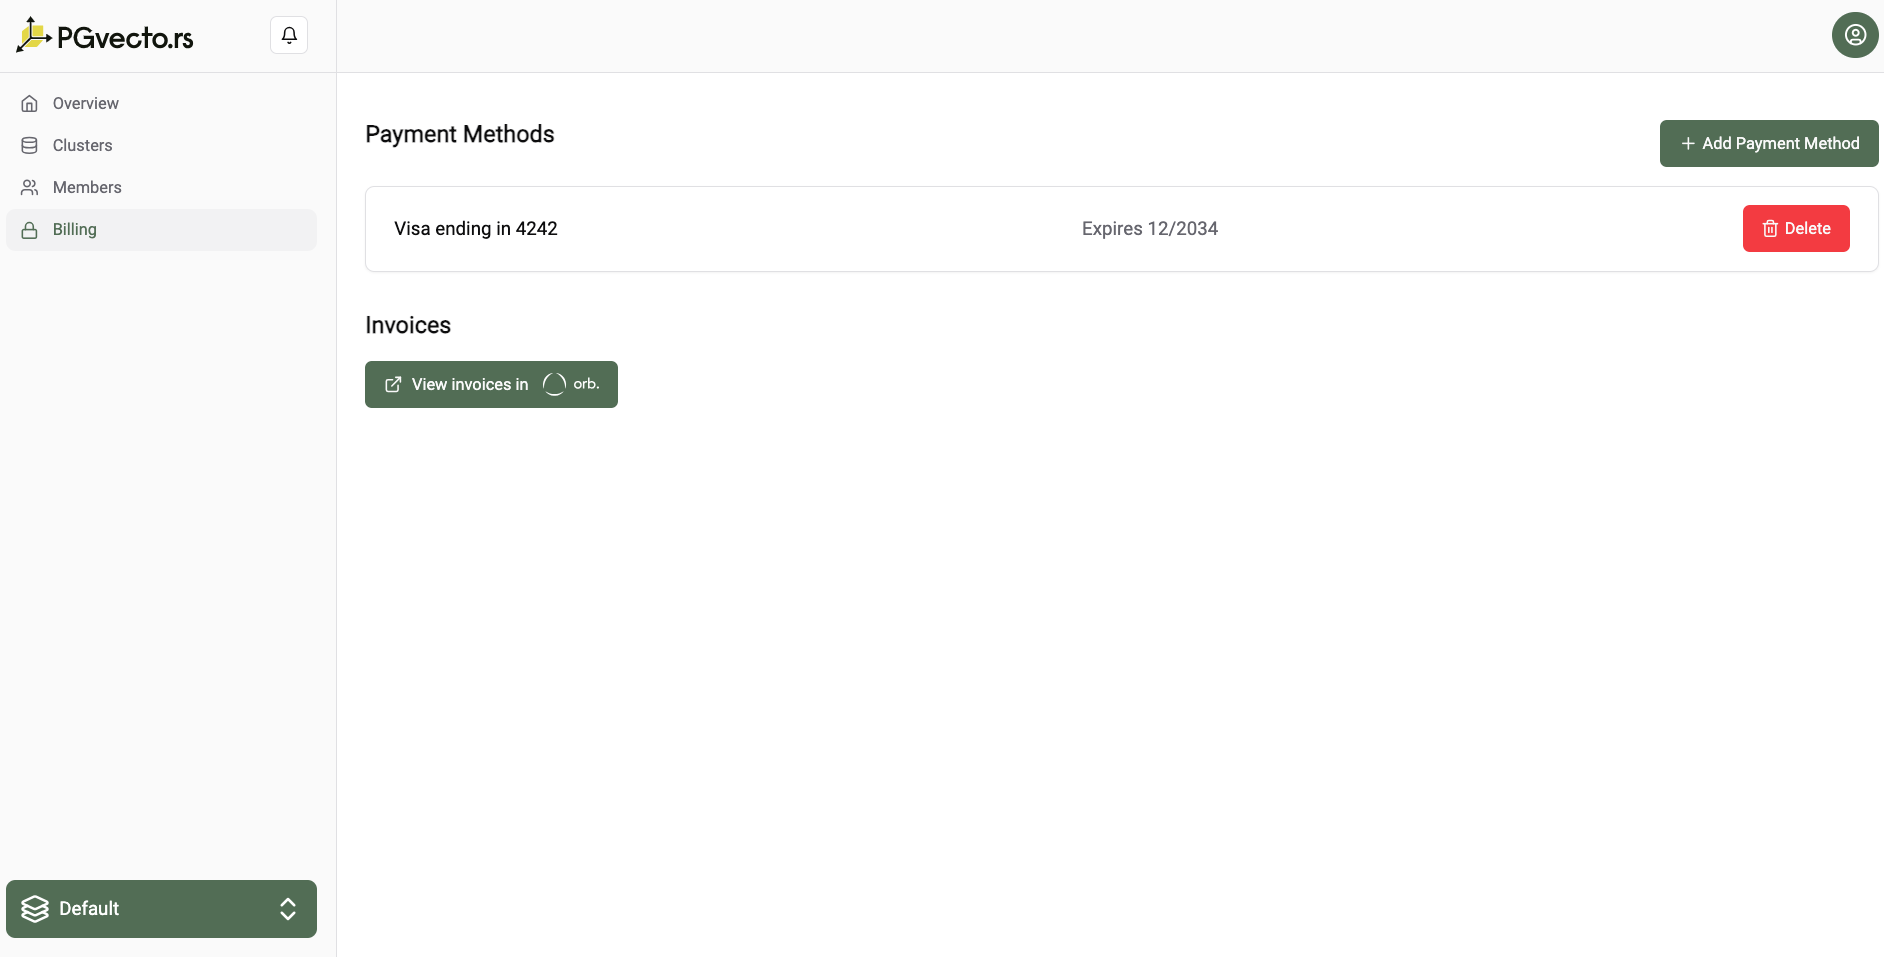
Every project has a billing page where you can view the billing information. In the billing page, you can add a payment method, view the billing invoices.
3 - Clusters
One or more clusters can be created in a project. A cluster is a collection of nodes that run a Postgres cluster.
Create a cluster
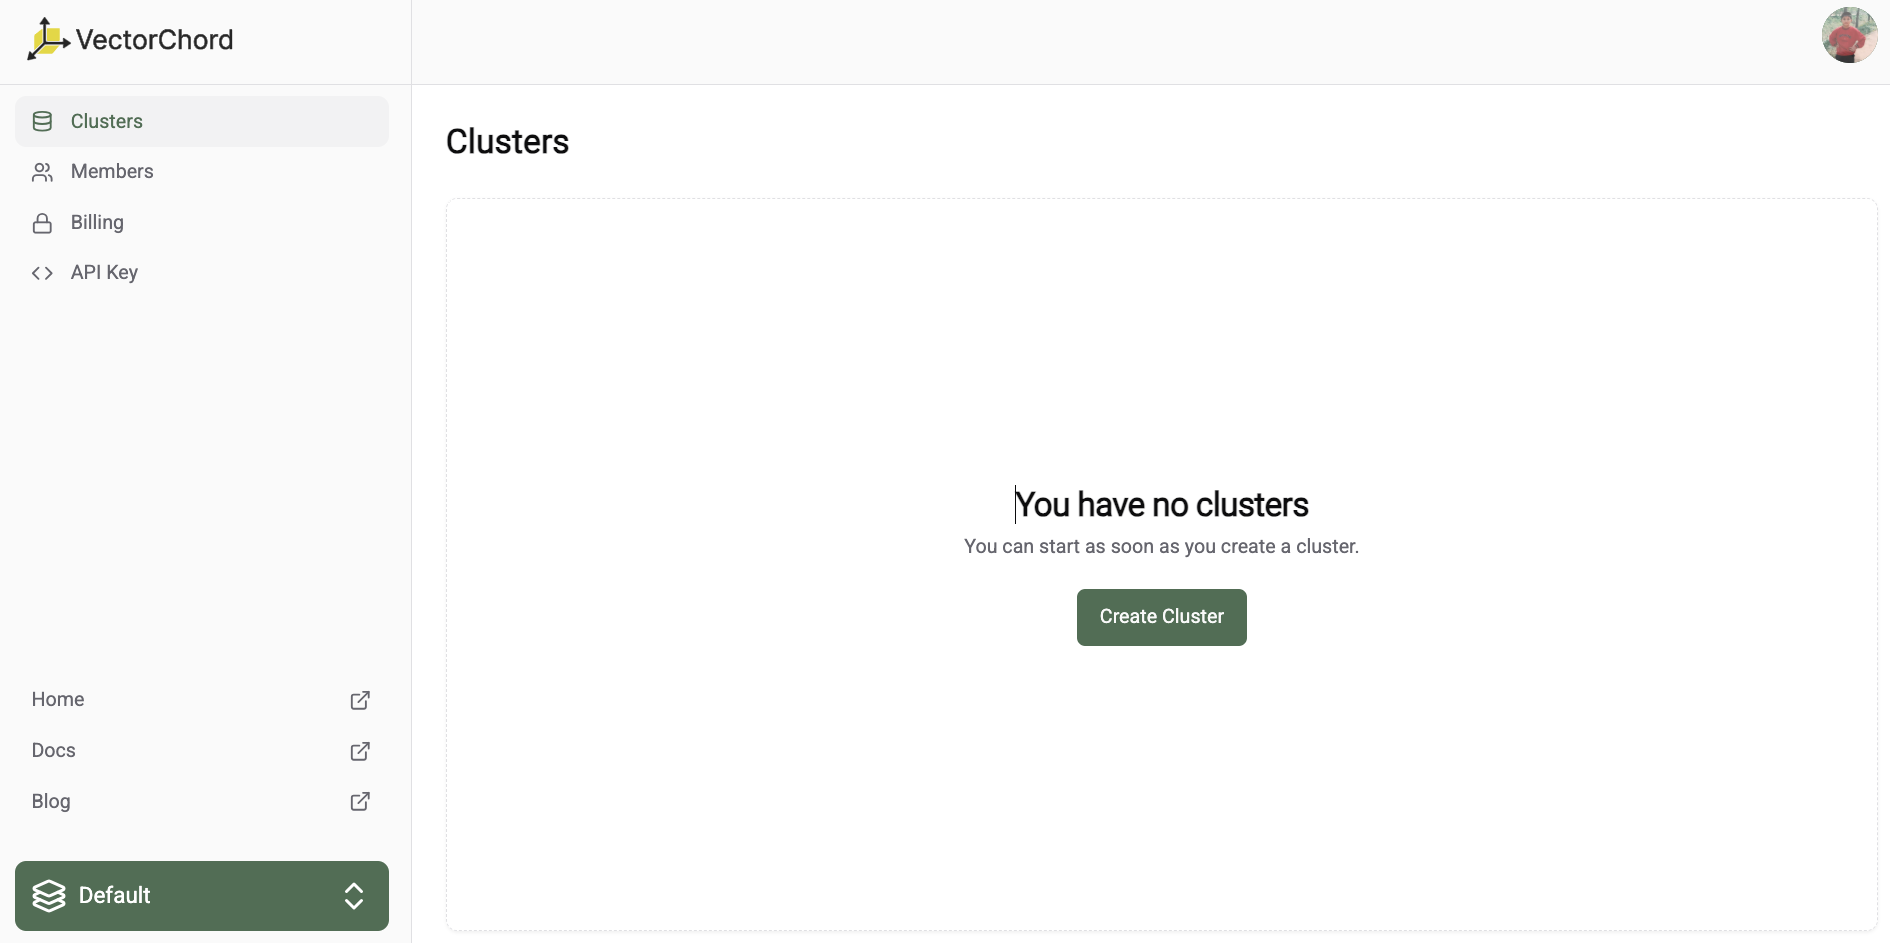
To create a new cluster, navigate to the VectorChord Cloud Console and click on the “Create Cluster” button.
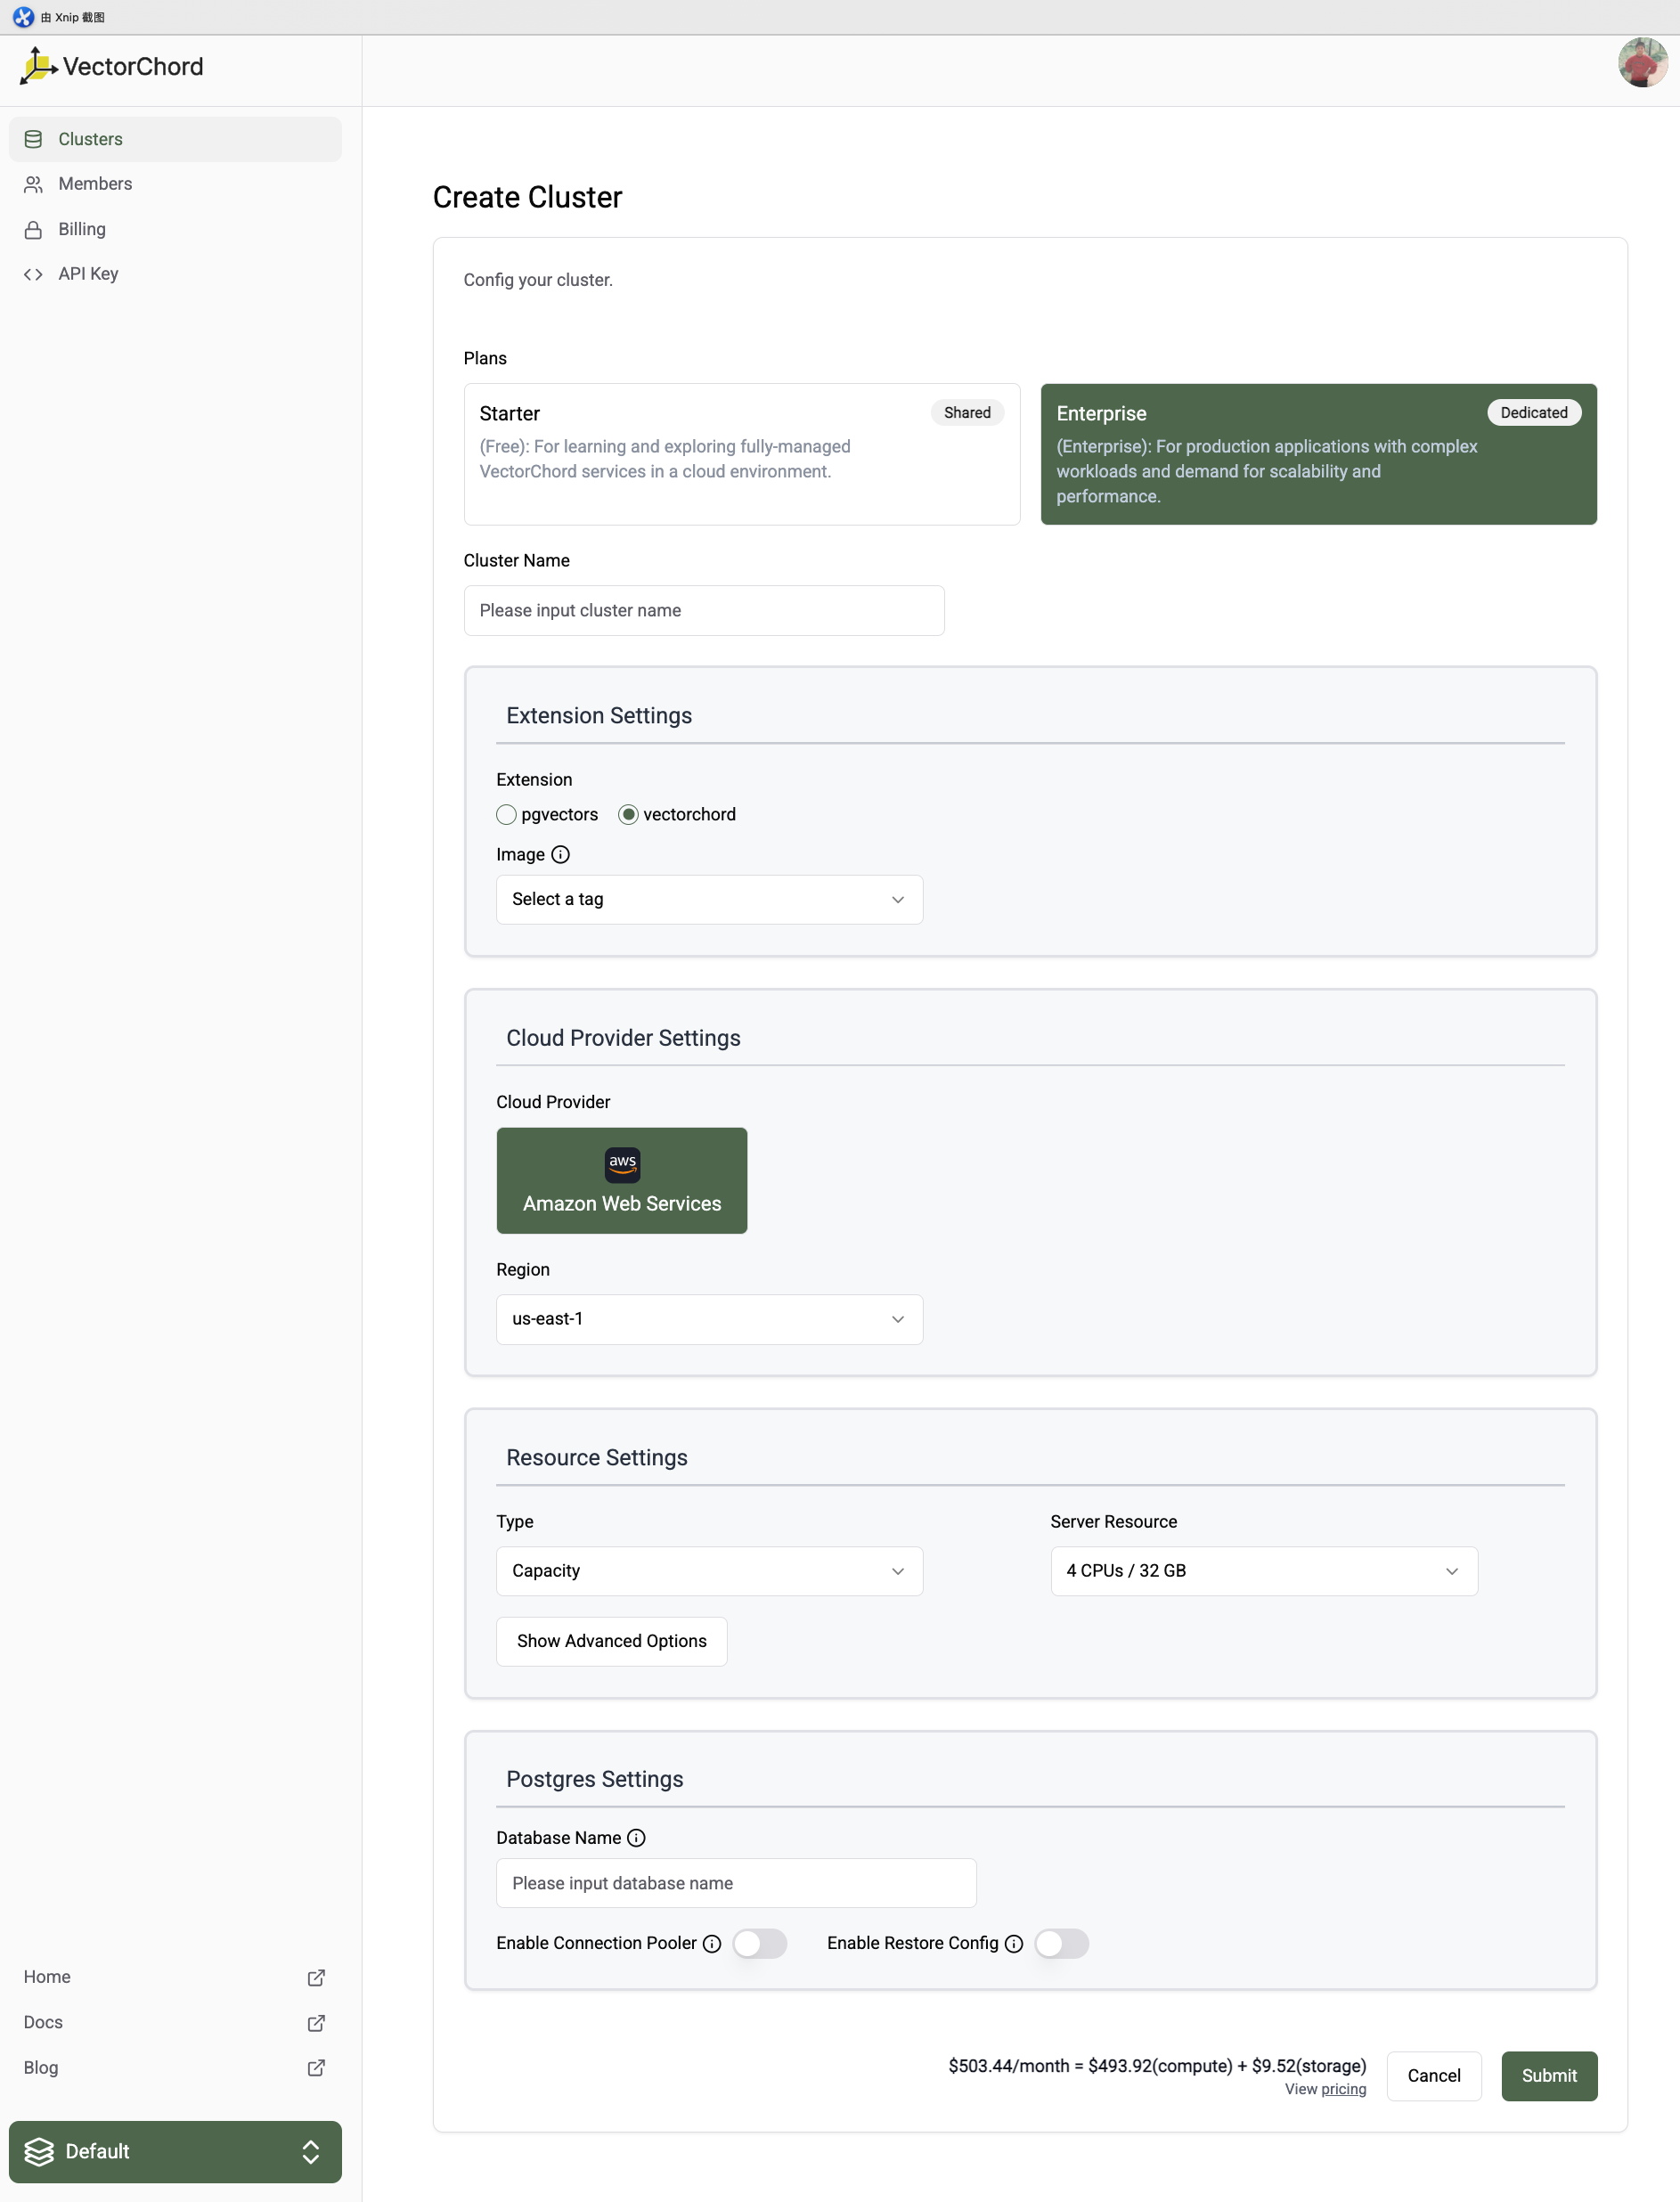
You need to specify the following information:
- Required:
- Plan: The plan you want to use for your cluster, for information about Cloud’s paid plan options, see Cloud plans.
- Cluster Name: A unique name for your cluster.
- Extension Settings:
-
Extension: We support two Vector Search extensions, pgvectors and its successor vectorchord
- vectorchord: Scalable, Fast, and Disk-friendly Vector search in Postgres
- pgvectors: Scalable, Low-latency and Hybrid-enabled Vector Search in Postgres. Revolutionize Vector Search, not Database.
WarningThe vectorchord only support server resource with NVMe SSD.
-
Image:
- VectorChord, we provide a tag in a semantic version format, for example 16-v0.1.0:
- 16 indicates the version number of Postgres major
- v0.1.0 indicates VectorChord version number
- pgvecto.rs, we provide a tag in a semantic version format, for example 16-v0.4.0-vectors-exts:
- 16 indicates the version number of Postgres major
- v0.4.0 indicates pgvecto.rs version number
- vectors indicates the installation location of pgvecto.rs scheme, optional vectors,extensions, public. Please choose public if you want to use VectorChord Cloud on AWS RDS. If you’re going to use fdw on Supabase, please choose extensions.
- exts indicates the cluster can install extensions from https://pgt.dev/.
- VectorChord, we provide a tag in a semantic version format, for example 16-v0.1.0:
-
- Cloud Provider Settings:
- Cloud Provider: The cloud provider where your cluster will be deployed, currently only AWS is supported.
- Region: The region where your cluster will be deployed.
- Resource Settings:
- Type: We provide two types of resources,
PerformanceandCapacity. - Server Resource:
- Performance:
- 1C/2G: Free tier, 1 core CPU, 2GB memory and 3Gi disk space.
- 2C/8G: Enterprise tier, 2 core CPU, 8GB memory and 15Gi disk space.
- 2C/16G: Enterprise tier, 2 core CPU, 16GB memory and 15Gi disk space.
- 4C/32G: Enterprise tier, 4 core CPU, 32GB memory and 90Gi disk space.
- Capacity:
- 4C/32G NVMe SSD: Enterprise tier, 4 core CPU, 32GB memory and 850Gi NVMe SSD disk space.
- Performance:
- Type: We provide two types of resources,
- Postgres Settings:
- Database Name: The name of the database that you will store vector data in.
- Enable Connection Pooler: (default: false): Enable the connection pooler for your cluster.
- Enable Restore Config: (default: false): Enable the restore config for your backup created in other clusters.
- Optional:
- Disk Size: Postgres PGData disk size, will change the default disk size.
- Instances: The number of instances in the cluster. The default is 1.
WarningCurrently, vector index not support streaming replication.
Delete a cluster
If you want to delete a cluster, navigate to the VectorChord Cloud Console and click on the “Delete” button.
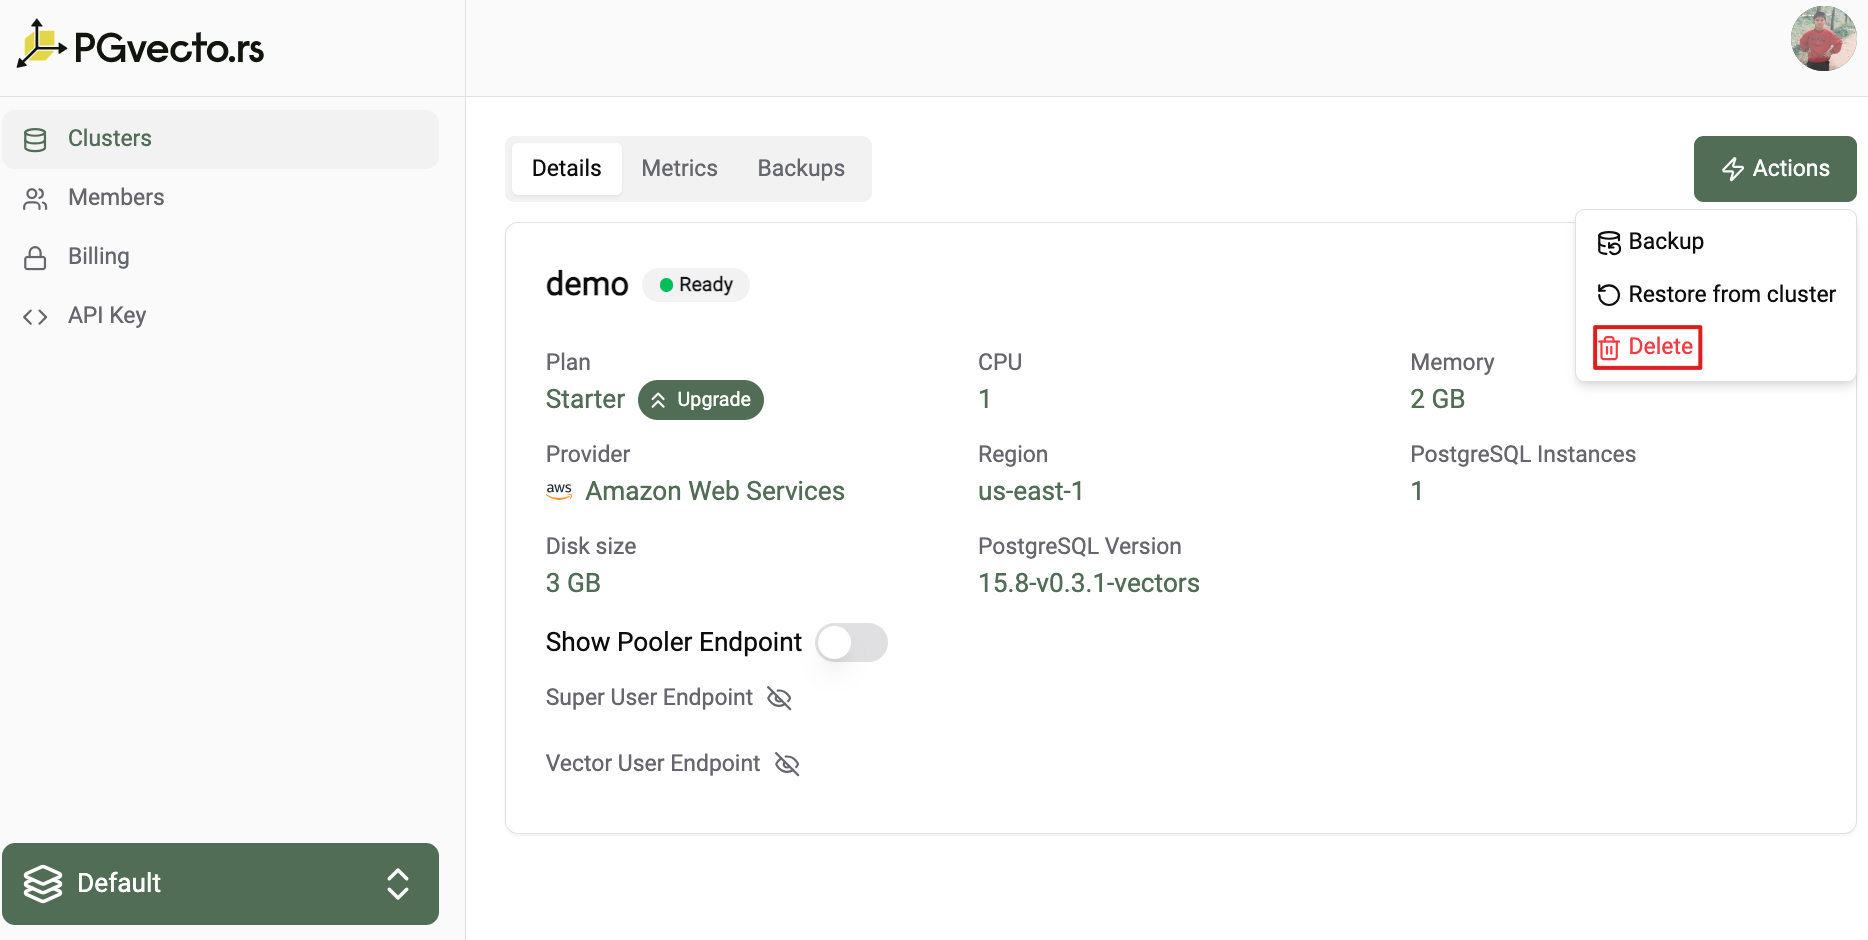
Once you delete this cluster, all data including WAL in Postgres and automatically or on-demand created backups in the cluster will be deleted as well.
Cluster Monitoring
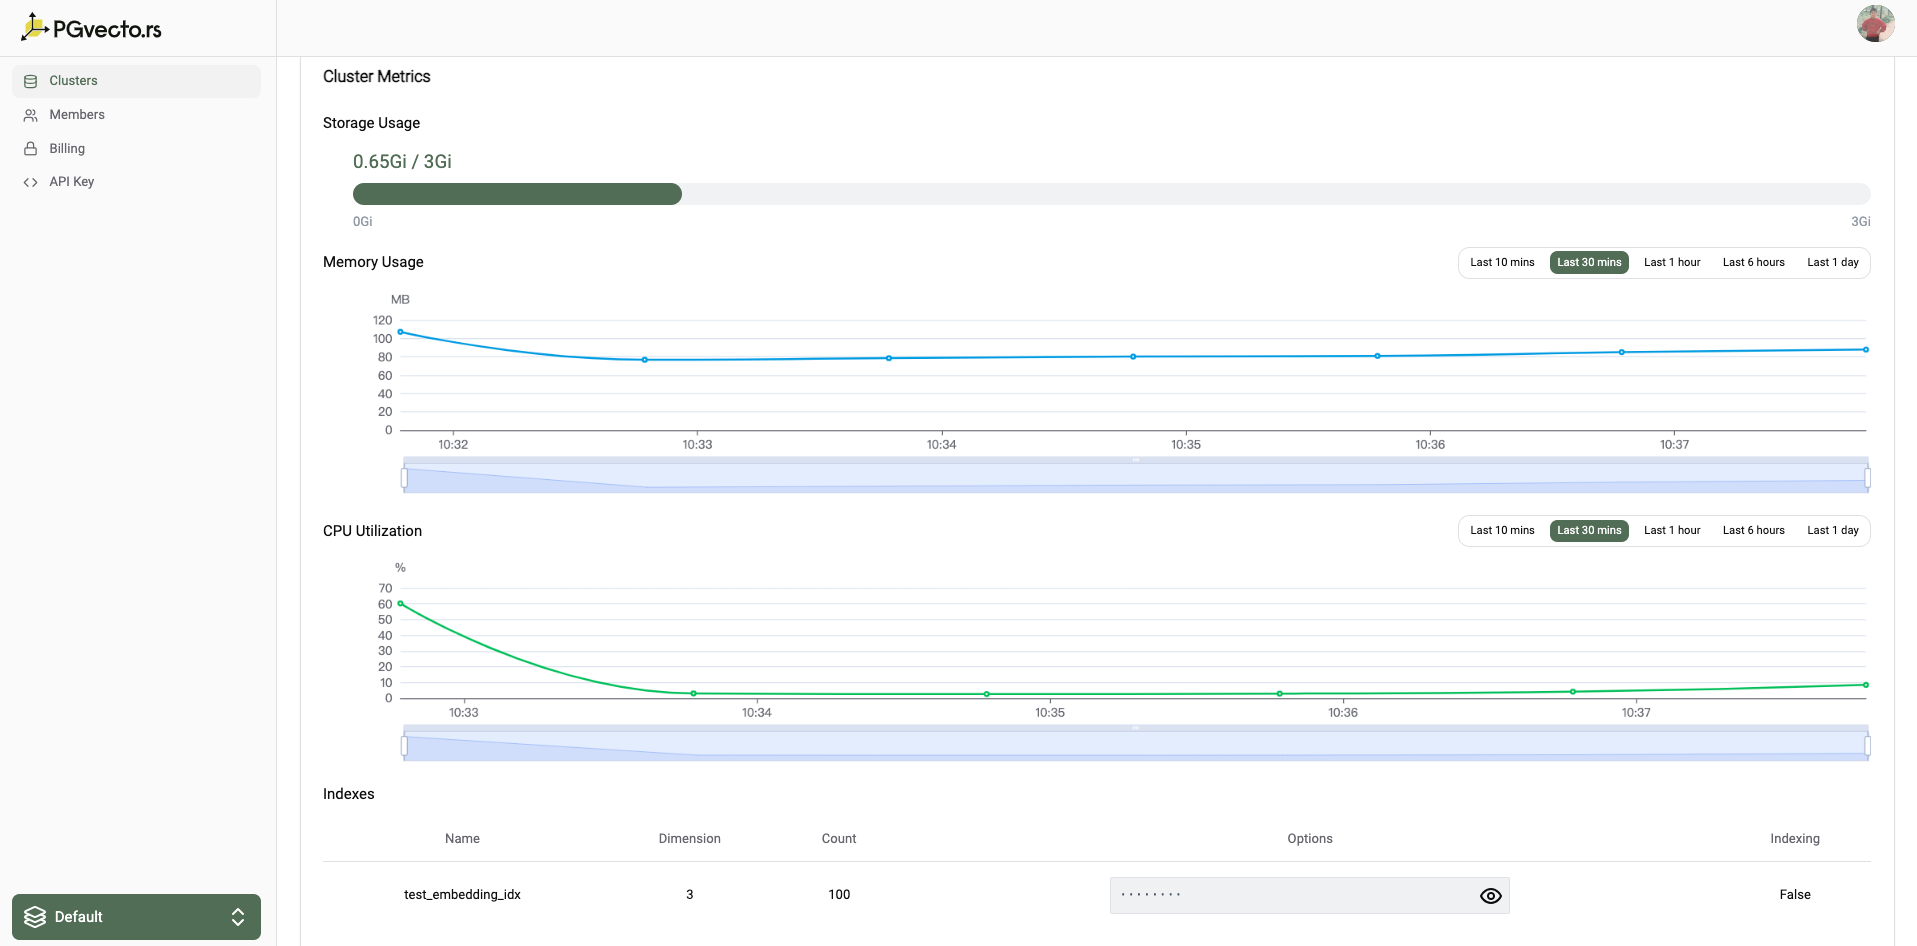
You can view the cpu and memory usage of your cluster in the cluster info page, and you can also view the index info for example the number of vectors in the index, the dimension of the vectors etc. For detailed information about monitoring, see Monitoring.
4 - Authorization
Topics related to role-based access control (RBAC) on your VectorChord Cloud clusters.
User Roles
We provide two types of roles for the project: Owner and Member.
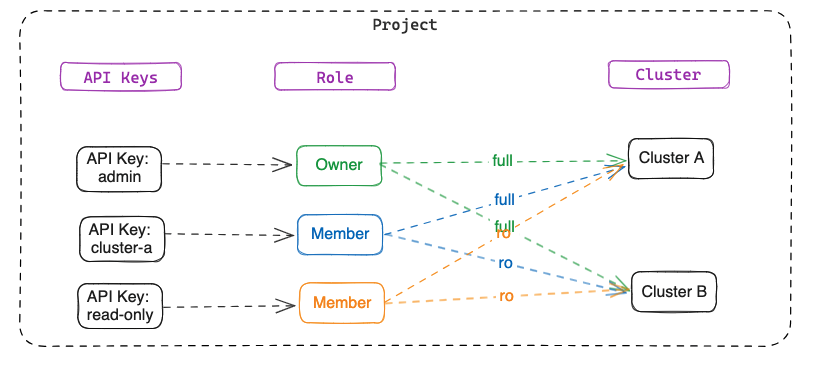
Owner: The owner has full access to the project. The owner can invite members, create or delete clusters, and view the billing information.Member: The member has read-only access to the project. The member can view the cluster information, but cannot create or delete clusters.
API Key Roles
API Key provide more fine-grained control over access to resources by assigning roles with specific permissions to users within the projects. We provide two types of roles for the API Key: Owner and Member.
Owner: The owner has full access to the project cluster.Member: The member has read-only access to the project cluster. However, you can specify clusters to which the member has full access.
Resource Hierarchy
For more information on the object hierarchy, see Overview of the cloud object hierarchy.
5 - Backup & Restore
Database backups are an integral part of any disaster recovery plan. Disasters come in many shapes and sizes. It could be as simple as accidentally deleting a table column, the database crashing, or even a natural calamity wiping out the underlying hardware a database is running on. The risks and impact brought by these scenarios can never be fully eliminated, but only minimized or even mitigated. Having database backups is a form of insurance policy. They are essentially snapshots of the database at various points in time. When disaster strikes, database backups allow the project to be brought back to any of these points in time, therefore averting the crisis.
Once you delete this cluster or your project, all data including WAL in Postgres and automatically or on-demand created backups in the cluster will be deleted as well.
Backup
Concepts
- WAL archive: a location containing the WAL files (transactional logs) that are continuously written by Postgres and archived for data durability
- Physical base backups: a copy of all the files that PostgreSQL uses to store the data in the database (primarily the PGDATA and any tablespace)
Automatic Backups
Once the cluster is created, automatic backups are enabled by default. Automatic physical base backups are taken daily and retained for 7 days. The backups are stored in AWS S3, and the retention policy for AWS S3 is set to 90 days.
At the same time, the WAL (Write-Ahead Logging) will be archived every 5 minutes. If these files cross a certain file size threshold, they are backed up immediately. As such, during periods of high amount of transactions, WAL file backups become more frequent. Conversely, when there is no activity in the database, WAL file backups are not made. Overall, this would mean that at the worst case scenario or disaster, the PITR(Point-In-Time Recovery) achieves a Recovery Point Objective (RPO) of five minutes.
On-demand Backups
If you want to create a backup at a specific point in time, you can create an on-demand backup. On-demand backups are physical base backups of the database cluster and retained for 7 days. They are stored in AWS S3 and can be retained for up to 90 days.
You can follow the steps below to create an on-demand backup:
- Clicking the
Actionsbutton and selectingBackup.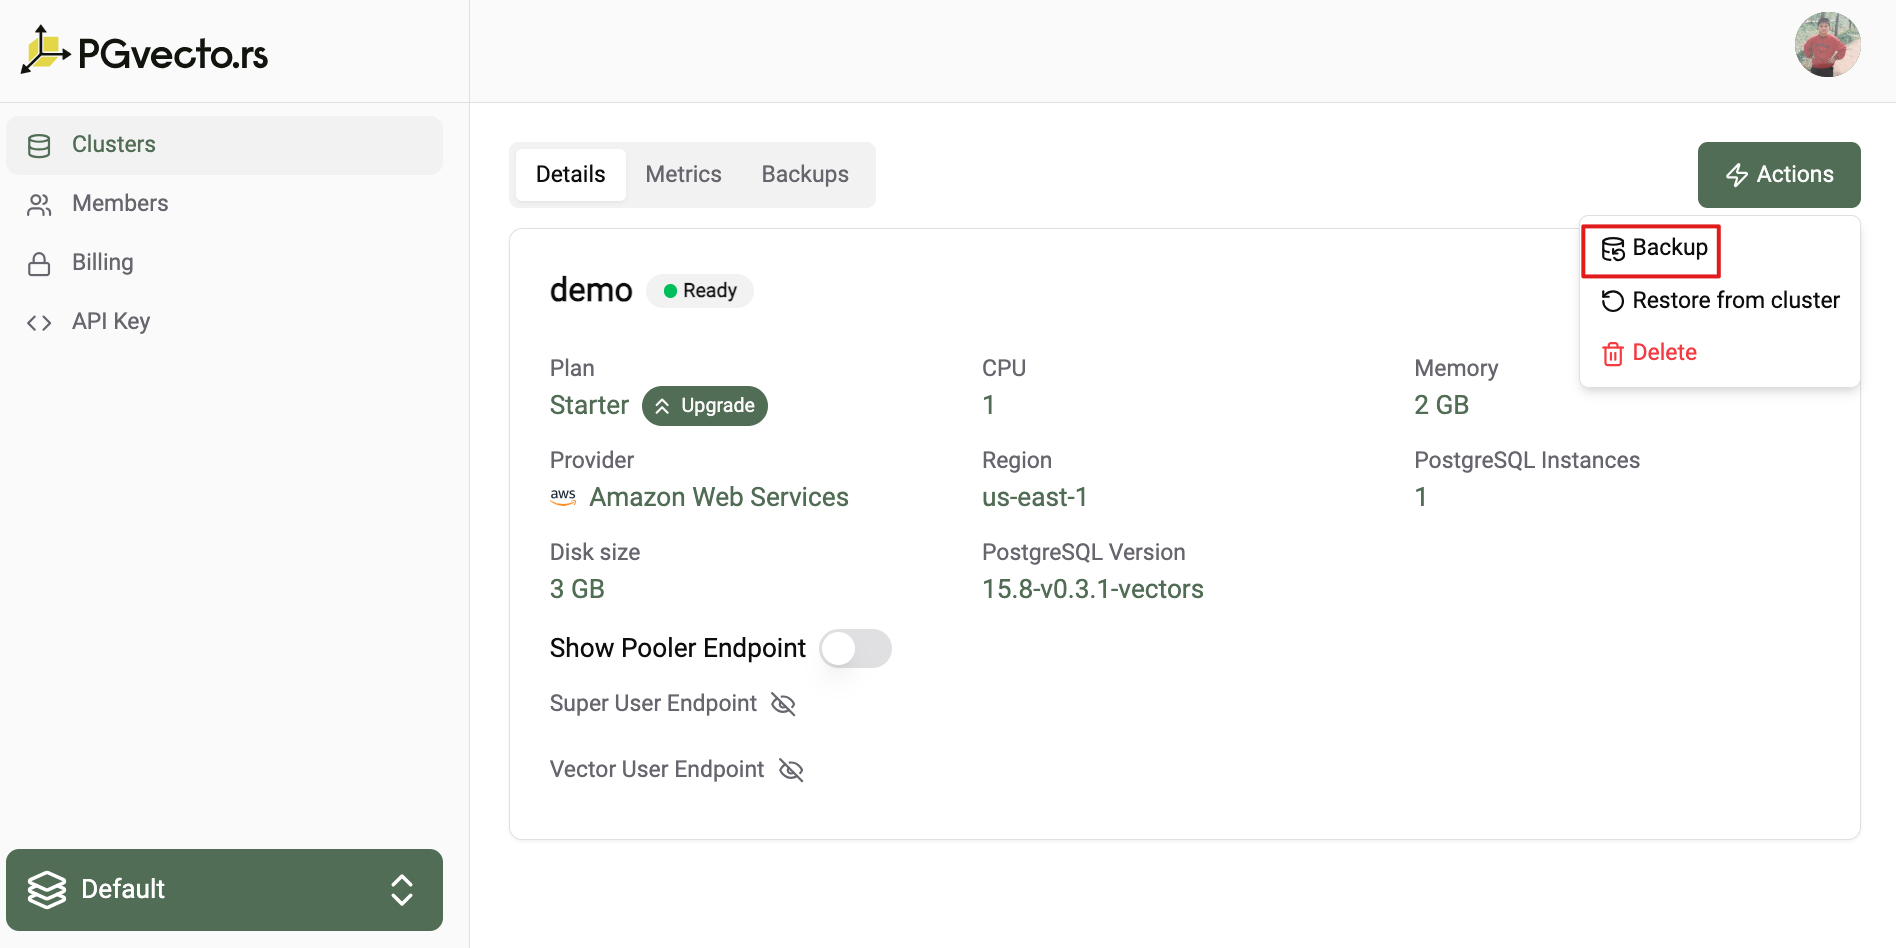
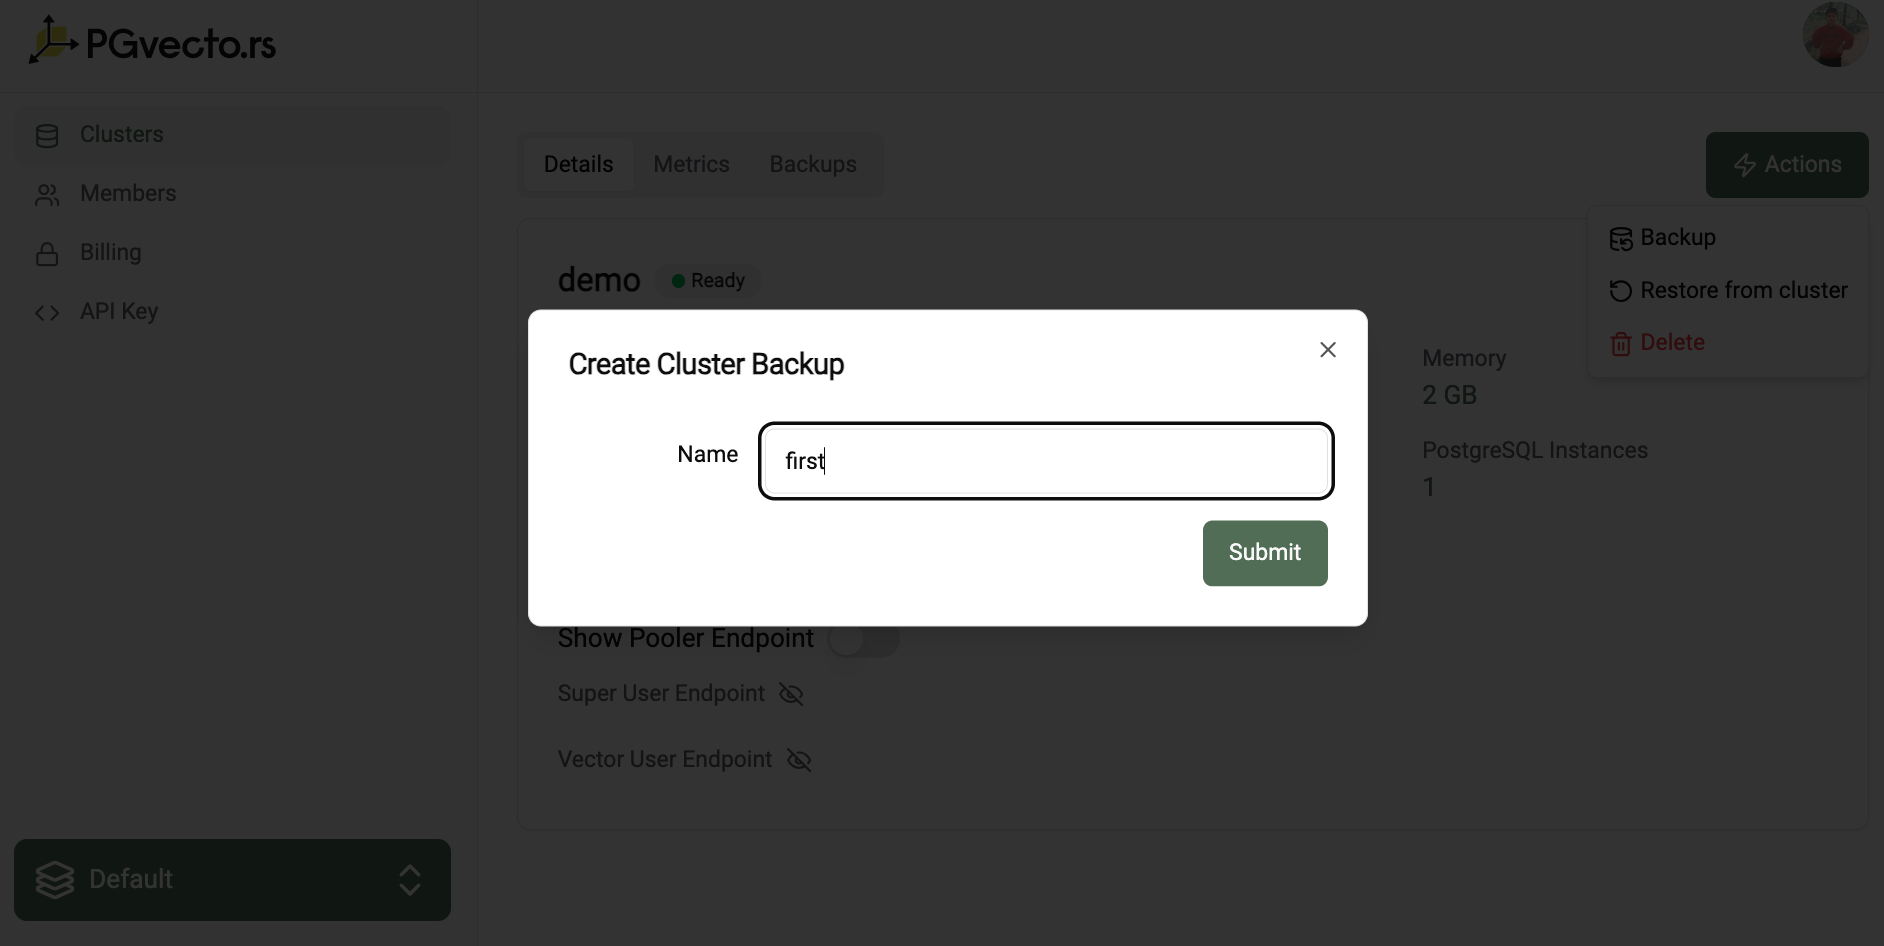
- Set the unique name for the backup.
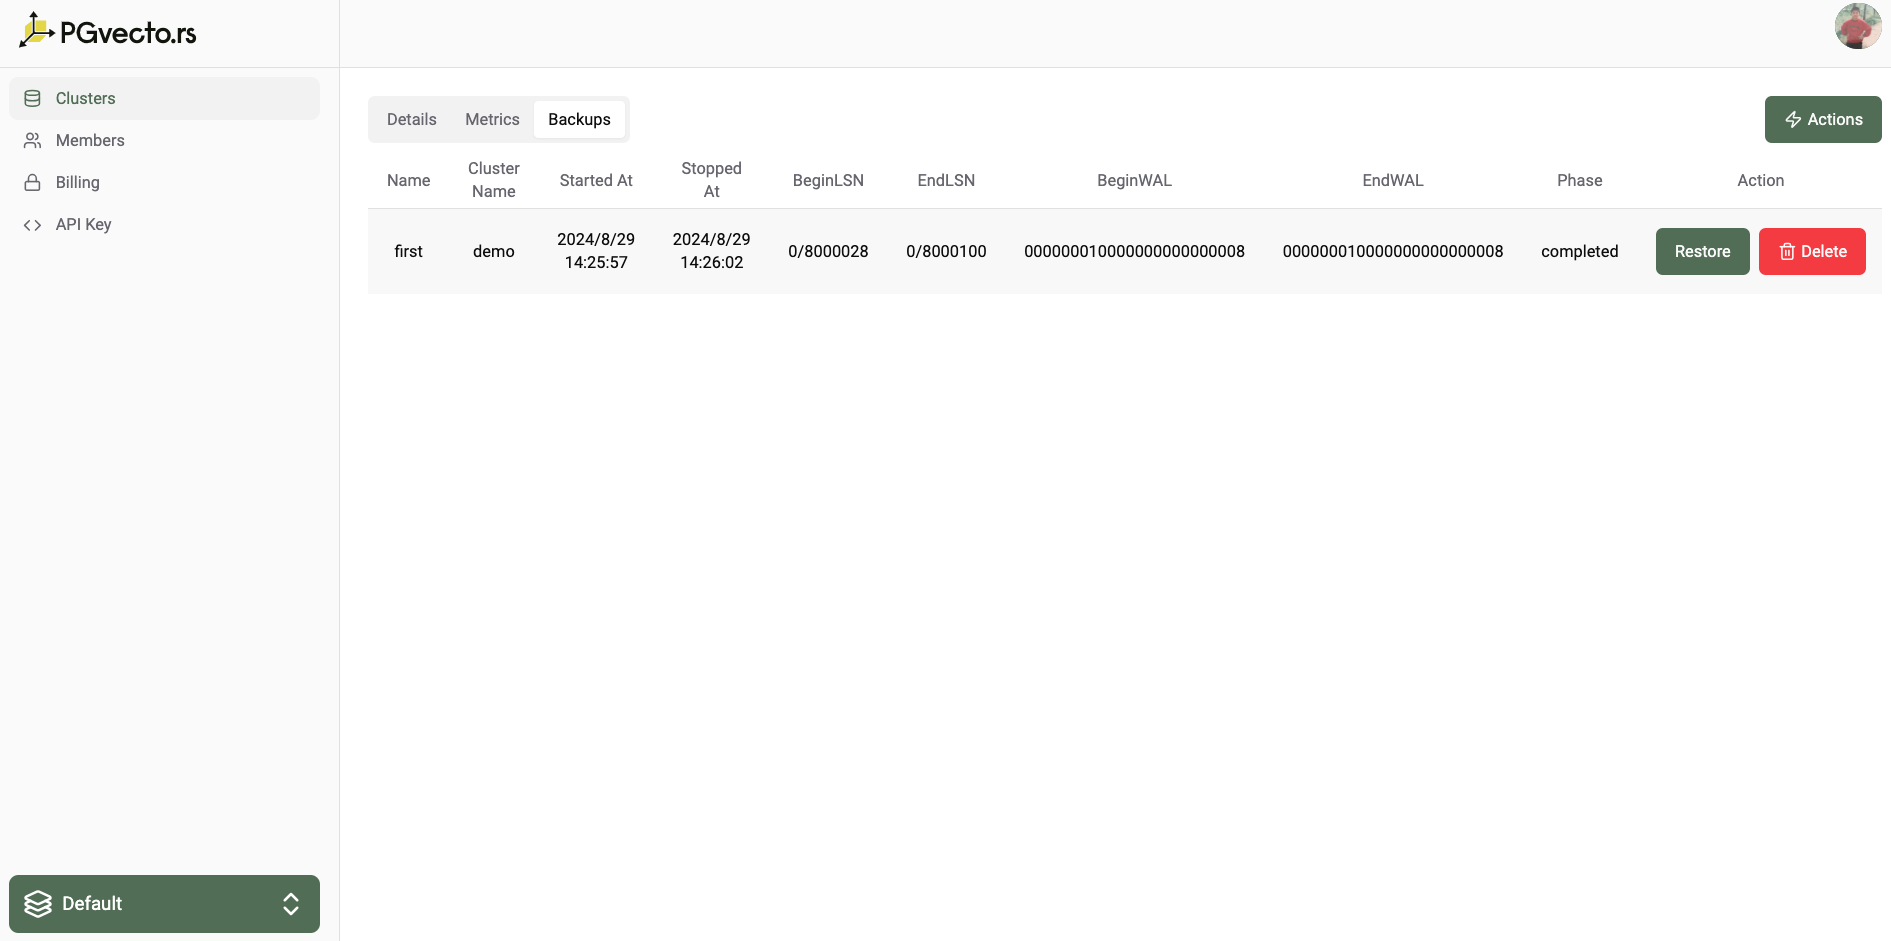
You can get the backup info in the Backups tab. The information includes:
- Backup name
- The cluster that the backup belongs to
- Backup start time
- Backup end time
- The begin LSN(Log Sequence Number) of the backup
- The end LSN of the backup
- The begin WAL segment of the backup
- The end WAL segment of the backup
- The backup phase
Restore
Restore from a cluster
Point-in-Time Recovery (PITR) allows a cluster to be backed up at much shorter intervals. This provides users an option to restore to any chosen point of up to seconds in granularity. Even with daily backups, a day’s worth of data could still be lost. With PITR, backups could be performed up to the point of disaster.
If you want to do a PITR for a cluster, you can follow the steps below:
- Enter cluster details page.
- Click the
Actionsbutton and selectRestore from Cluster.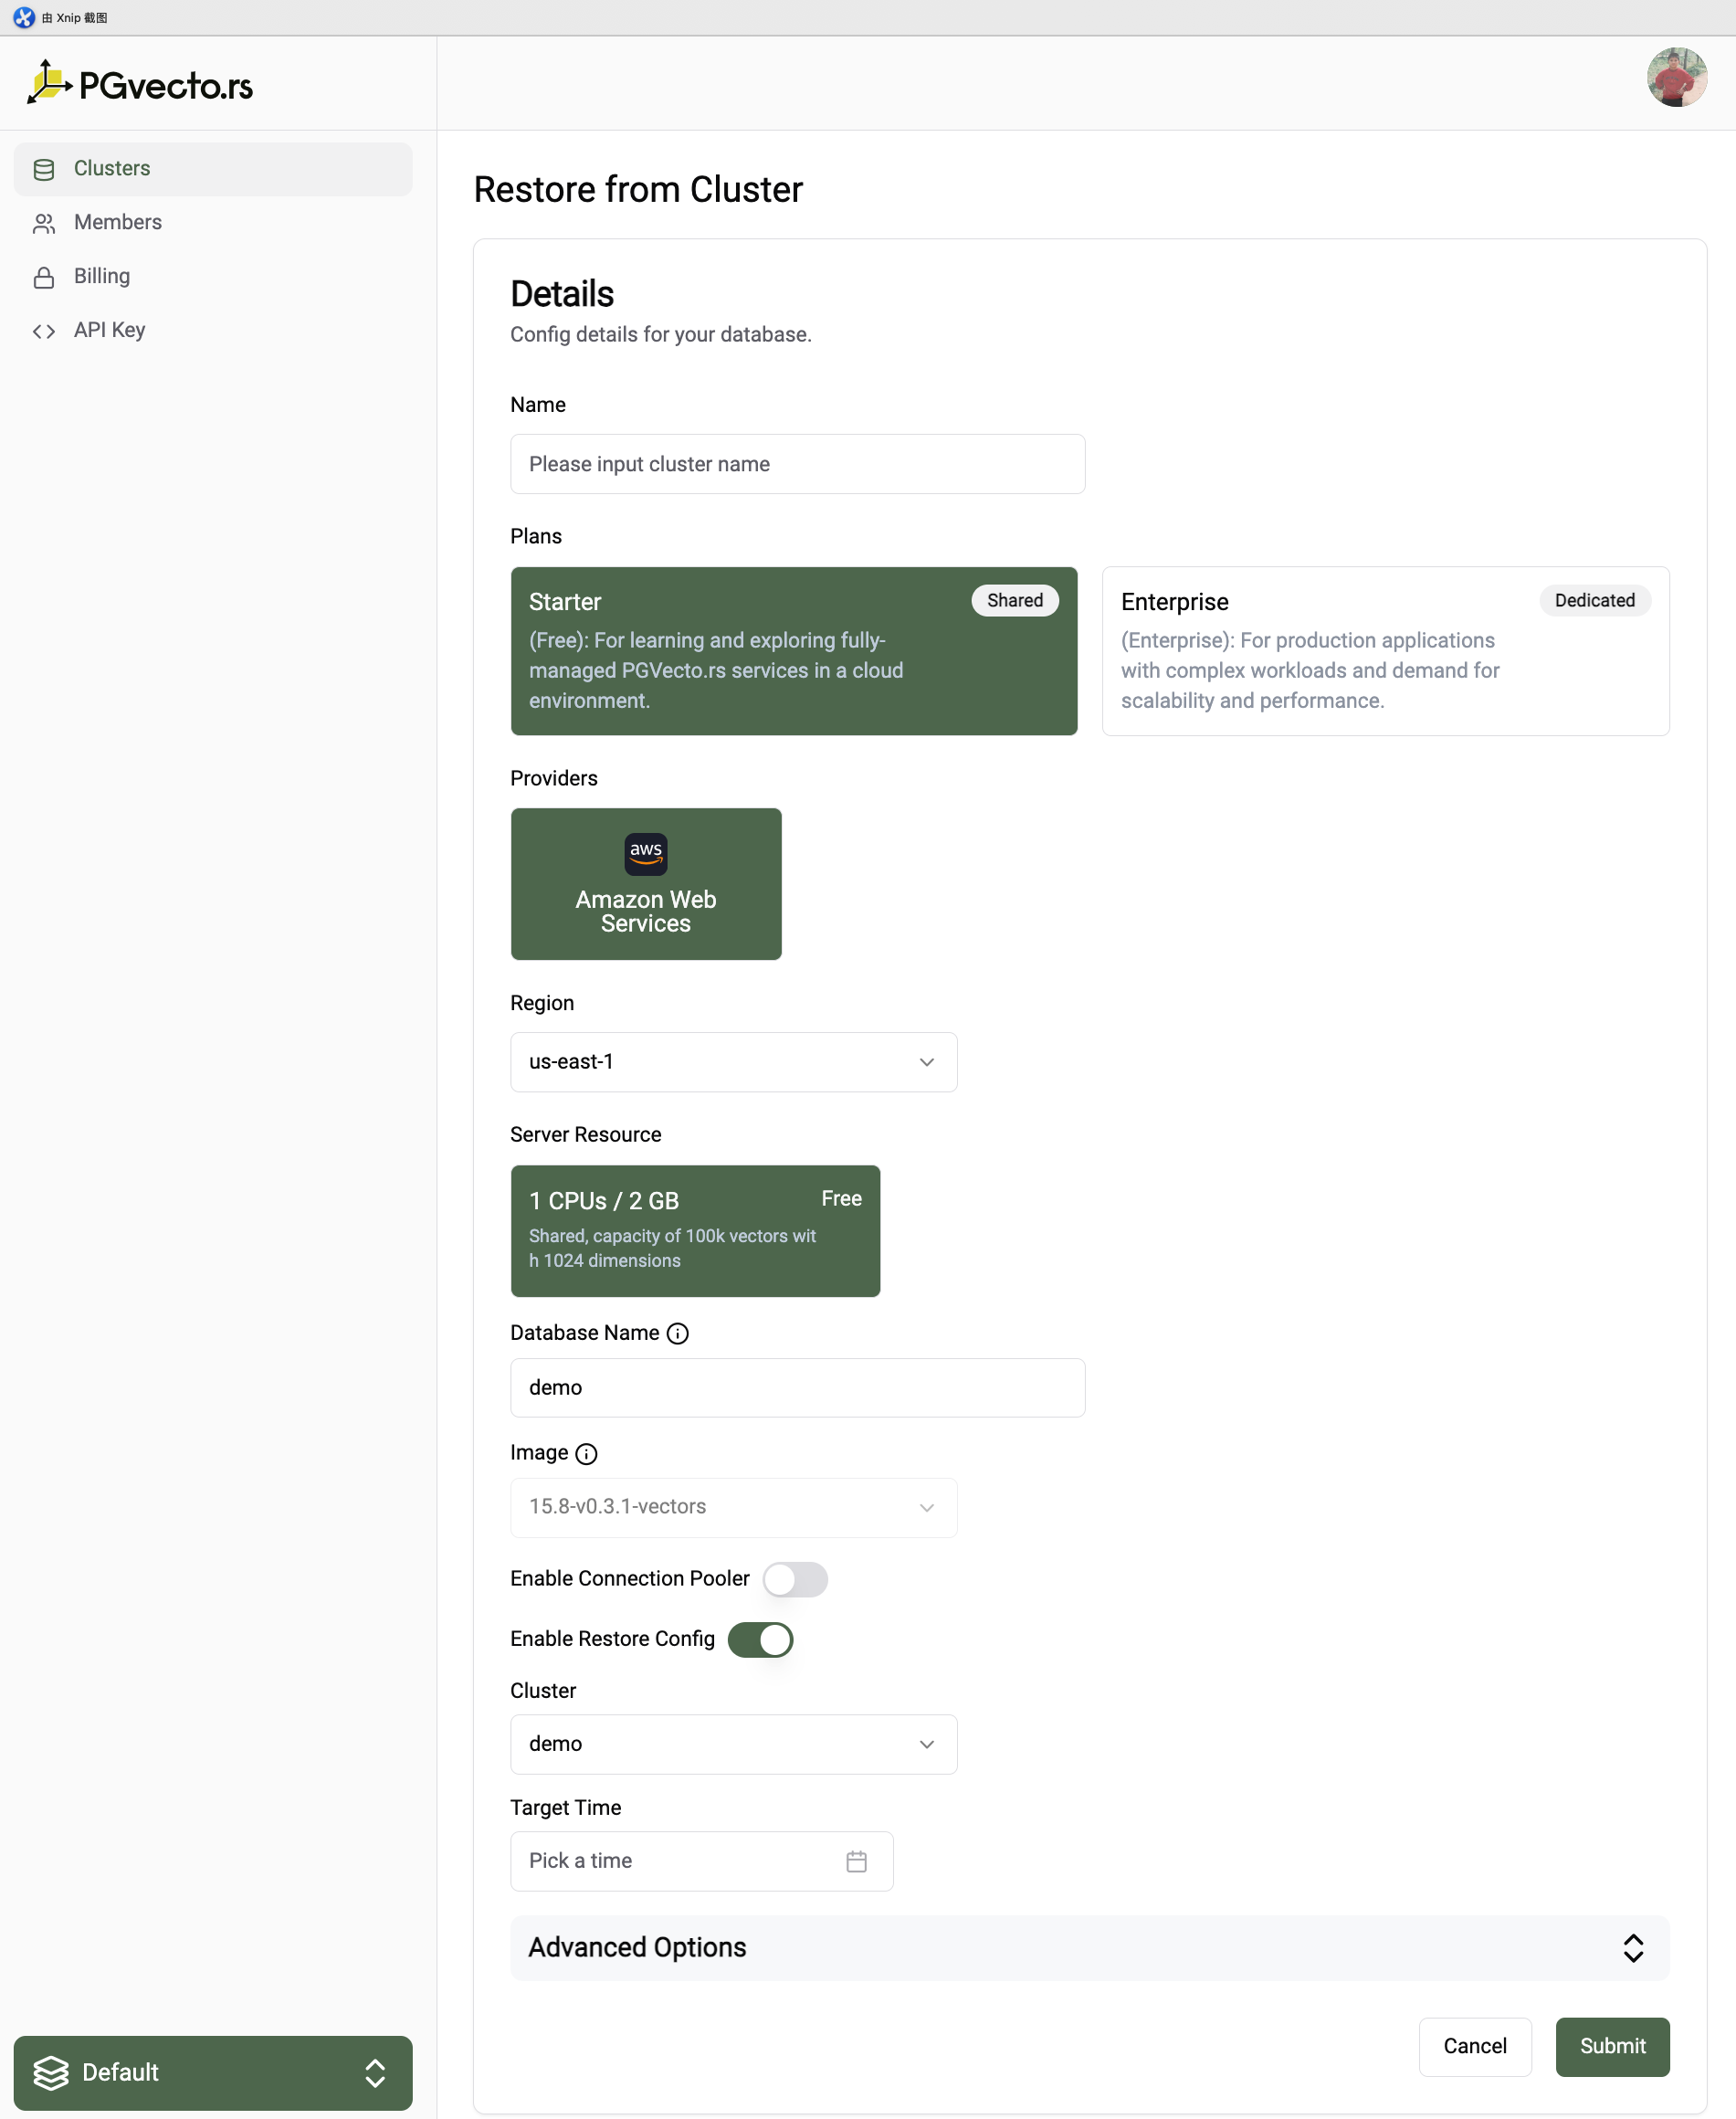
- Select the server resource that you want to restore to.
- Select the target time that you want to restore to.
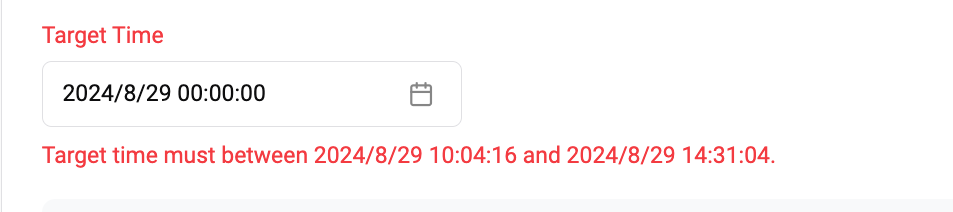 Warning
The target time should be within the first recoverability point and last archived wal time.
Restore from an on-demand backup
If you want to restore from an on-demand backup, you can follow the steps below:
- Enter the backups details page of a cluster.
- Click the
Actionsbutton and selectRestore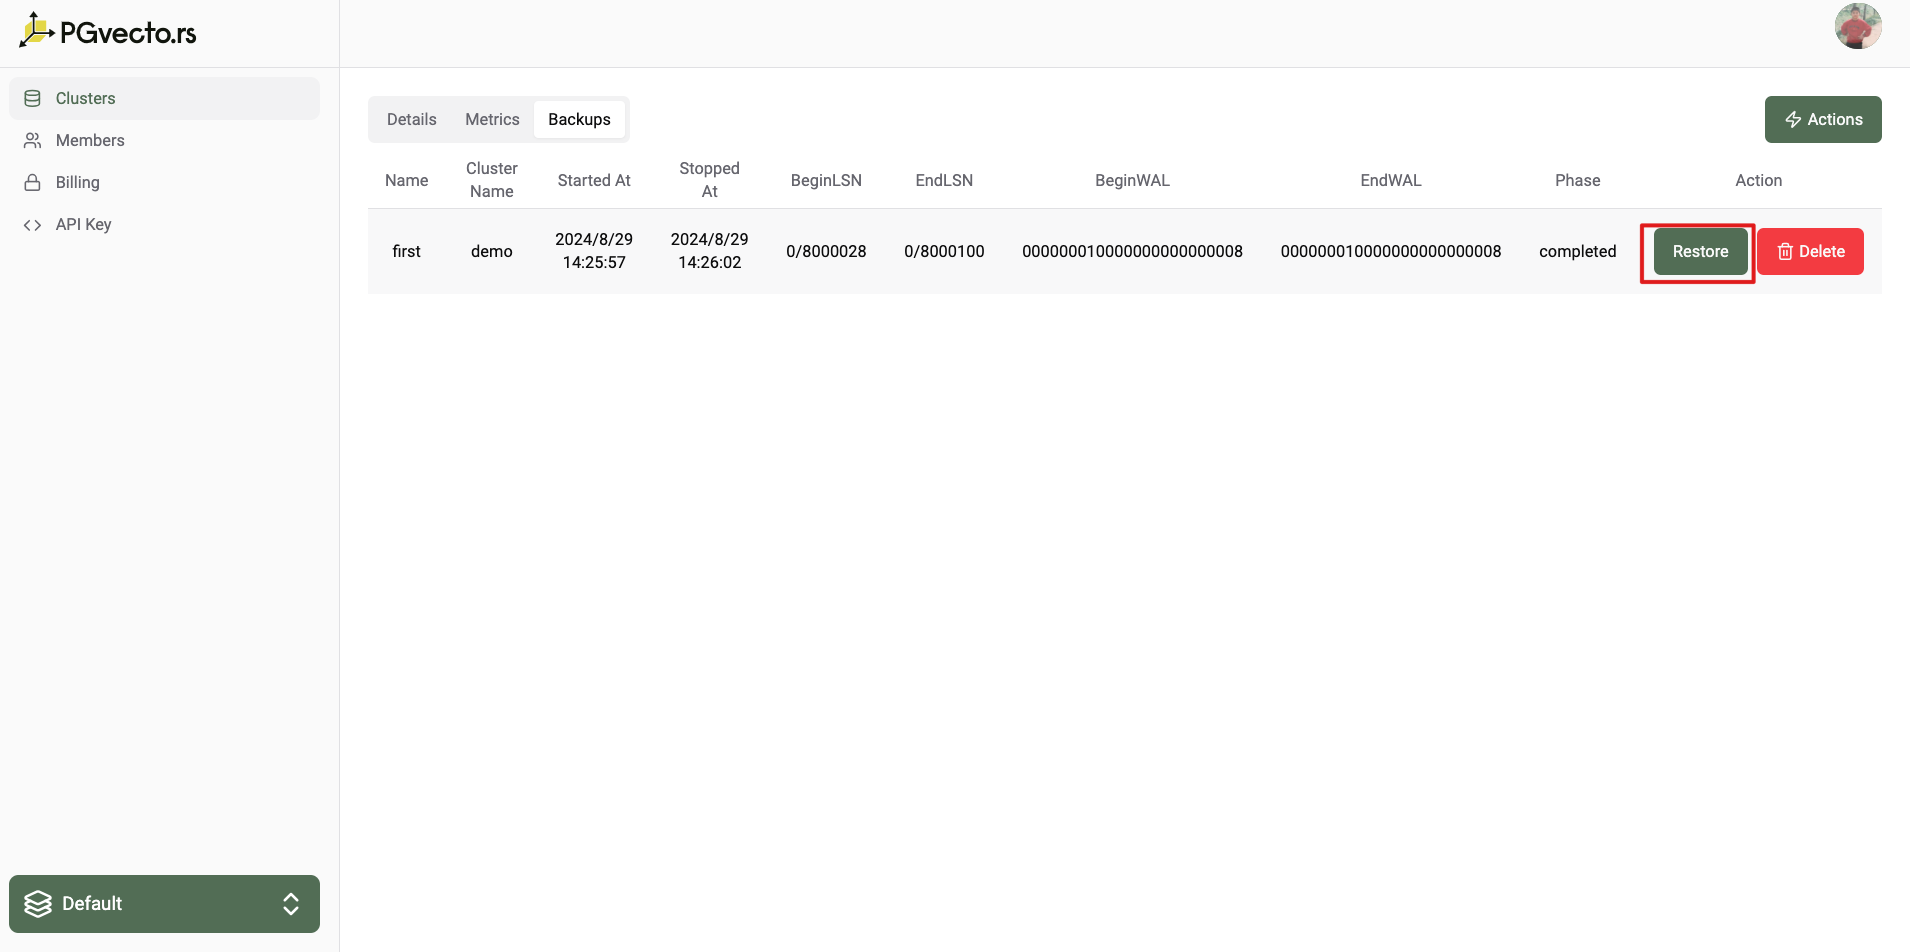
- Select the server resource that you want to restore to.
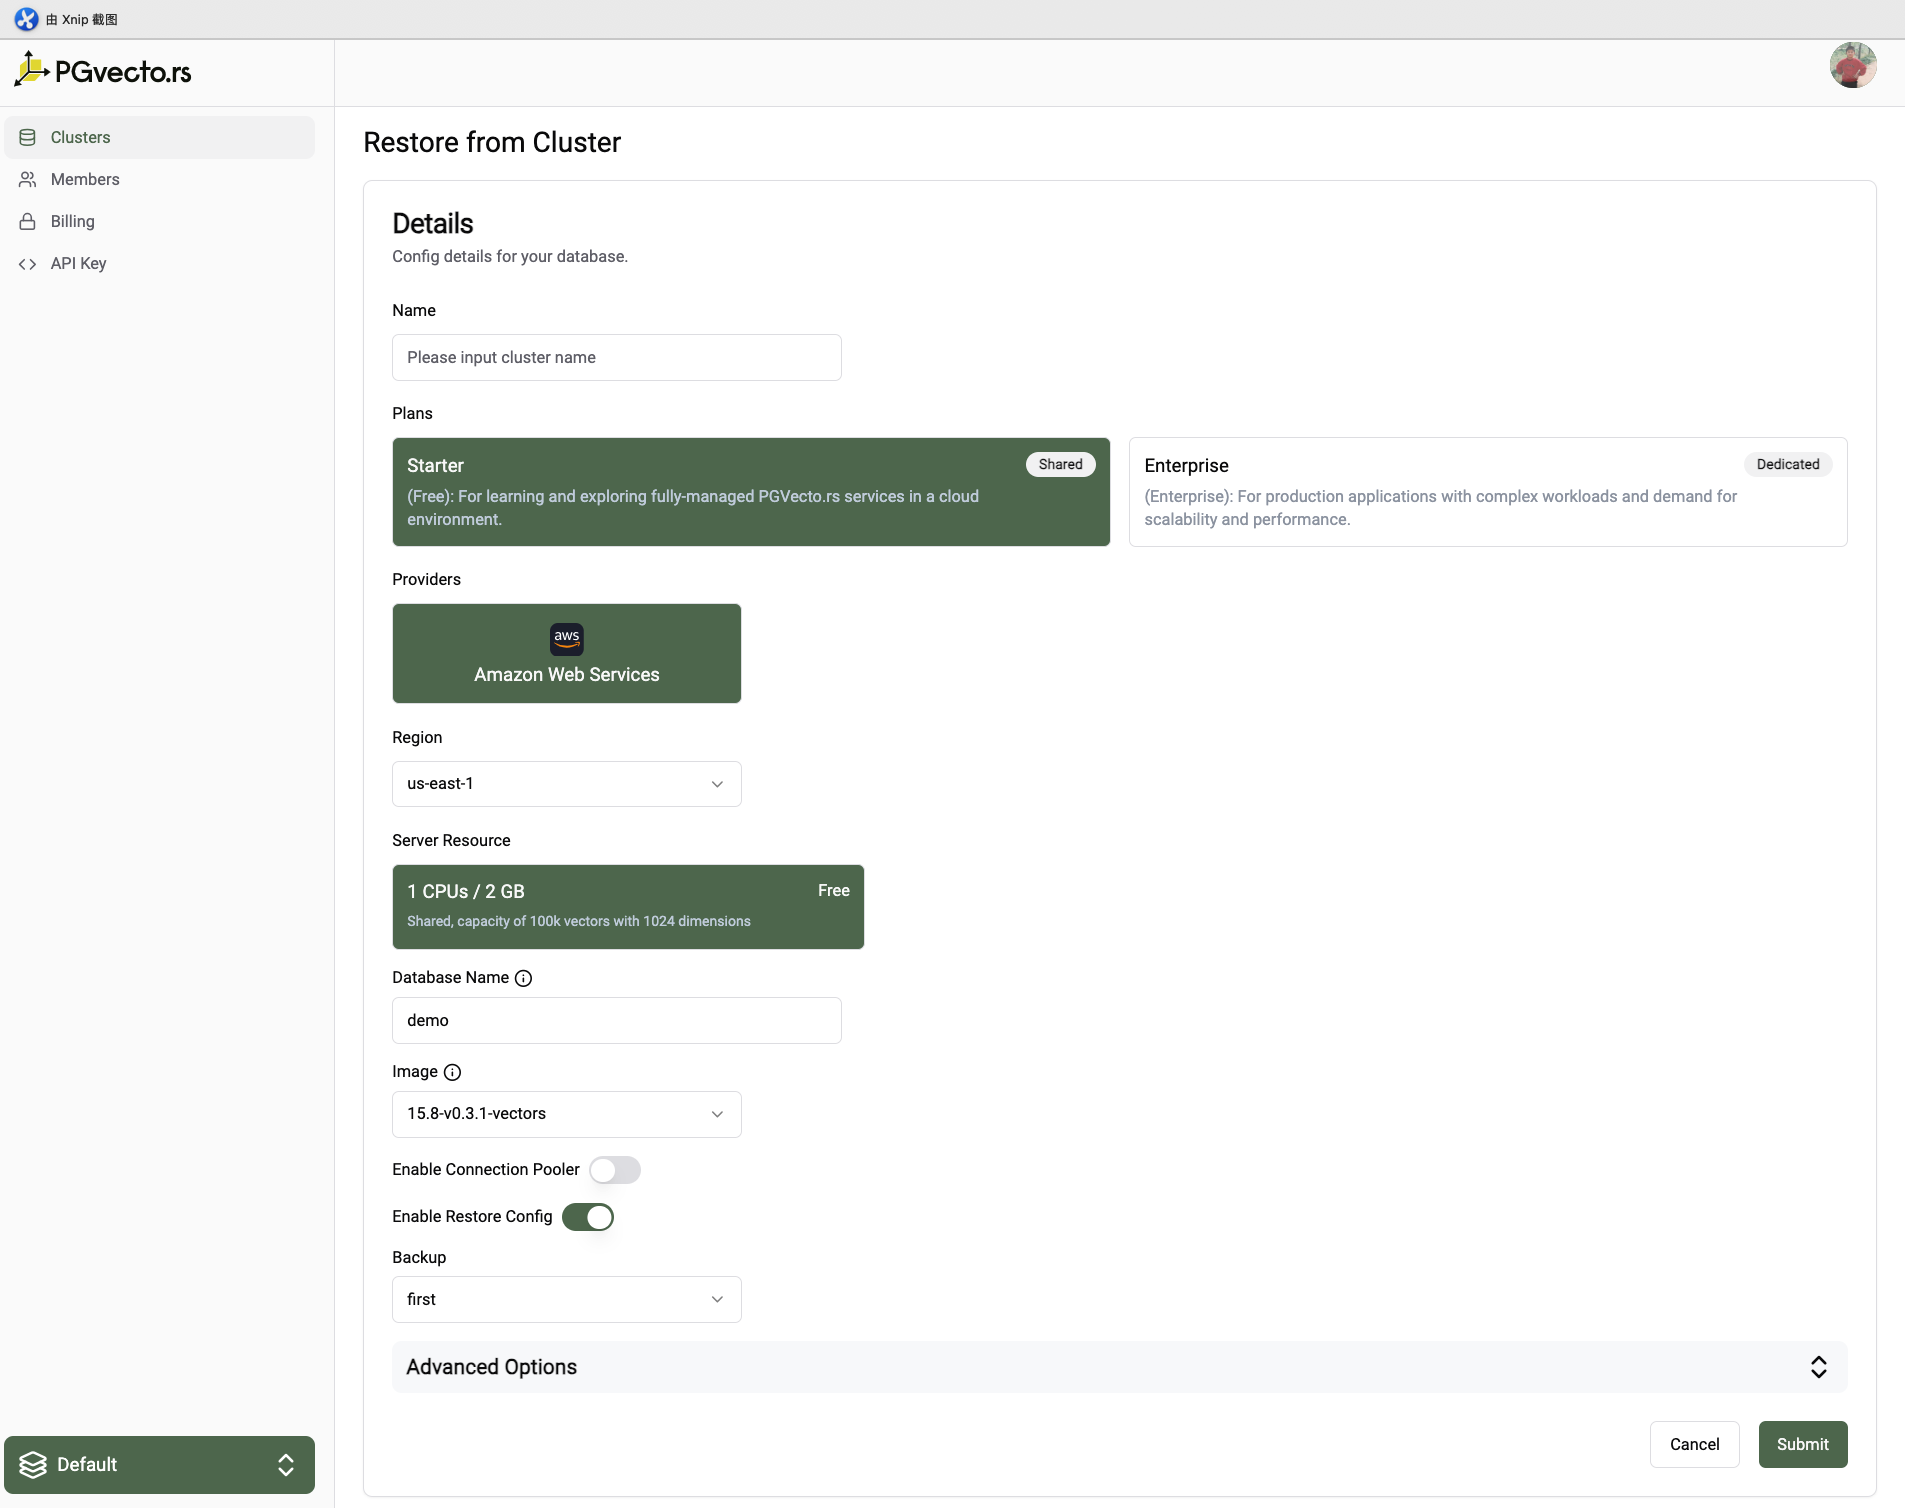
The cluster you are restoring to should have the same image,database name and region as the backup, but recovery from the cluster can cross regions.
6 - Upgrade
You may need to upgrade your cluster and do not want to lose any data. You can upgrade the server resource like CPU, memory. Or you only want to upgrade the storage. The following sections will guide you through the process of upgrading your cluster.
Increasing server resource
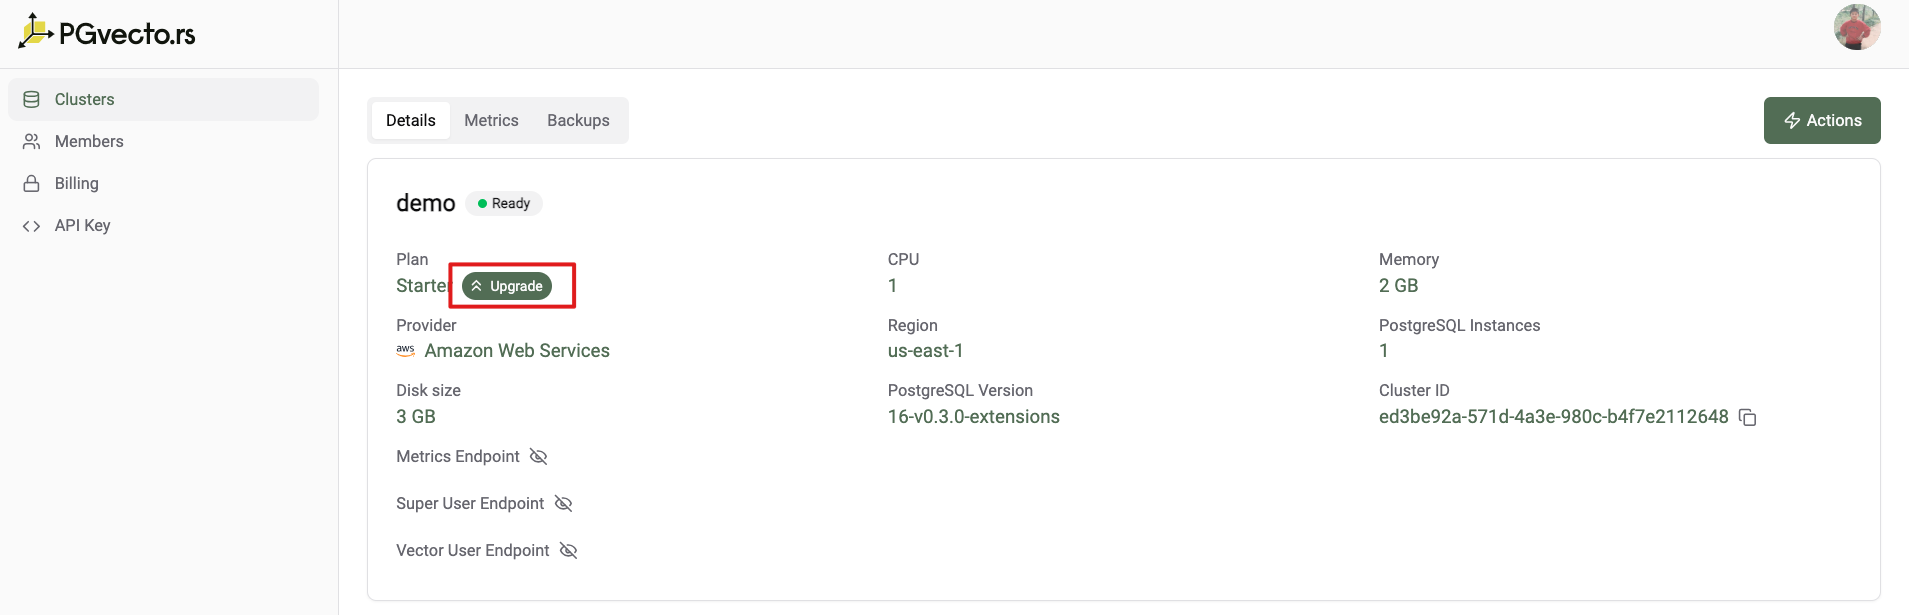
If you want to increase the server resource like CPU and memory, the status of the cluster need to be Ready. And click the Upgrade button in the cluster detail page.
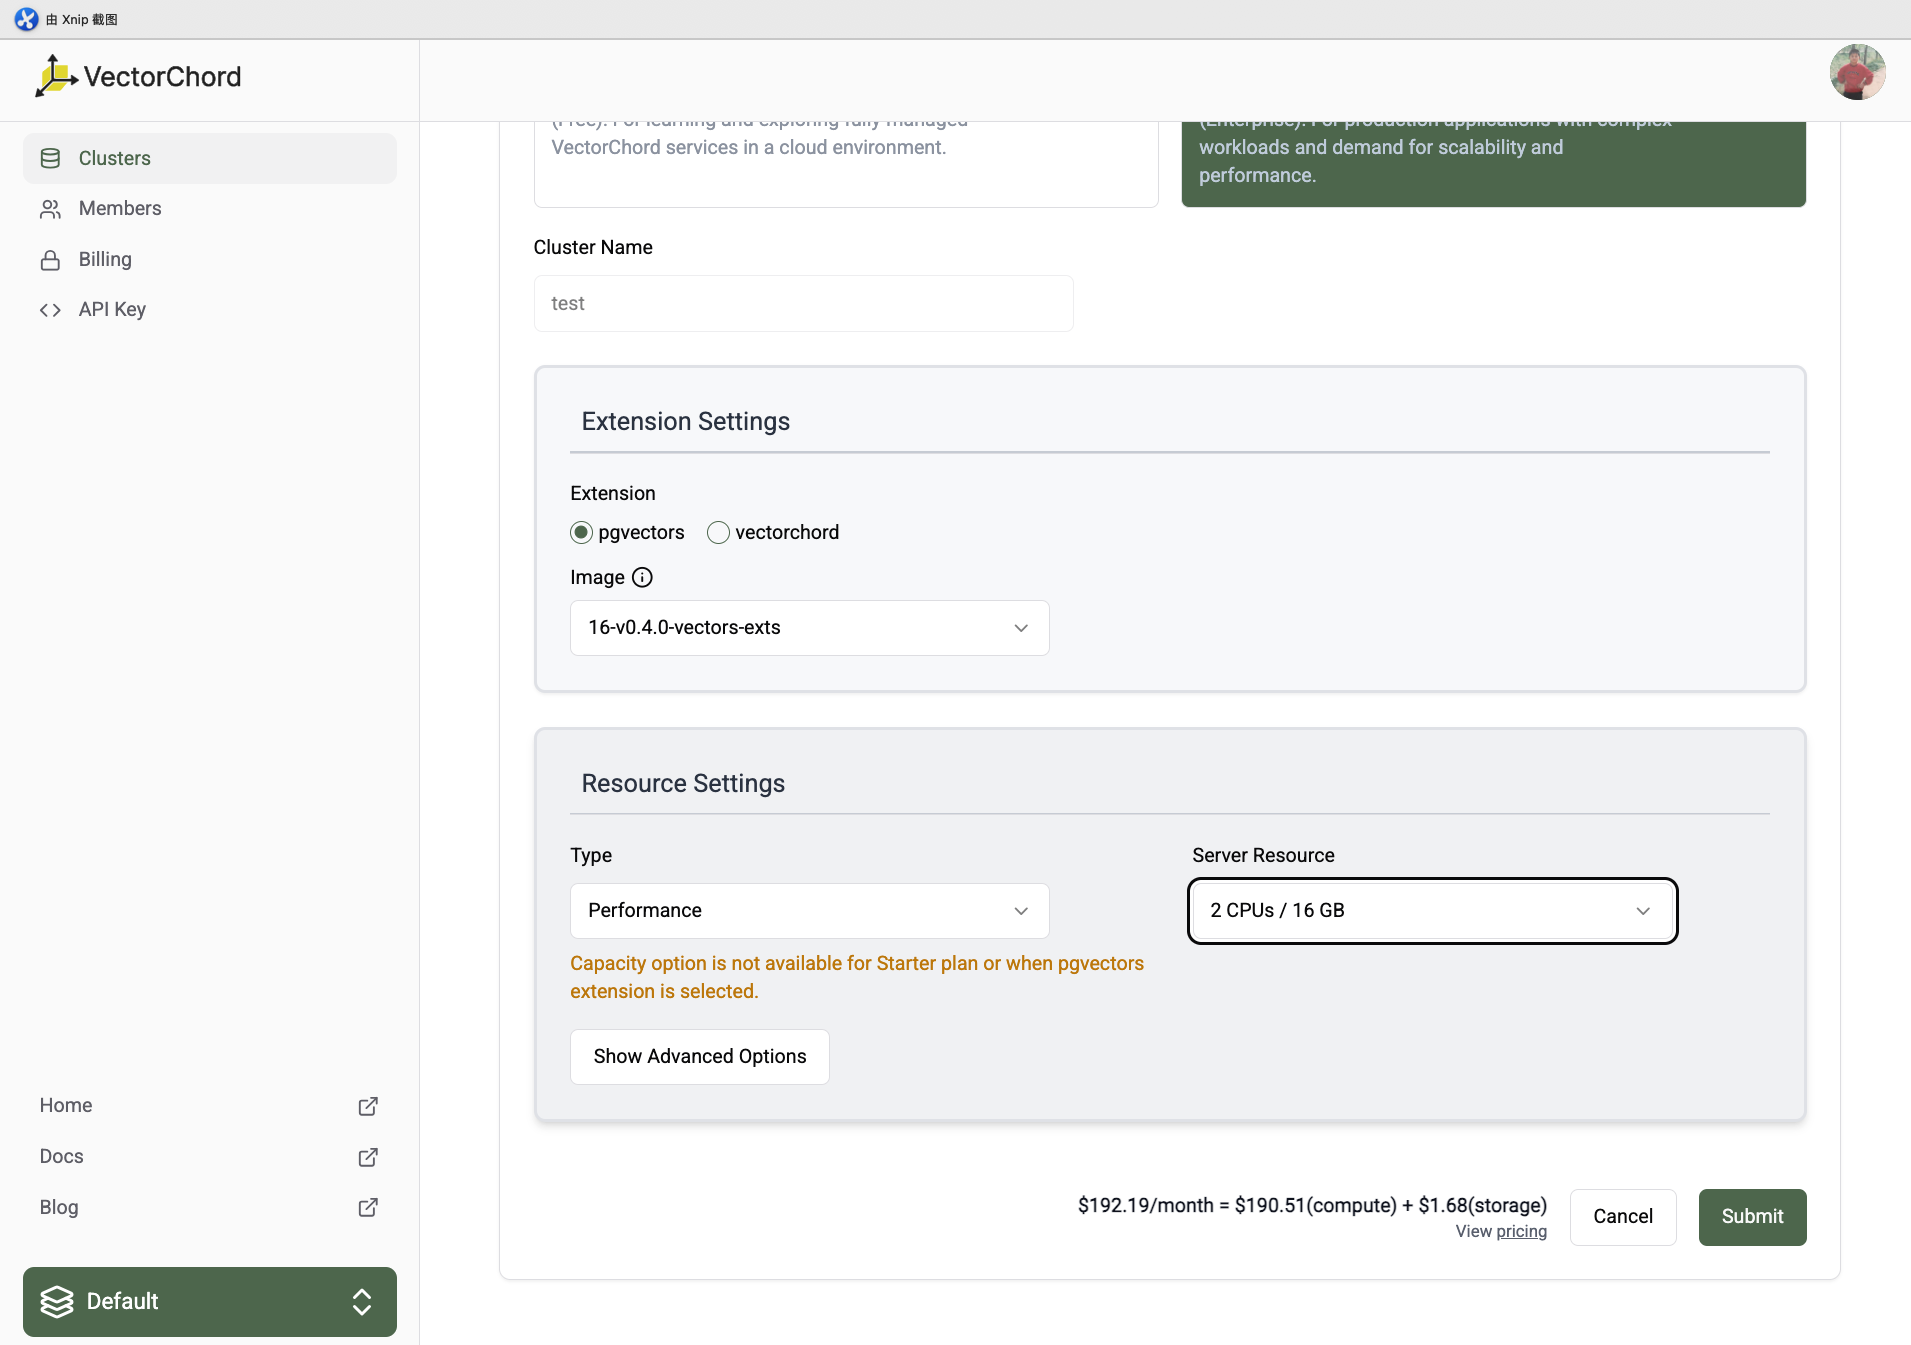
In the upgrade page, you can select the new plan and server resource. The price will be calculated based on the new server resource. Click the Submit button to upgrade the cluster.
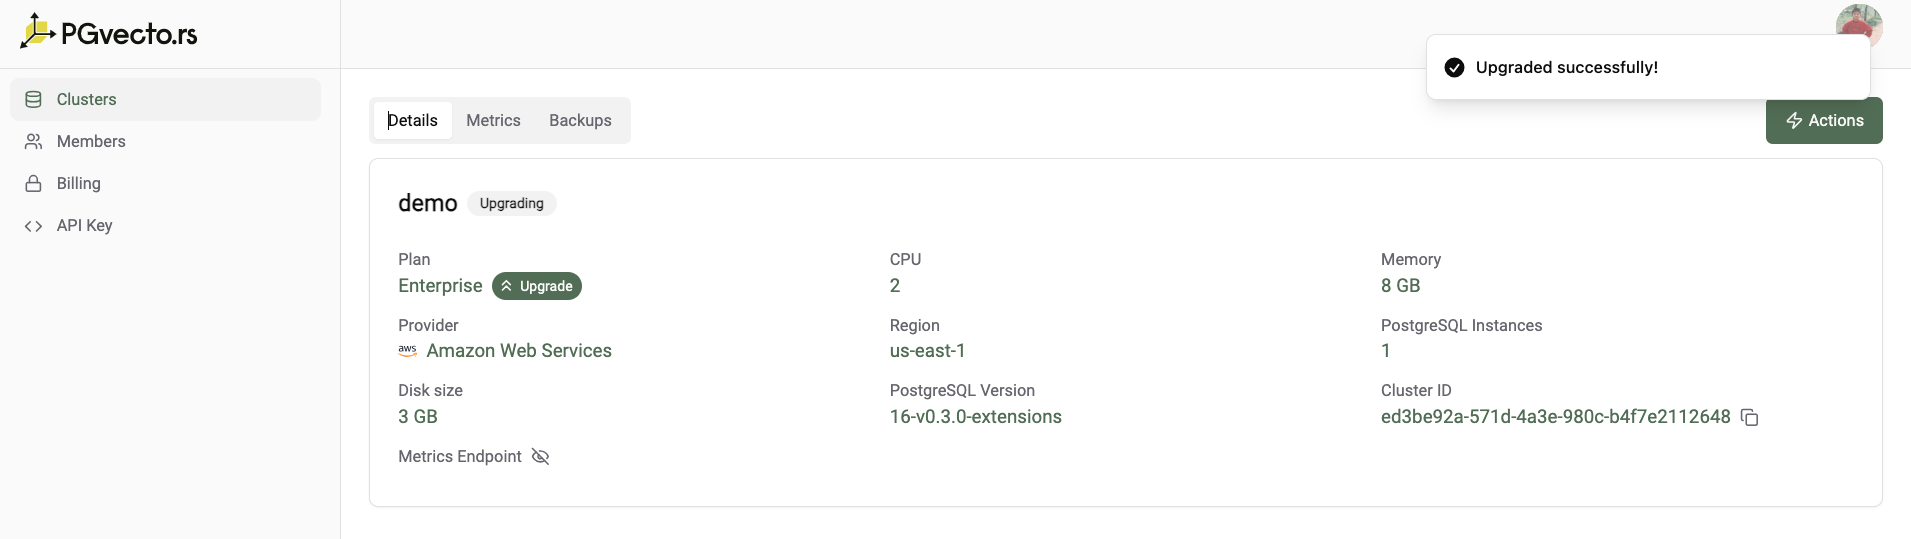
After submitting the upgrade request, the cluster will be in the Upgrading status. The cluster will be unavailable during the upgrade process. The upgrade process may take a few minutes to complete. After the upgrade process is completed, the cluster will be in the Ready status. And the cpu, memory will be updated to the new server resource, and the storage will remain the same.
Increasing only storage
If you only want to increase the storage, the status of the cluster need to be Ready. And click the Upgrade button in the cluster detail page.
In the upgrade page, you can insert the new disk size in advanced options. The price will be calculated based on the new storage size. Click the Submit button to upgrade the cluster.
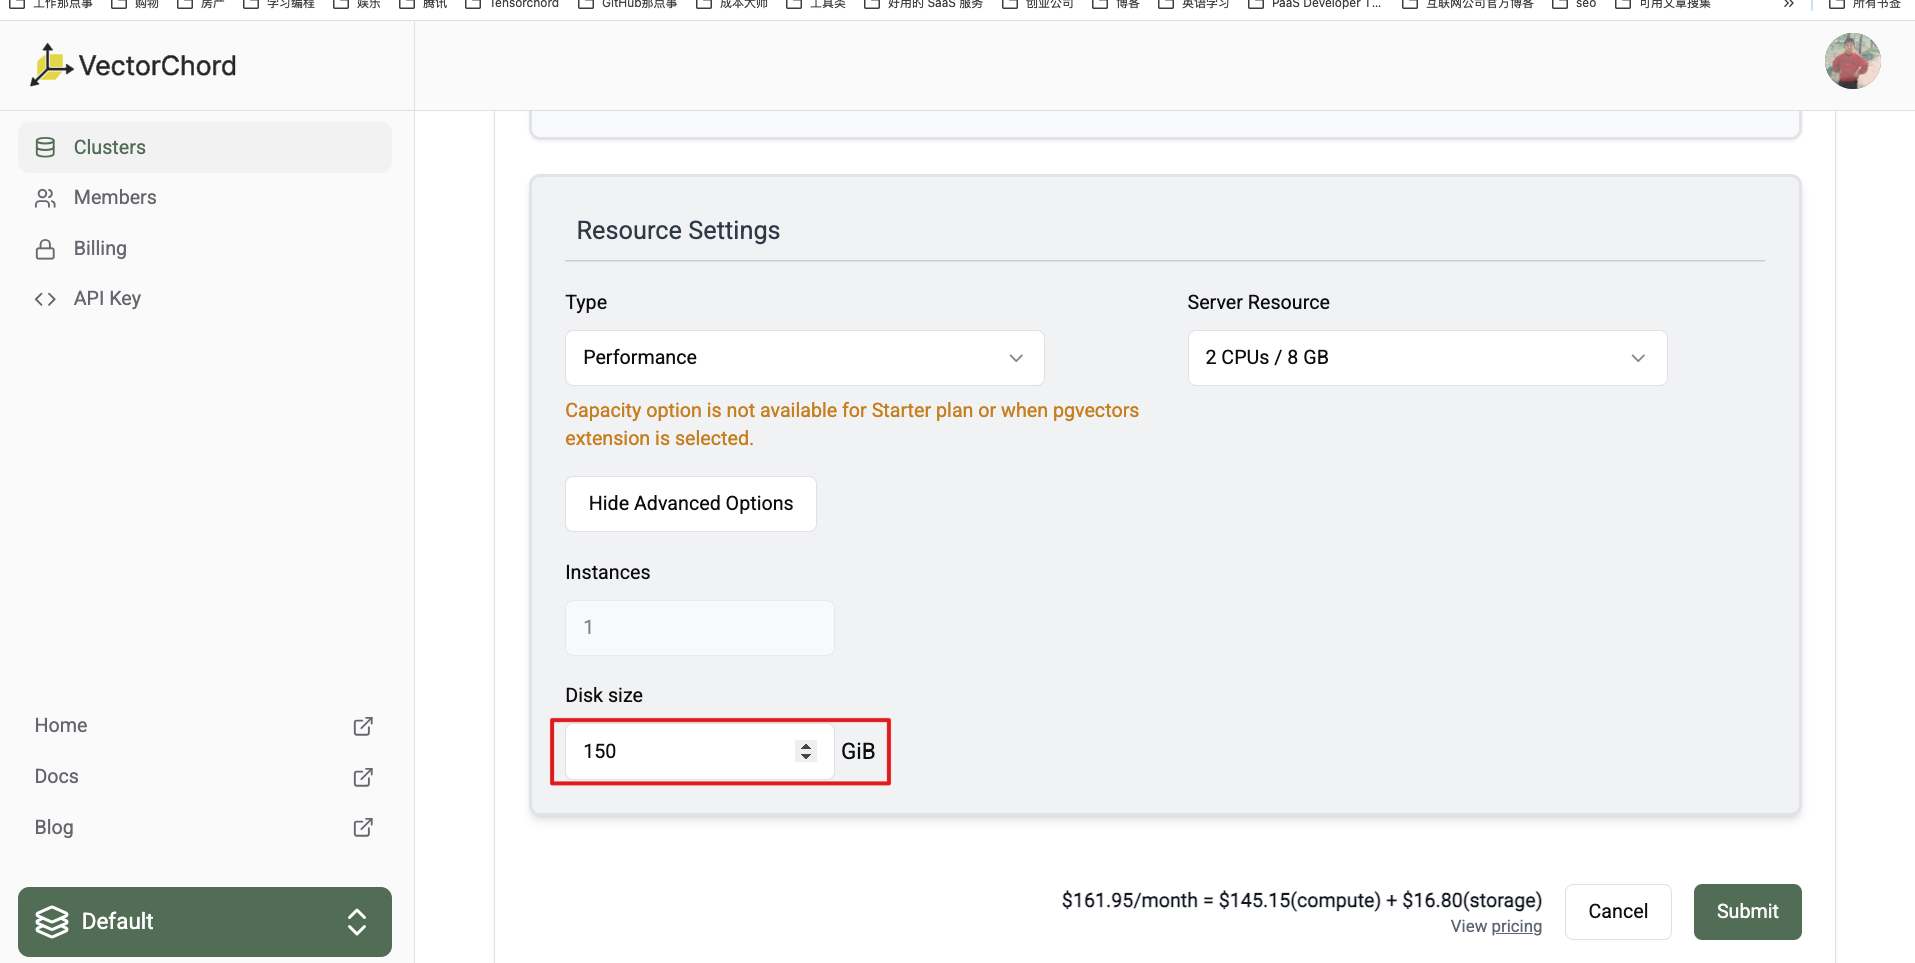
After a few minutes, the status of cluster will change from Upgrading to Ready. And the storage will be updated to the new storage size, and the cpu, memory will remain the same.
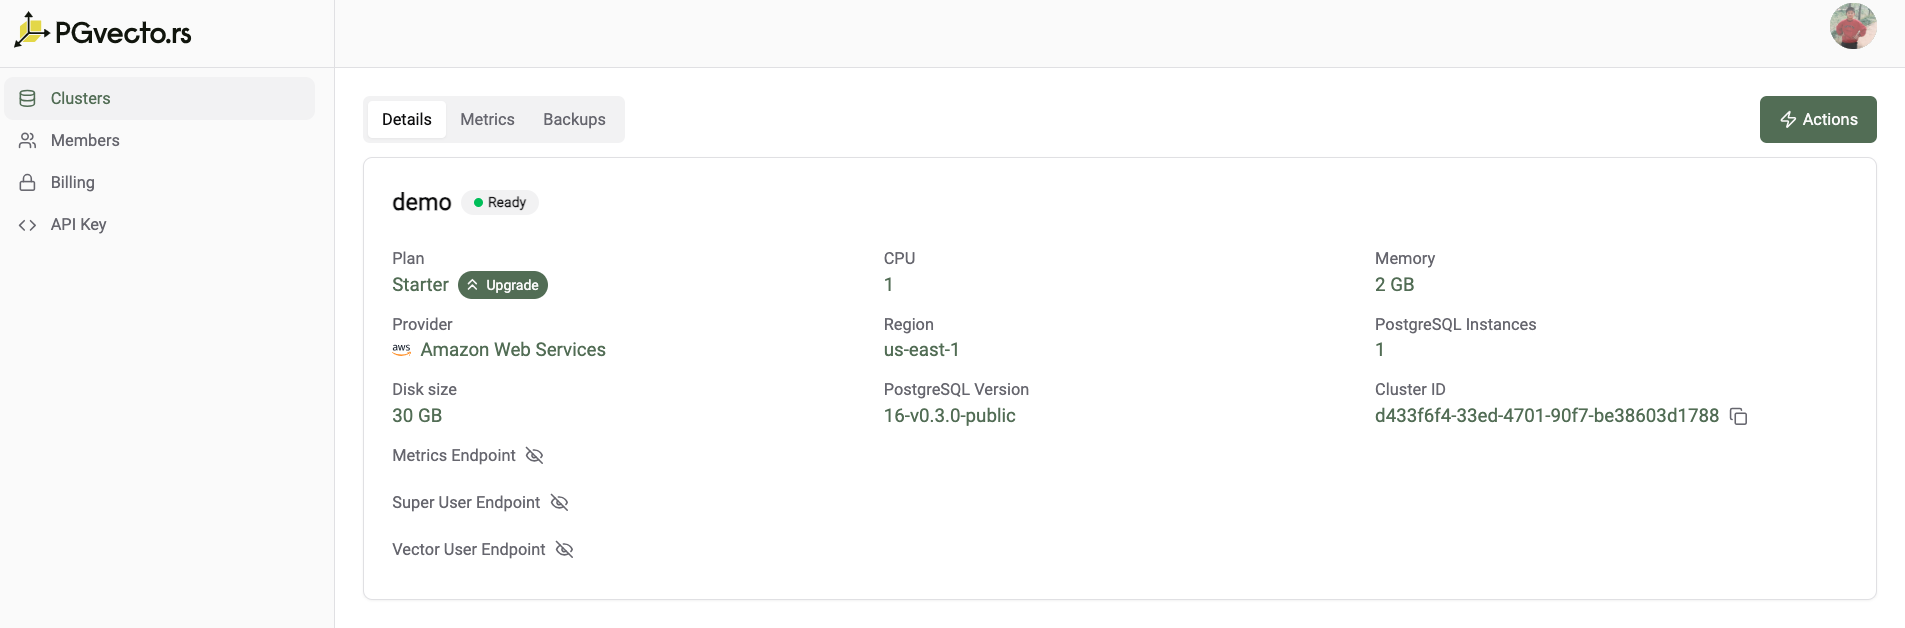
If you want to upgrade the server resource and storage at the same time, you can directly select the server resource and disk size in the upgrade page. The price will be calculated based on the new server resource and storage size. Currently, we not support downgrade the server resource and storage size. If you want to downgrade the server resource and storage size, you can contact us to help you.
7 - API Keys
On VectorChord Cloud, every project comes with a set of API keys. These keys are essential authentication tokens required for initiating terraform operations.
Role-based Access Control (RBAC)
Role-based Access Control (RBAC) is a crucial security mechanism in VectorChord Cloud, applicable to managing API calls. This system allows for fine-grained control over access to resources by assigning roles with specific permissions to users within the projects.
For more information on access levels of each role, see Authorization.
Create an API Key
To create an API key, follow these steps:
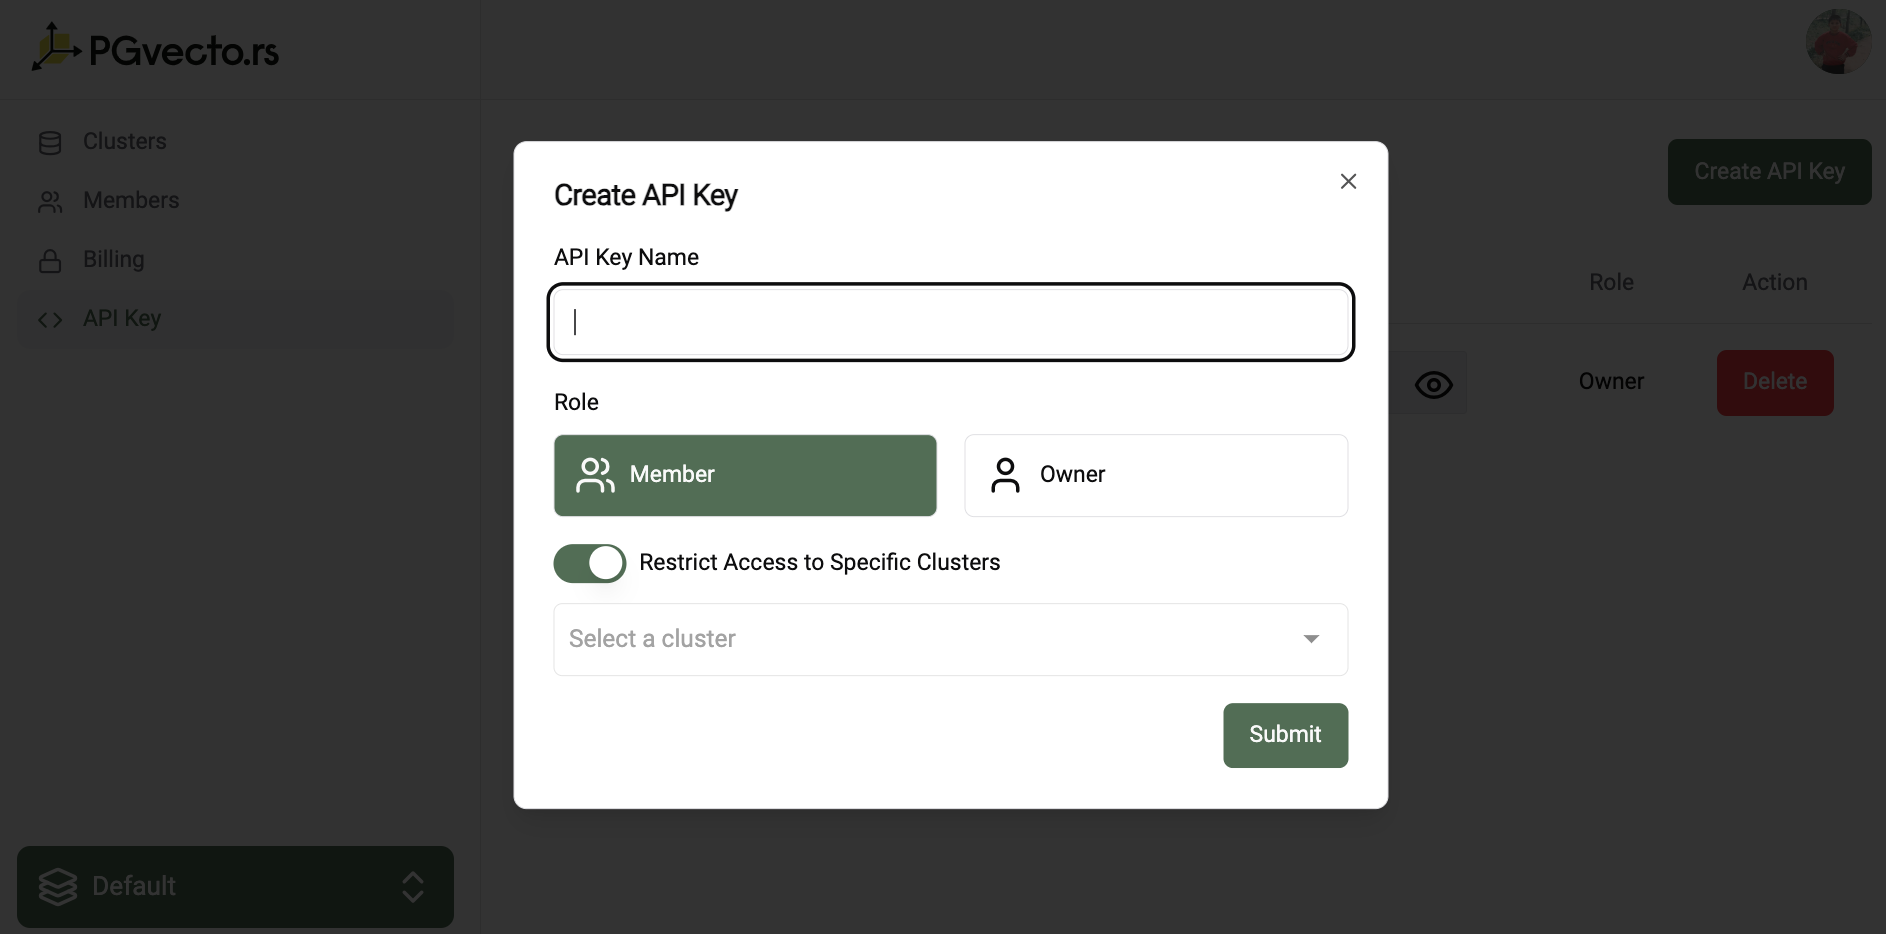
- Navigate to the API Key section in the left-hand menu.
- Click the Create API Key button.
- Enter a name for the API key.
- Select the role for the API key.
- Owner: The owner has full access to the project cluster.
- Member: The member has read-only access to the project cluster. However, you can specify clusters to which the member has full access.
- Click the Create button.
Delete an API Key
To delete an API key, follow these steps:
- Navigate to the API Key section in the left-hand menu.
- Click the Delete button next to the API key you want to delete.
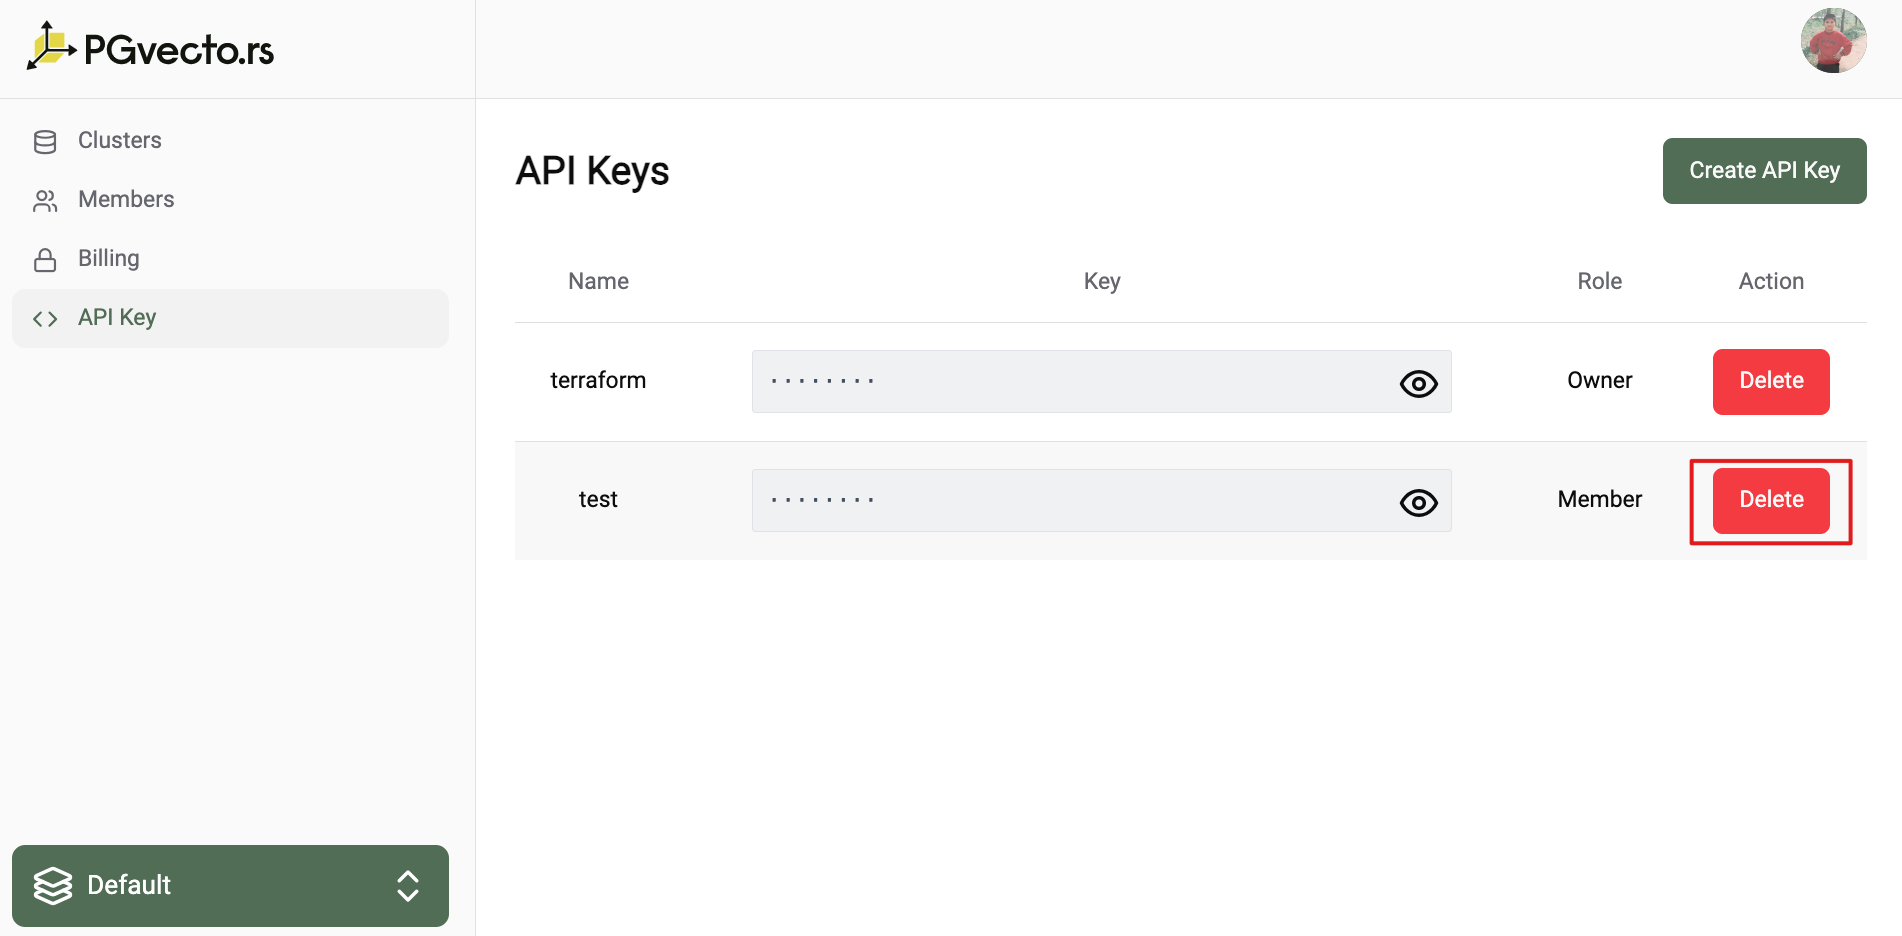
Notice that once you delete an API key, you cannot recover it.
List of API Keys
To view the list of API keys, follow these steps:
- Navigate to the API Key section in the left-hand menu.
- You can view the list of API keys with their respective roles.
If you are not the project owner, you will not have access to the list of API keys.
8 - Terraform Integration Overview with VectorChord Cloud
This guide walks you through the process of installing and configuring the PGVecto.rs Cloud provider.
1. Prerequisites
Before you begin, ensure you have the following:
-
Terraform Installed: Download and install Terraform from here by following the provided instructions.
-
VectorChord Cloud Account: Access to VectorChord Cloud and your API Key are essential. Go to the VectorChord Cloud Console and create an API key. The API key must have the
ProjectOwnerpermissions. For more information, see API Key.
2. Download VectorChord Cloud Terraform Provider
Start by configuring the VectorChord Cloud provider within your Terraform configuration file (main.tf). Follow these steps:
3. Initialize Terraform Configuration
Initialize the Terraform configuration by running:
Terraform will download the pgvecto-rs-cloud provider and install it in a hidden subdirectory of your current working directory, named .terraform.
4. Authenticate VectorChord Cloud Terraform Provider
Your VectorChord Cloud API Key is required to use the Terraform Provider. There are two ways to configure this.
Option 1: Specify API Key in Provider Block
Append the following code to your main.tf file:
Replace <your-api-key> with your VectorChord Cloud API Key.
Option 2: Use Environment Variable
Set the API key as an environment variable:
Then the provider declaration in your main.tf file is simply:
By following these steps, you should have the VectorChord Cloud Terraform provider configured and ready to move on to the next steps.
4. Manage VectorChord Cloud Cluster
Create a Enterprise Plan
The following example demonstrates how to create a PostgreSQL cluster with the Enterprise plan. For more information about the options, refer to the Resource Schema.
Connect to the cluster
Upgrade the cluster
Up to now, we only support upgrading the server resource, plan and disk size. There are some restrictions on the upgrade operation, such as the cpu and memory of the server resource must be greater or equal to the original one, the disk size must be greater or equal to the original one. And the plan upgrade must from the Starter to Enterprise.
Destroy the cluster
5. Recovery
In this section, we will show you how to restore your PostgreSQL database from existing backup or point-in-time recovery (PITR).
Recovery from the backup
The cluster you are restoring to should have the same image,database name and region as the backup.
-
Get the backup id from dashboard
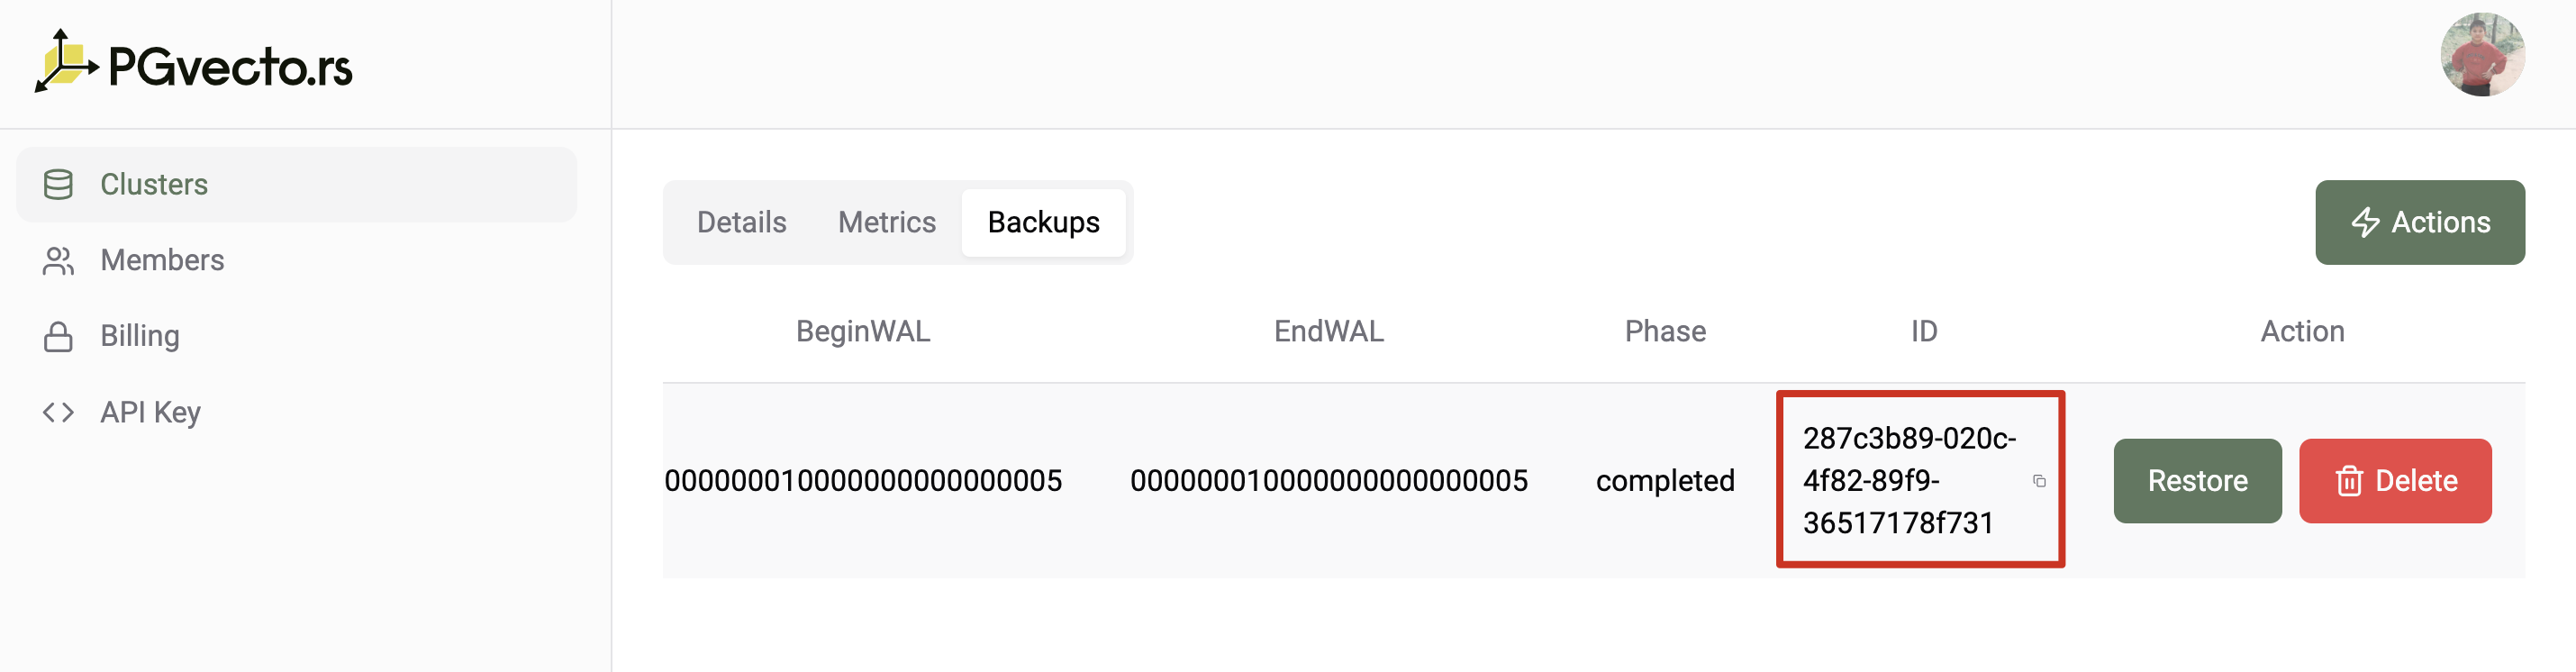
-
Create a new cluster with the backup id
PITR
The cluster you are restoring to should have the same image,database name as the cluster.
-
Get cluster id from dashboard
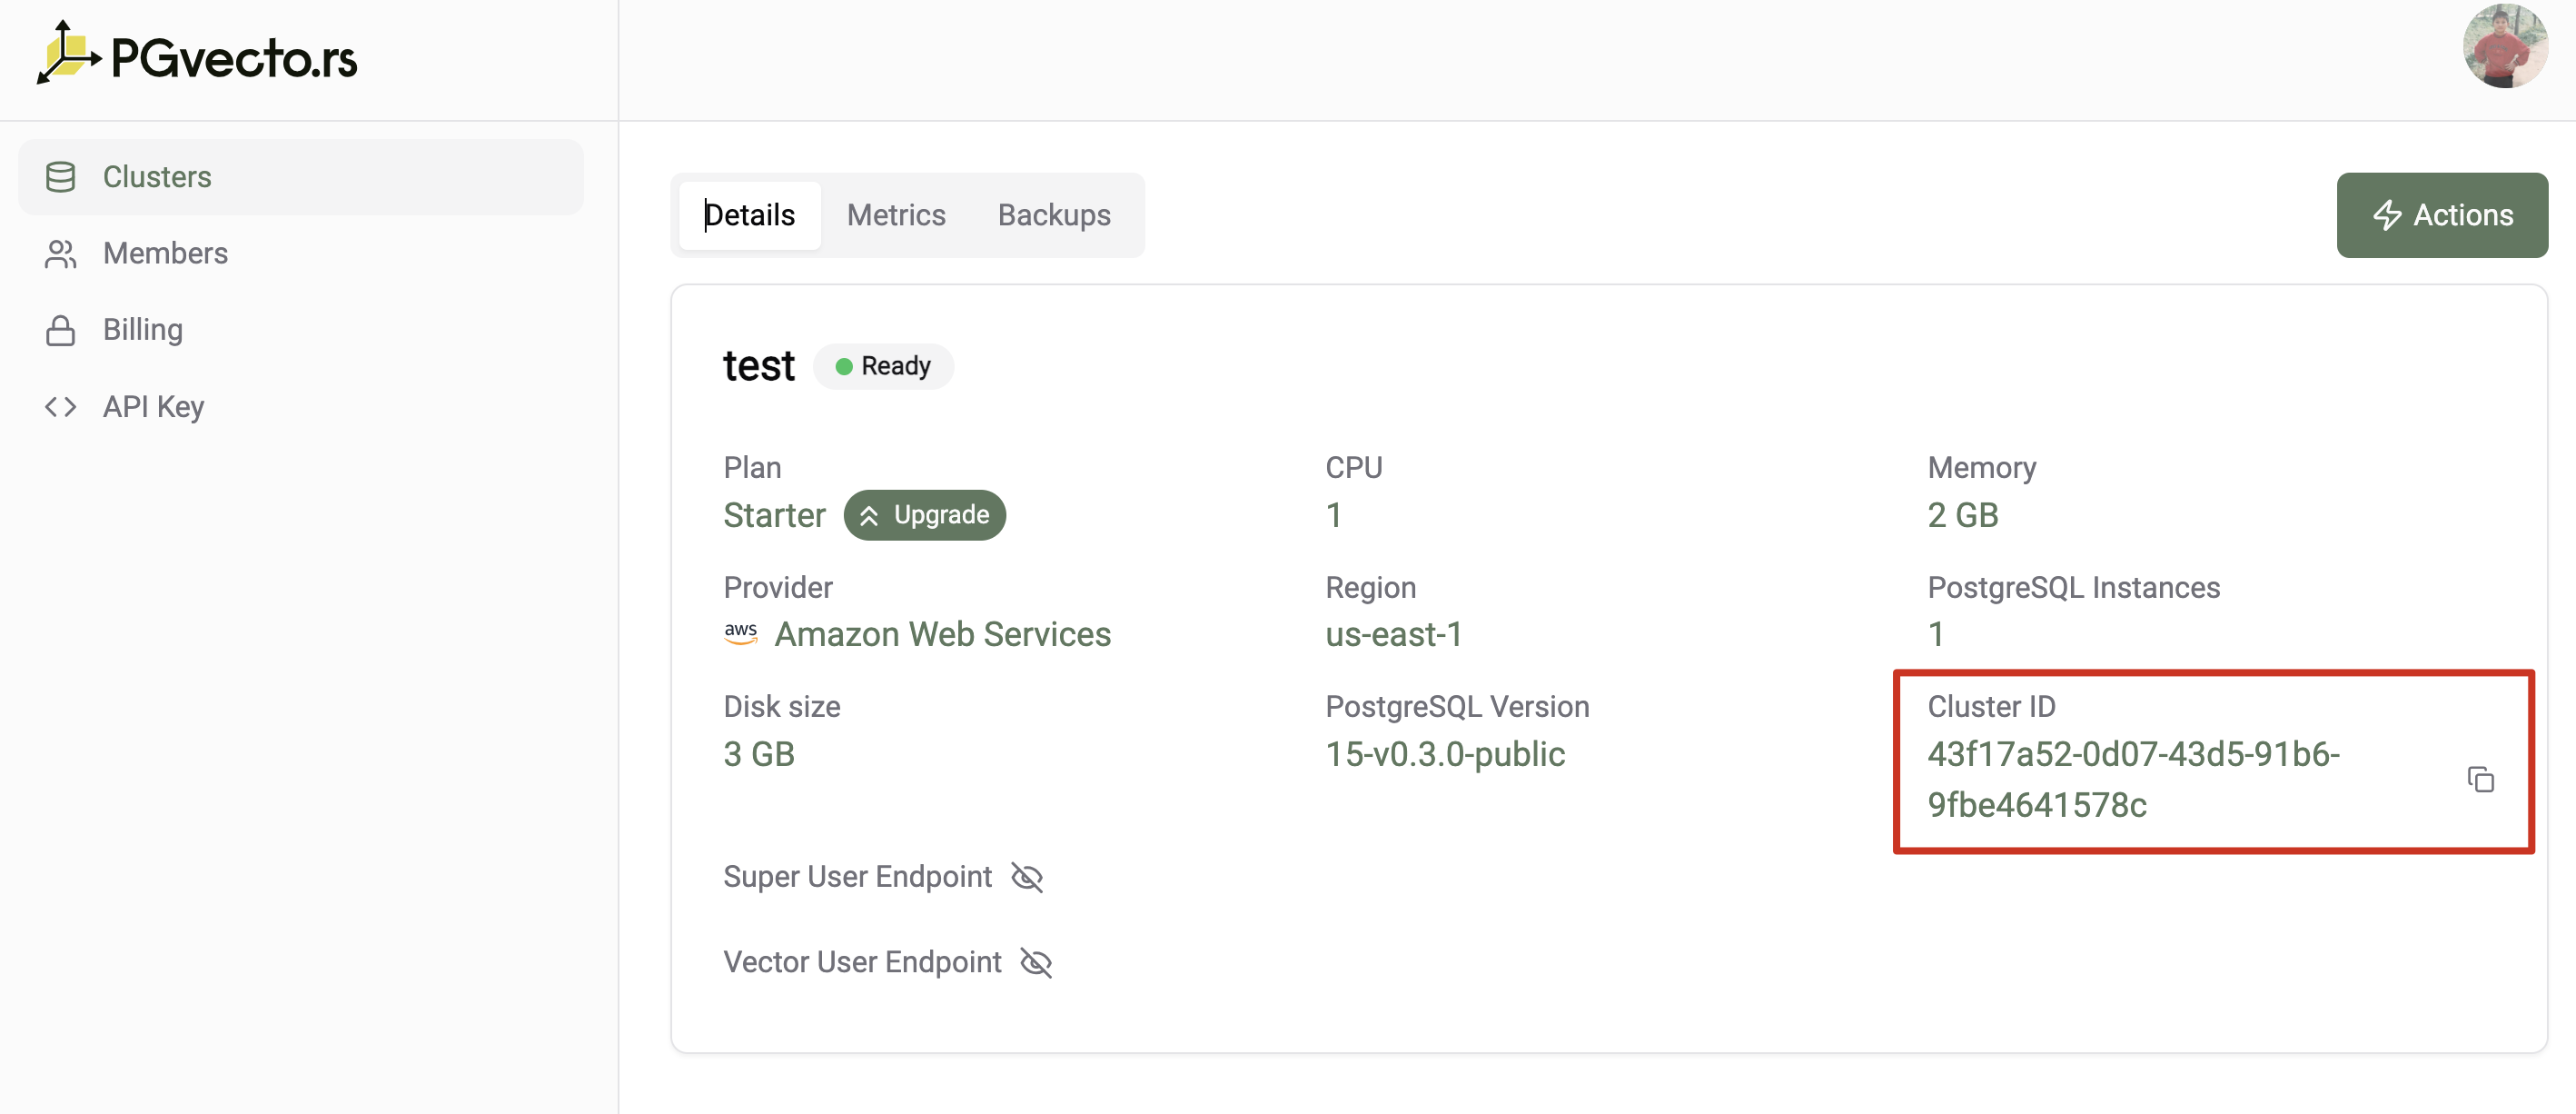
-
Create a new cluster with the cluster id and target time
9 - Regions
Deploying to Regions
With VectorChord Cloud, you can deploy clusters to different Regions. When creating an cluster, pick a Region using the drop-down selector.
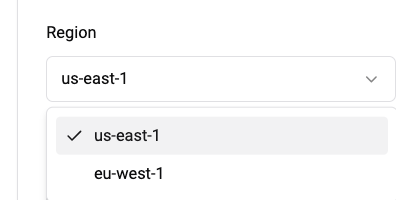
Don’t see the Region or Provider that you want? Please contact us at Discord, we are happy to help.
10 - Workflow
Overview
Workflow is a feature that allow you can use some pre-defined functions to complete some tasks. For example, you can use ExternalBuildIndex workflow to build index externally for your Postgres cluster. There are some advantages of using workflow:
- Out Of Box: You can use the pre-defined functions to complete some tasks without writing any code.
- Accelerate Tasks: You can use a server with a higher resource configuration than the PostgreSQL cluster to accelerate the task.
- Cluster Stability: The workflow is executed in a separate server, which will not affect the stability of the PostgreSQL cluster.
- Low Cost: You do not need to pay continuously like a database for high configuration resources for short-term tasks.
Supported Workflows
Supported workflows are as follows:
ExternalBuildIndex
The ExternalBuildIndex workflow is used to build vchord index externally for your Postgres cluster, details can be found here.
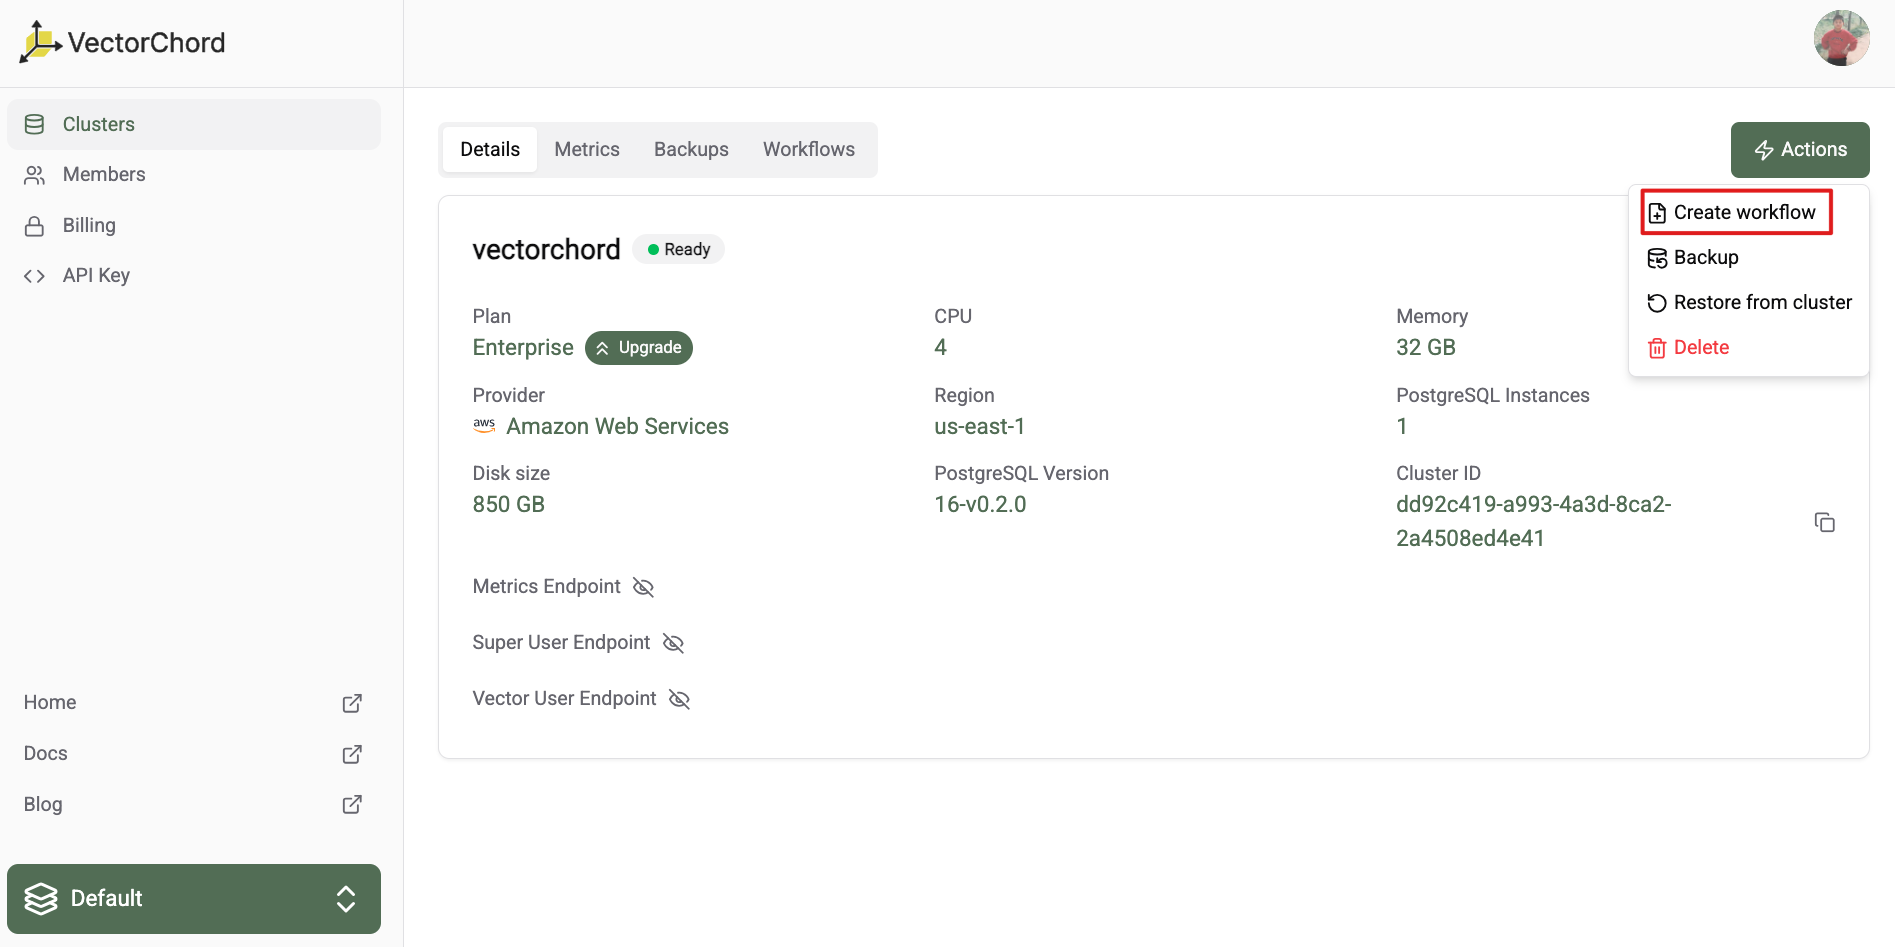
In dashboard, you can click the Create Workflow button to create a new workflow.
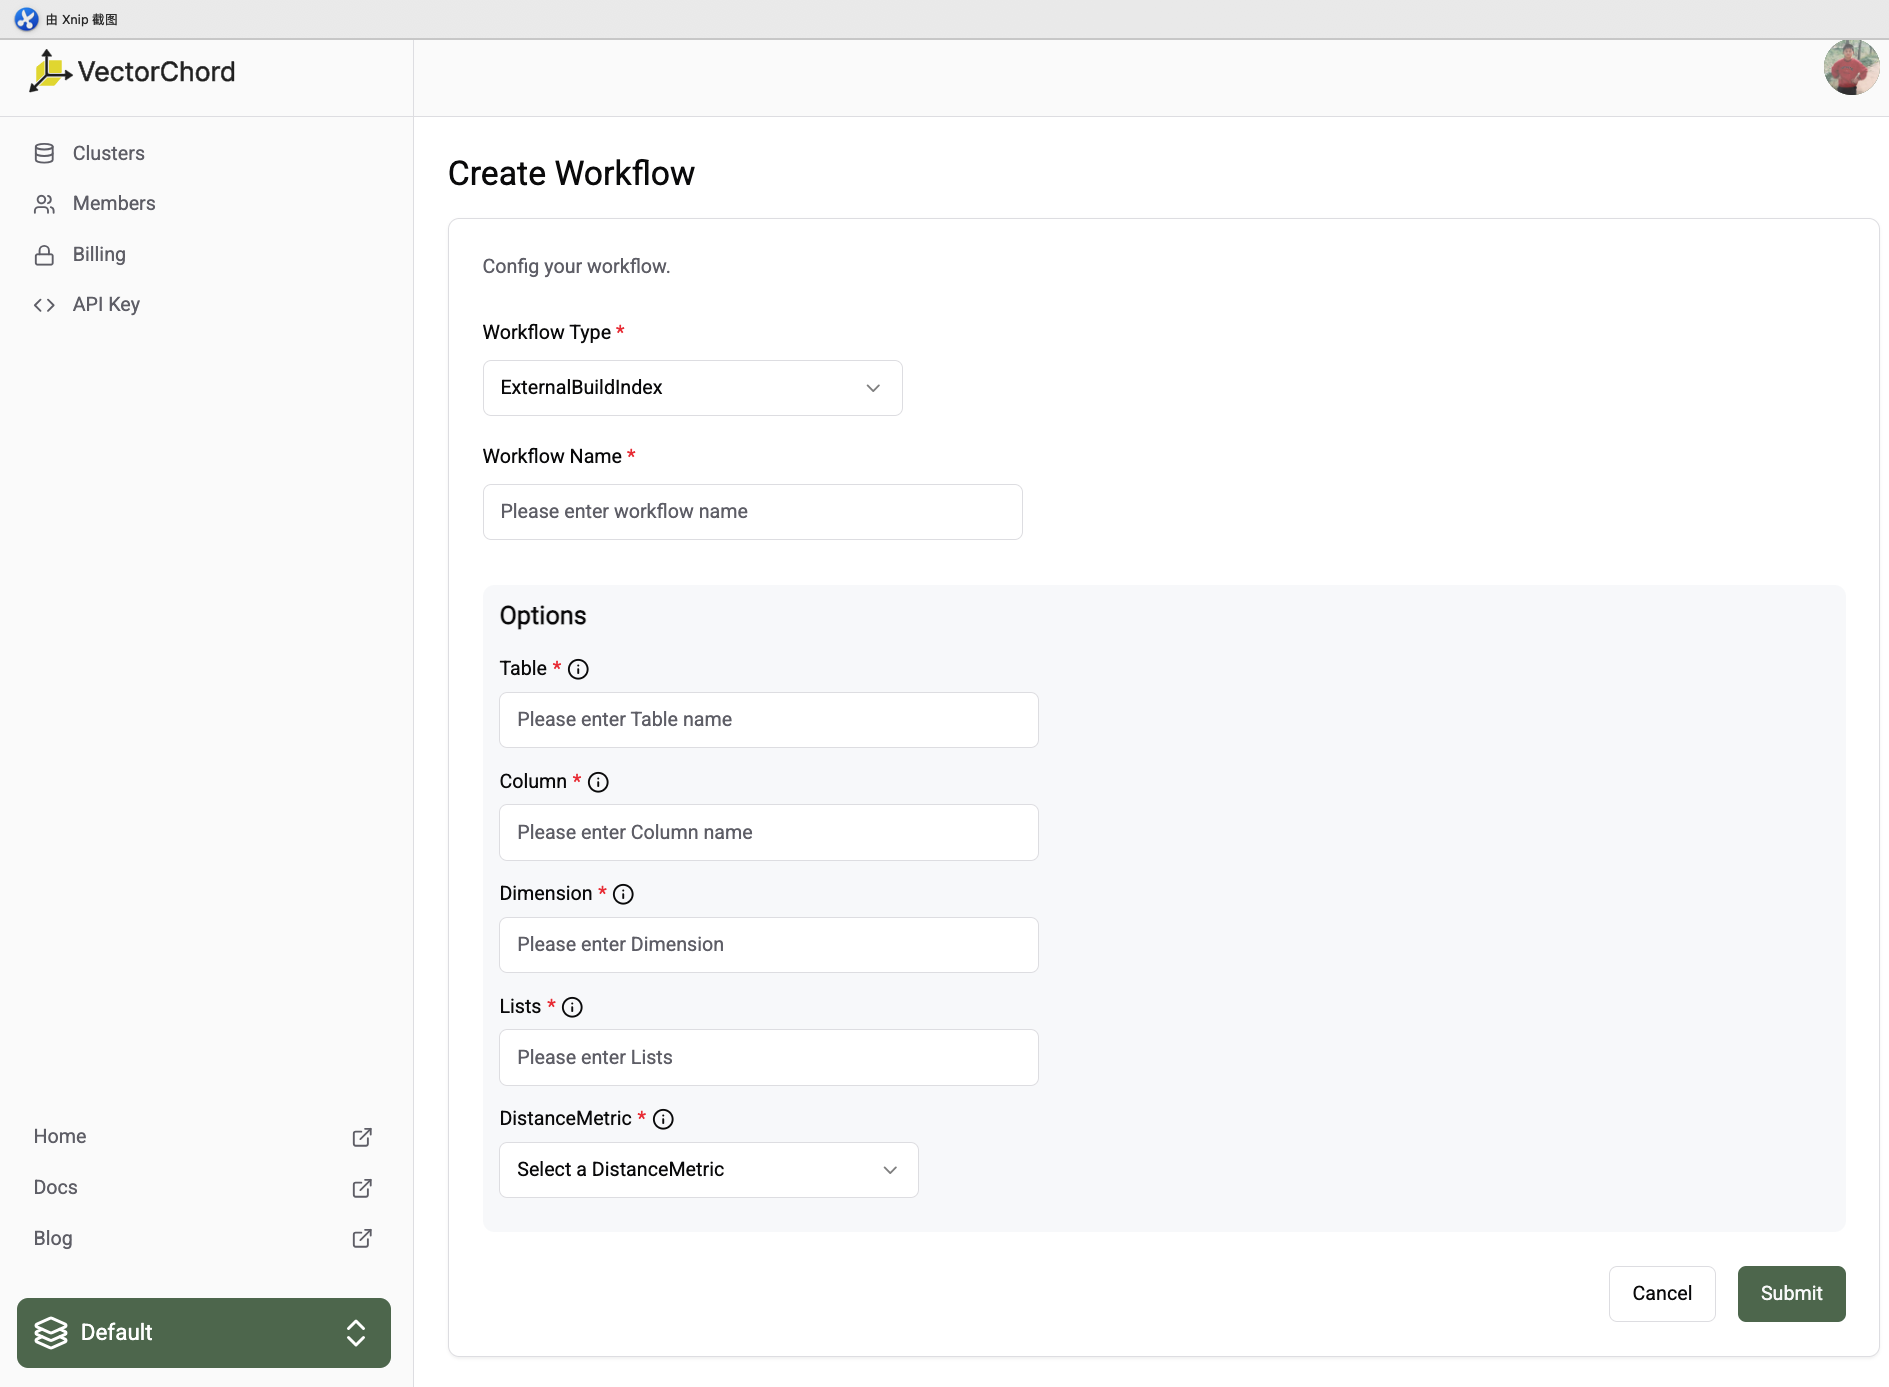
You need to specify the following information:
- Workflow Name: A unique name for your workflow.
- Option: The option for
ExternalBuildIndexworkflow- Table: The table where the vector is located
- Column: Vector column name
- Dimension: The dimension of the vector
- Lists: KMeans n list
- DistanceMetric: The distance metric for the vector
- DistanceMetricCosine: Cosine distance
- DistanceMetricL2: Euclidean distance
- DistanceMetricDot: Dot product distance
After submitting the workflow, the workflow will be in the Running status. The workflow will be unavailable during the running process. The running process may take a few minutes to complete. After the running process is completed, the workflow will be in the Succeeded status. You can list all the workflows in the dashboard.
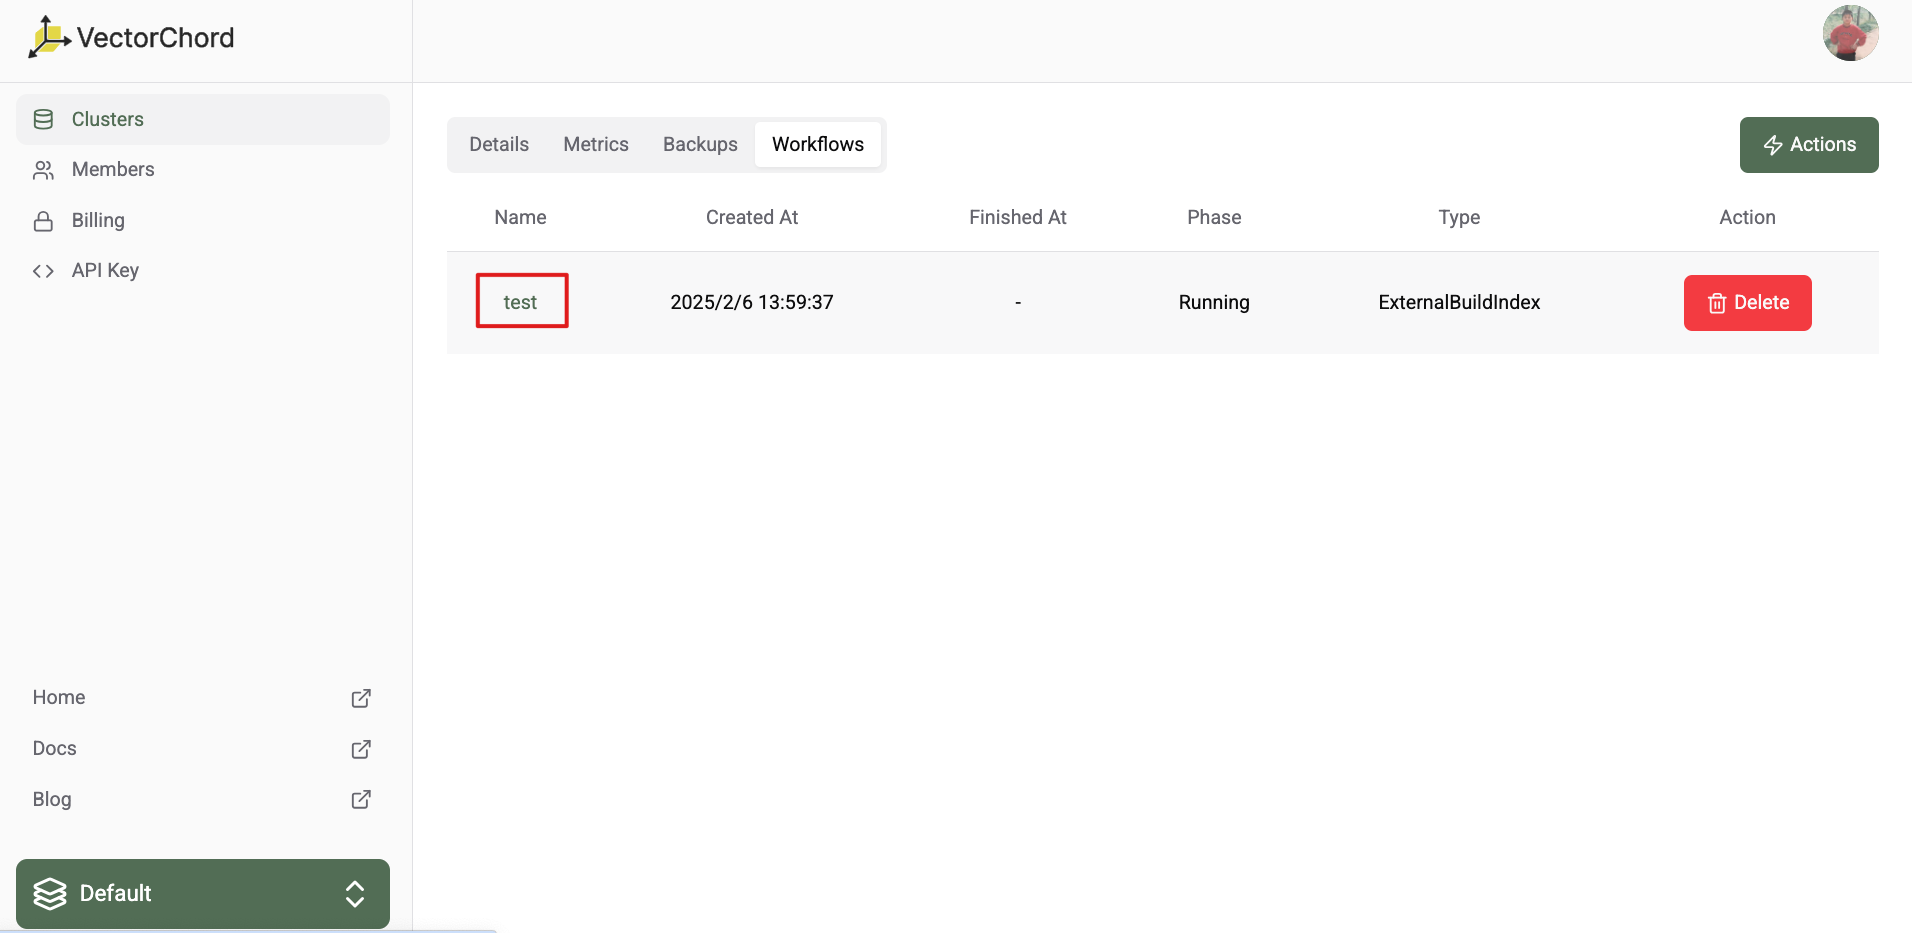
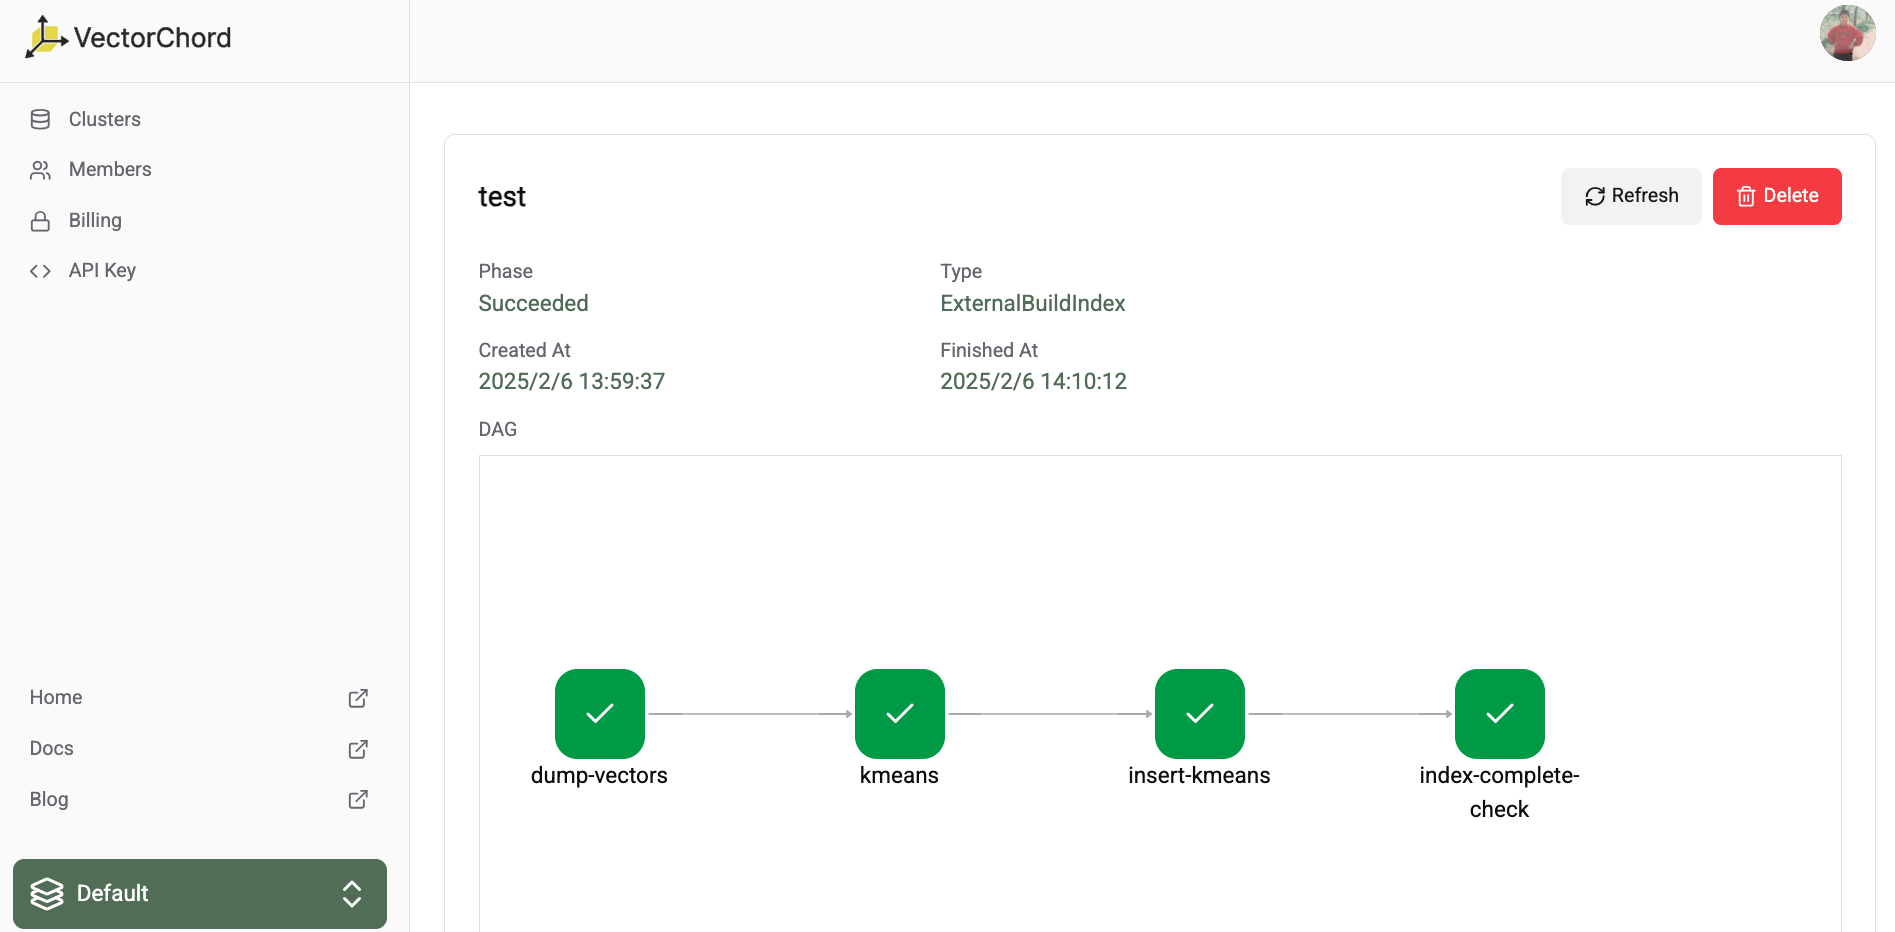
You can check the detail of every step in the workflow detail page.
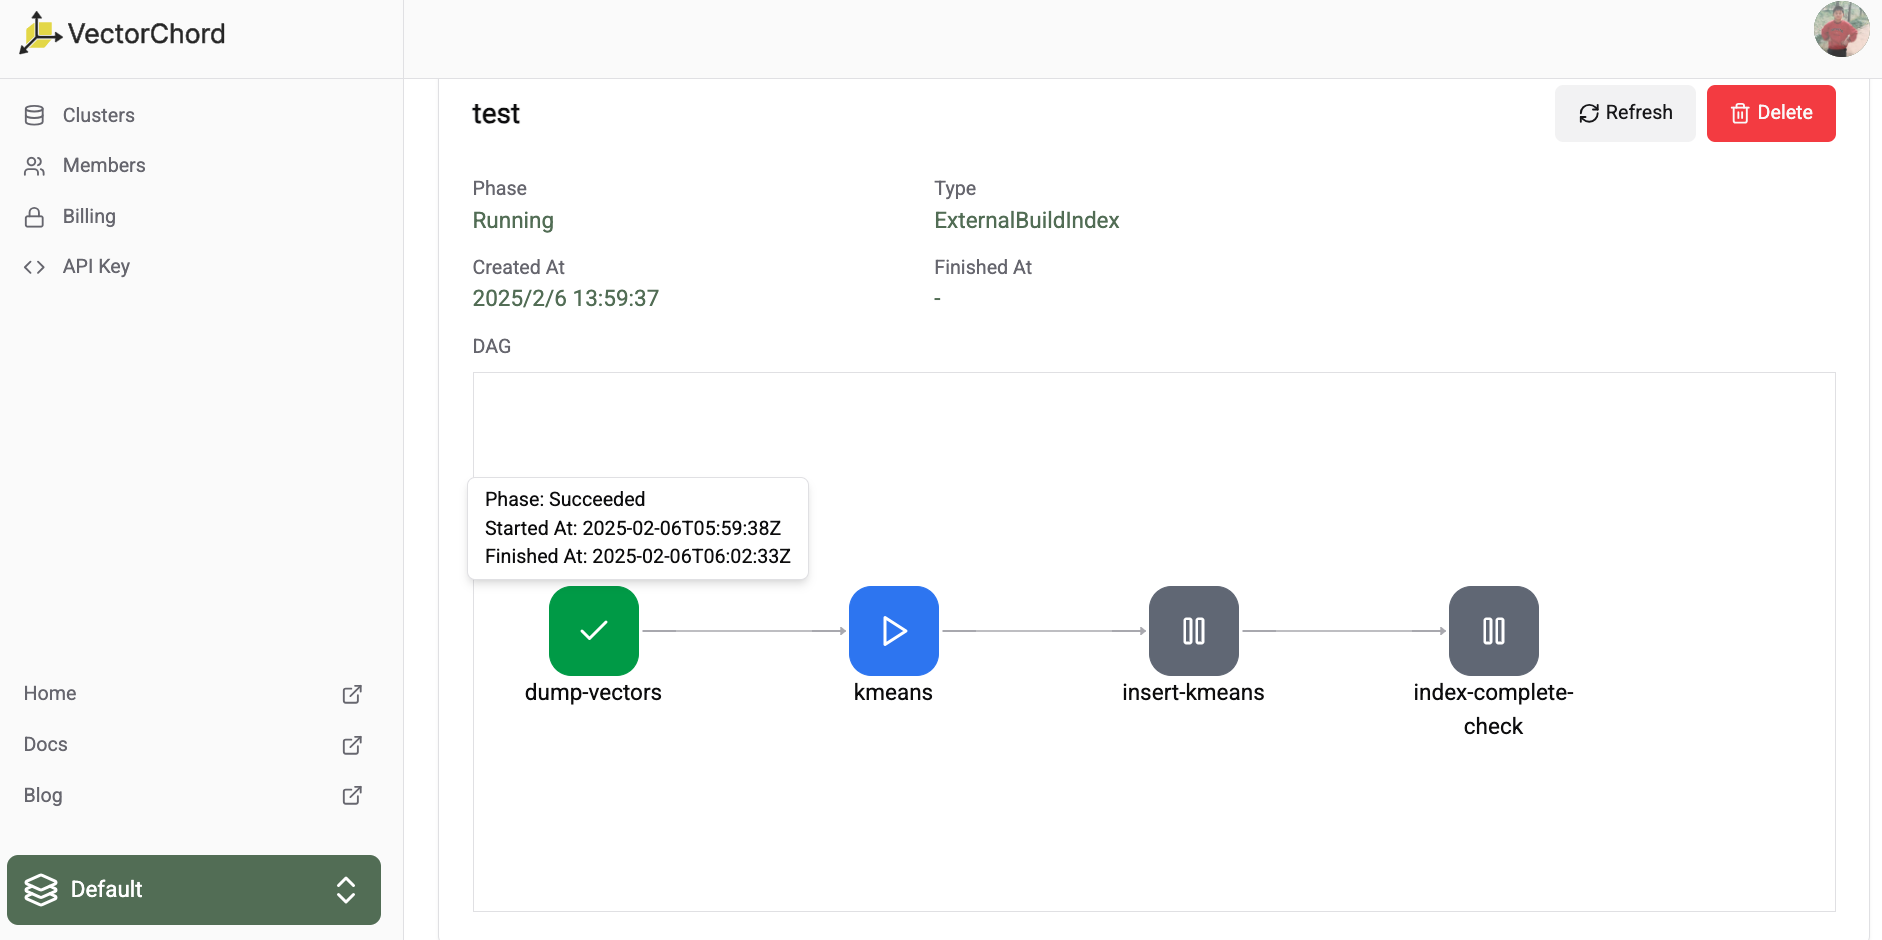
When the workflow is in the Succeeded status, you can validate the index is ready to use.