This is the multi-page printable view of this section. .
Use Cases
- 1: Hybrid Search
- 2: Adaptive retrieval and shortening embeddings
- 3: Image Search
- 4: Multi Tenancy
- 5: Sparse Vector Search
- 6: Generative Question-Answering
1 - Hybrid Search
We will show you how to use pgvecto.rs to implement hybrid search in this section.
Vector Search and Full Text Search
Postgres provides full text search, based on the match operator @@. It returns true if a tsvector (document) matches a tsquery (query). It doesn’t matter which data type is written first:
As the above example suggests, a tsquery is not just raw text, any more than a tsvector is. A tsquery contains search terms, which must be already-normalized lexemes, and may combine multiple terms using AND, OR, NOT, and FOLLOWED BY operators. In this example, the tsquery 'cat & rat' matches the tsvector 'a fat cat sat on a mat and ate a fat rat' because it contains both the terms 'cat' and 'rat'.
You could use full text search and vector search together in a single query, with the help of pgvecto.rs. In this example, we create a table named items with two columns: content and embedding. The column content is of type text, and the column embedding is of type vector(3). We insert four items into the table:
You should get the following table:
Let’s search for the items with the word cat and rat in their content first. We will use full text search to do that. The function to_tsvector converts a text to a tsvector. The operator @@ checks if a tsvector matches a tsquery.
to_tsvector parses a textual document into tokens, reduces the tokens to lexemes, and returns a tsvector which lists the lexemes together with their positions in the document.
In the example above we see that the resulting tsvector does not contain the words a, on, or it, the word rats became rat, and the punctuation sign - was ignored, because of the text search configuration is set to english.
We should get the following result:
Then we will sort the result by the distance between the embedding of each item and the embedding of the query. We will use vector search to do that:
We will get the item with the embedding [7, 8, 9] first, and the item with the embedding [1, 2, 3] second:
Advanced search: Merge the results of full text search and vector search
You could normalize the rank of the full text search result and the vector search result, and then merge them together:
The SQL query performs a combined semantic search and full-text search on “items” and retrieves the results based on their relevance scores. Here’s a breakdown of the query:
- The query starts with a Common Table Expression (CTE) named “semantic_search.” It selects columns “id,” “content,” “embedding,” and calculates the rank using the “<->” operator, which measures the distance between the “embedding” column and the vector ‘[7, 8, 9]’. The results are ordered by the rank.
- Another CTE named “full_text_search” is defined. It selects the same columns as the previous CTE but calculates the rank using the “ts_rank” function with a full-text search query. The ’to_tsvector’ function converts the “content” column into a tsvector, and the ’tsquery’ ‘cat & rat’ matches rows containing both “cat” and “rat” in the “content” column. The results are ordered by the rank.
- The main query selects columns from both CTEs using the
COALESCEfunction to handle cases where one CTE may have null values. It also calculates the overall rank by summing the reciprocal of the ranks from each CTE. - The main query performs a FULL OUTER JOIN between the two CTEs on the “id” column.
- The final result is ordered by the overall rank in descending order.
In this query, we first calculate the rank of the full text search result and the vector search result separately. Then we merge the two results together. We will get the following result:
2 - Adaptive retrieval and shortening embeddings
OpenAI latest embedding models support shortening embeddings, where developers could simply “remove some numbers from the end of a sequence” and still maintain a valid representation for text.
This enables very flexible usage. For example, when using a vector data store that only supports embeddings up to 1024 dimensions long, developers can now still use our best embedding model text-embedding-3-large and specify a value of 1024 for the dimensions API parameter, which will shorten the embedding down from 3072 dimensions, trading off some accuracy in exchange for the smaller vector size.
Shortening embeddings
OpenAI’s new embedding model text-embedding-3-large produces embeddings with 3072 dimensions by default.

But you could safely remove some numbers from the end of the sequence and still maintain a valid representation for text. For example, you could shorten the embeddings to 1024 dimensions.
You may need normalization to ensure that the shortened embeddings compatible with some distance calculation e.g. dot product. OpenAI’s API will help you on this if you are calling text-embedding-3-large to generate a lower dimension embedding directly, instead of truncating the original embeddings on your own.
There are lots of benefits to using shortening embeddings:
- Reduced memory usage: Shortening embeddings can reduce the memory usage to store the embeddings.
- Lower dimensions: Shortening embeddings can reduce the dimensions of the embeddings. Some vector data stores only support embeddings up to a certain number of dimensions (e.g. 2000).
- Faster indexing and search: Smaller embeddings can be indexed and searched faster than larger embeddings.
- Trade-off performance and cost: Shortening embeddings can trade off some accuracy in exchange for the smaller vector size.
However, the accuracy of the shortened embeddings is not as good as the full embeddings.
Trade-off performance and cost
We have performed an experiment to evaluate the effectiveness of reduced embeddings compared to the complete embeddings. The benchmark was conducted using the dbpedia-entities-openai3-text-embedding-3-large-3072-1M dataset. The experiment was carried out on a Google Cloud VM with specifications of n2-standard-8, which includes 8 vCPUs and 32 GB of memory.
We have established a table and populated it with 1 million embeddings, each consisting of 3072 dimensions.
The code for inserting 1M embeddings into the table:
Furthermore, we have created indexes for embeddings with dimensions of 256, 1024 and 3072, and performed an ANN (Approximate Nearest Neighbors) query for each dimension. There is no need to create the 256-dimensional column, as we can use the first 256 dimensions of the 3072-dimensional embeddings.
Additionally, we have constructed a binary vector index for the 3072-dimensional embeddings and conducted an ANN query using this index as well.
We run the KNN query with different limits (5, 10, 50, 100) for the number of neighbors to retrieve.
The QPS (Queries Per Second) and the average query time were measured for each query with the help of pgbench.
The query.sql file contains the following SQL queries:
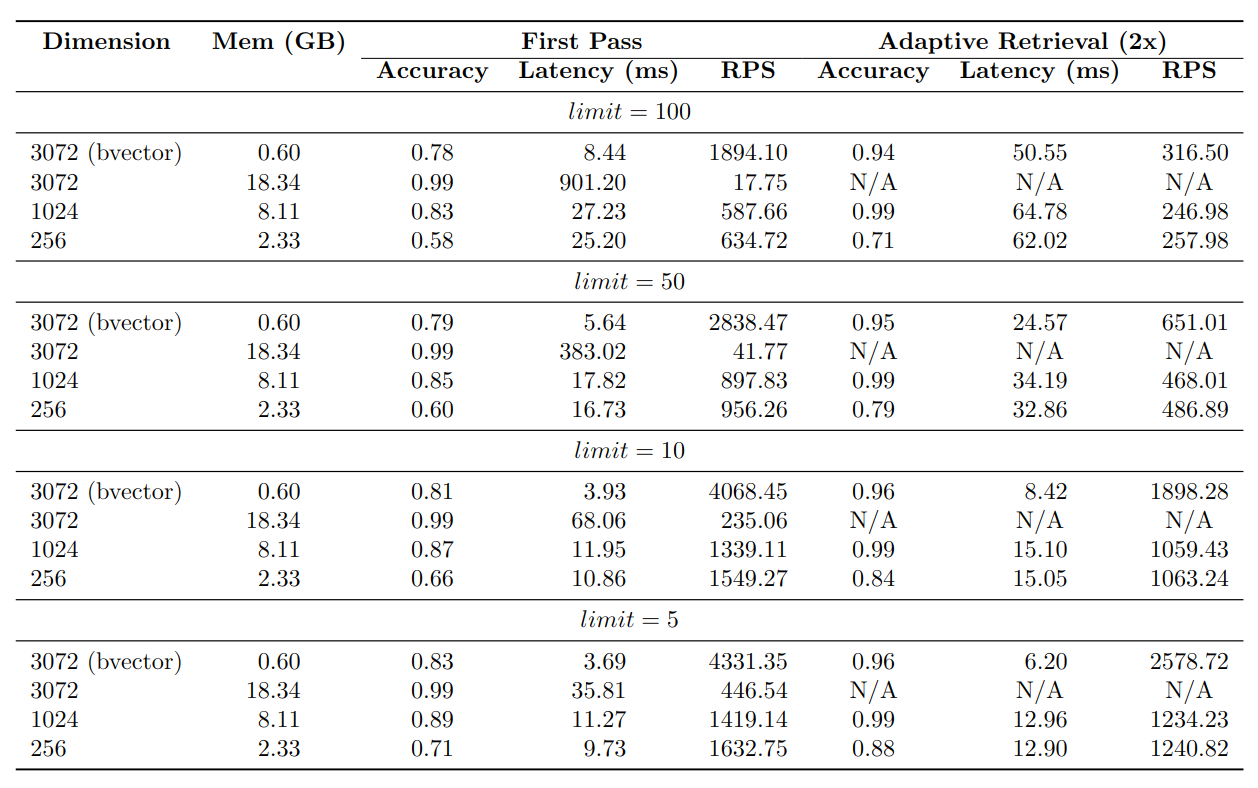
The results of the experiment are shown here:
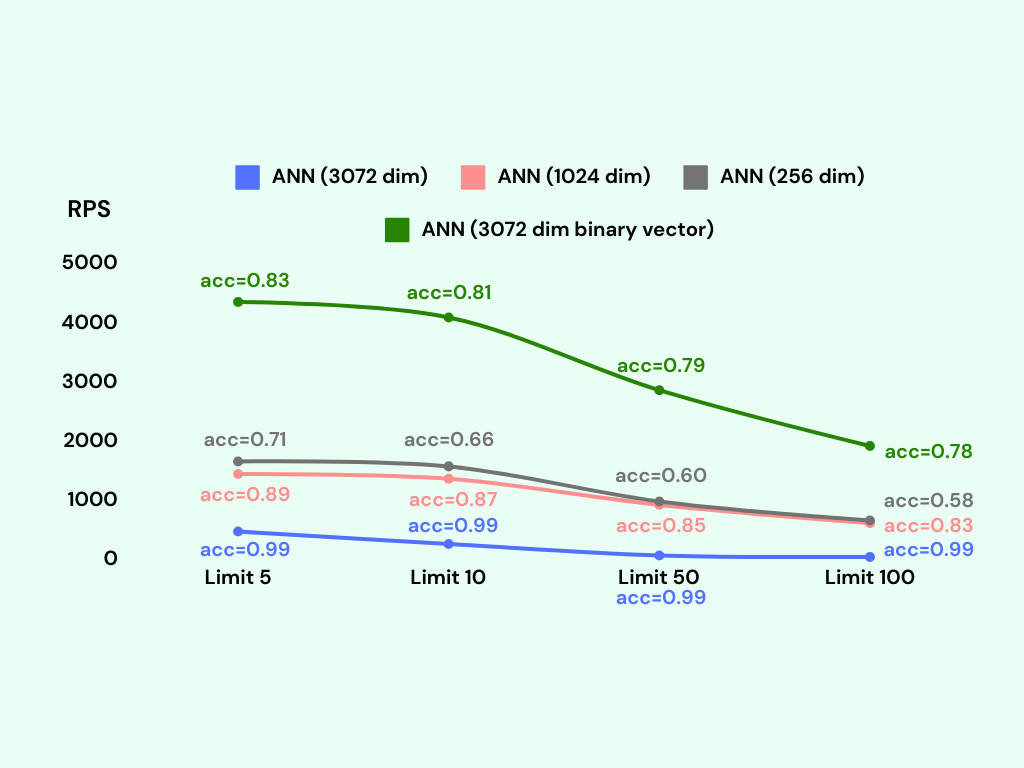
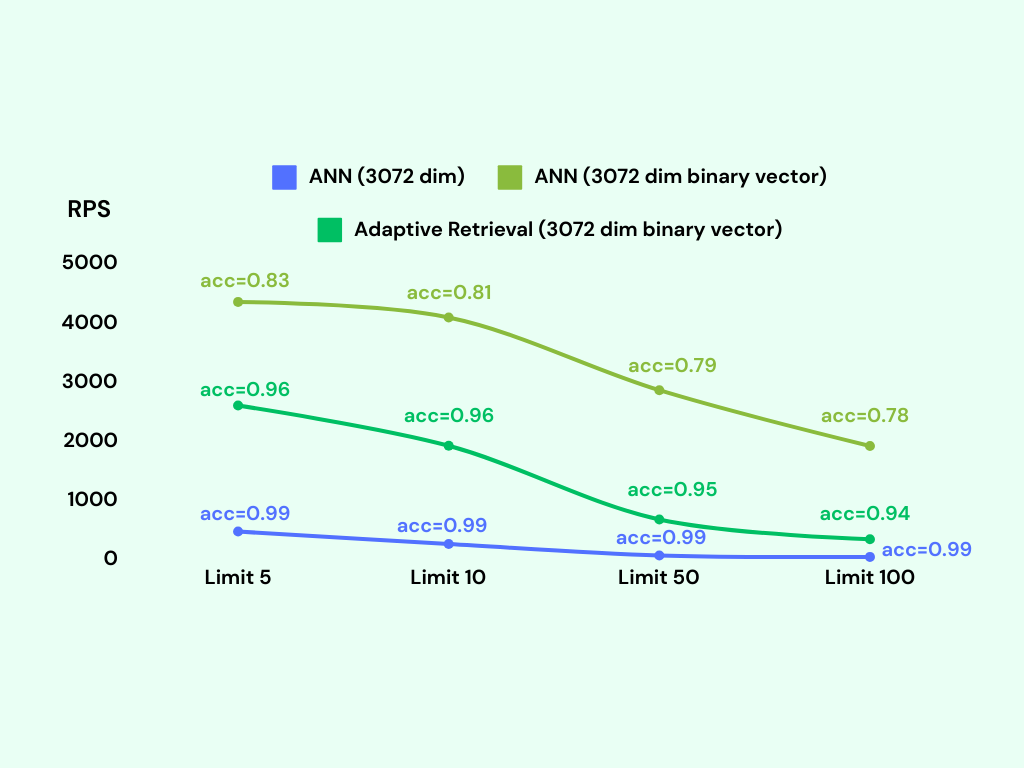
As anticipated, the 3072-dimensional embeddings exhibit the highest accuracy, while the 1024-dimensional embeddings demonstrate a slightly lower accuracy at around 85%. The 256-dimensional embeddings yield the lowest accuracy, approximately 65%. On the other hand, the binary vector index achieves an accuracy of about 80%.
Regarding the Requests Per Second (RPS) metric, the binary vector index showcases the most efficient performance, followed by the 256-dimensional embeddings, the 1024-dimensional embeddings, and finally, the 3072-dimensional embeddings.
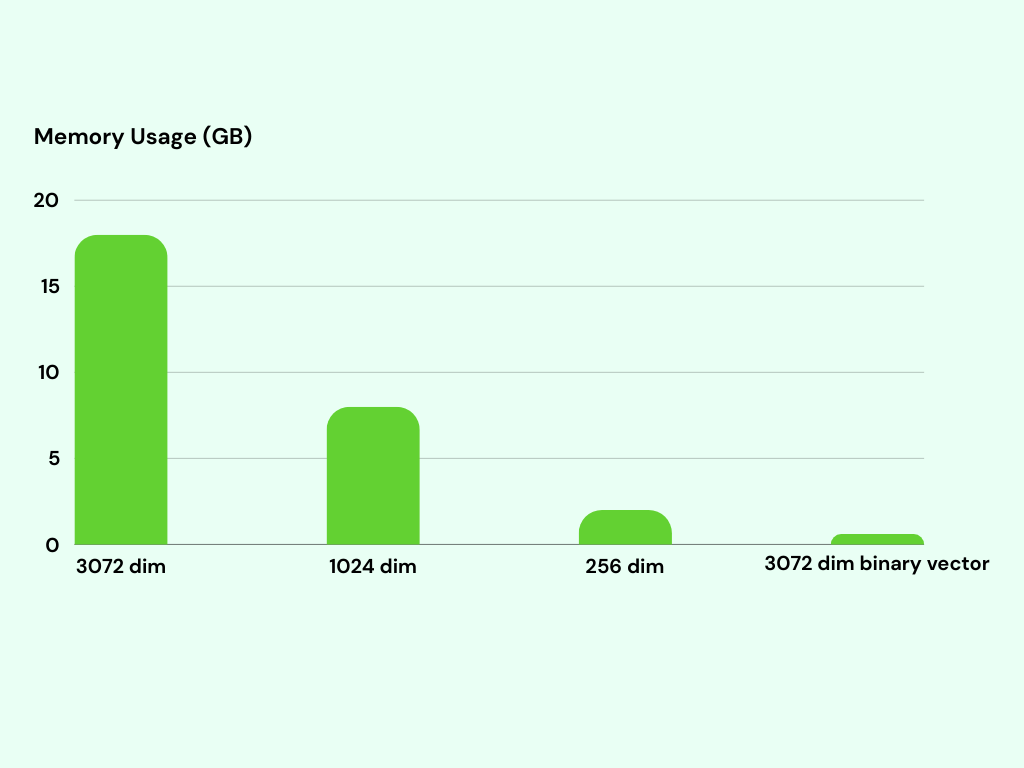
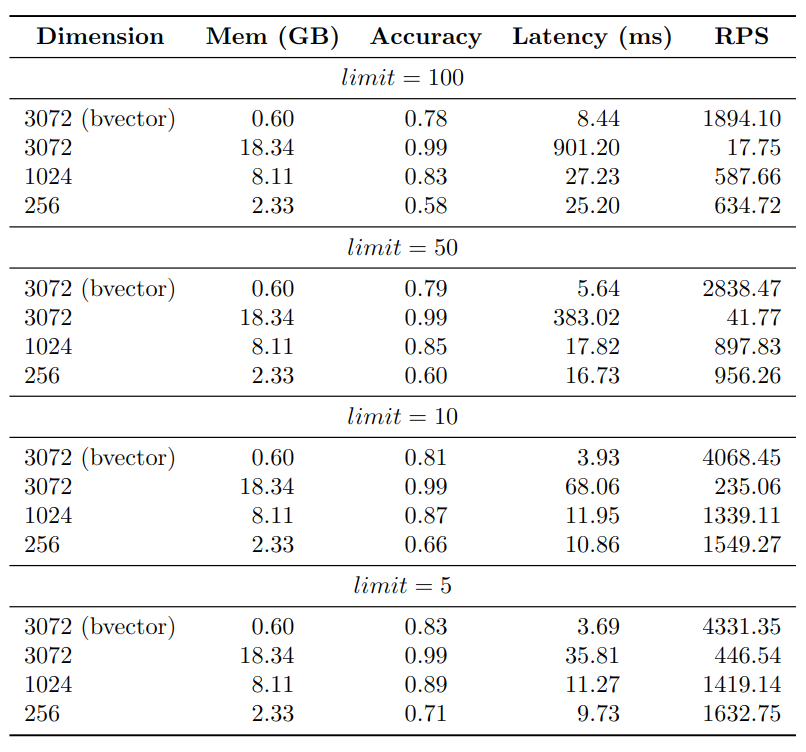
The memory usage of the indexes is an important aspect to take into account. Indexing 1 million 3072-dimensional binary vectors requires only around 600MB of memory. In contrast, the 3072-dimensional vector index consumes approximately 18GB of memory. This represents a significant difference in memory usage, as the 3072-dimensional vector index utilizes approximately 30x more memory than the binary vector index.
Improve the accuracy via adaptive retrieval
Lower dimension and binary vector indexes trade off accuracy for advantages such as higher RPS and lower memory usage compared to full dimension indexes. Adaptive retrieval techniques can be used to combine the strengths of both approaches, achieving an optimized solution that balances accuracy, memory usage, and query speed.
The logic behind adaptive retrieval is really simple. Let’s take get top 100 candidates as an example. We can perform the following steps:
- Query the lower dimensional or binary vector index first to retrieve 200 candidates from the 1 million embeddings. This is a fast operation.
- Rerank the candidates using a KNN query to retrieve the top 100 candidates. K-NN is well-suited for situations where smaller sets and precise similarity search are necessary, making it an excellent choice for reranking in this context.

The reranking step is a bit slower than the initial query, but it is still much faster than querying the full dimension index. It could be done in the pgvecto.rs:
The match_documents_adaptive function accepts a query embedding and a match count as input parameters. It first retrieves match_count * 2 candidates from the 1 million embeddings using the 256-dimensional index. Then, it reranks the candidates using a KNN query to retrieve the top match_count candidates.
The function for binary vector and 1024-dimensional embeddings can be implemented in a similar manner.
We conduct the benchmark again with the adaptive retrieval technique. We tag the adaptive retrieval technique as Adaptive Retrieval in the following figure.
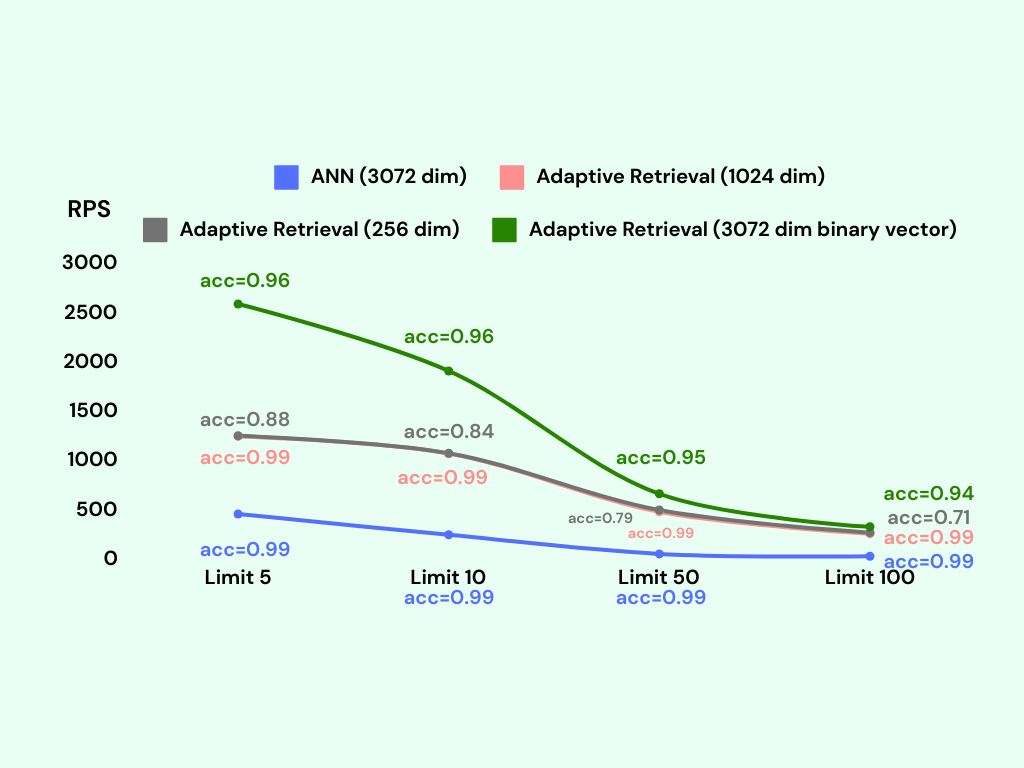
Adding a reranking step significantly improves the accuracy of the lower dimensional and binary vector indexes.
The binary vector index with adaptive retrieval achieves an accuracy of around 95%, with only a slight decrease in RPS compared to the binary vector index without adaptive retrieval. Remarkably, the memory usage of the binary vector index with adaptive retrieval is only around 600MB, which is the same as the binary vector index without adaptive retrieval.
Conclusion
Shortening embeddings can reduce the memory usage to store the embeddings, and speed up indexing and search. However, the accuracy of the shortened embeddings is not as good as the full embeddings. That’s why we need to use adaptive retrieval techniques to improve the accuracy of the lower dimensional indexes.
It seems that binary vector indexes with adaptive retrieval are the best choice for the text-embedding-3-large model. You could also consider 1024-dimensional indexes with adaptive retrieval if you need a higher accuracy (e.g. 99%).
PS: All the code and data used in this experiment are available in the pgvecto.rs-matryoshka-embeddings-benchmark.
3 - Image Search
Image intelligent search, also known as content-based image retrieval, goes beyond traditional keyword-based search and enables users to search for images based on their visual content. For example, you could search images that contain a red mushroom (image from immich):

The feature looks like a magic because it allows you to search for images that you don’t have keywords for. The search engine understands the content of the images and videos and can find the ones that are similar to the query.
How it works
Image intelligent search leverages advanced computer vision techniques and machine learning algorithms to understand the visual characteristics and features within images, allowing users to perform freeform searches without relying on specific keywords or metadata.
The first step is to extract meaningful features from images and generate a vector representation of each image. This is typically done using deep learning models such as CLIP. The vector representation is called an embedding. It is a list of numbers that represents the image.
Then you could use vector stores like pgvecto.rs to store the embeddings and perform efficient vector search.
Example
We will leverage CLIP, a neural network that connects text and images, to generate embeddings for our images. These embeddings capture the visual concepts present in the images. Subsequently, we will utilize pgvecto.rs, a scalable vector search tool built on Postgres, to store these embeddings and conduct efficient vector searches. By combining the power of CLIP and pgvecto.rs, we can retrieve similar images based on their visual content.
Generate embeddings
You could use CLIP to generate embeddings for images:
Store embeddings
Let’s say you have a table named images with three columns: id, author and embedding. The column embedding is of type vector(512). You could insert an image into the table like this:
Search for similar images
You could search for similar images like this:
Advanced search
Assuming you want to search for the 64 nearest rows and the results don’t contain the images from the author Allen.
You may want the following SQL to work:
In base mode, you may only get 32 rows since the HNSW algorithm bypasses filter conditions during the search and relies on PostgreSQL to apply filters post-search.
You could use the vbase search mode to achieve this. In vbase mode, searching results become an iterator that continuously returns results. The database can continuously retrieve results from it until the user’s query conditions are met. It’s quite different from other vector search library, such as faiss. The latter can only return a fixed-size result set, and this size needs to be determined before the search. For queries with filtering conditions, it is not possible to determine the size of the result set in advance. As a result, either insufficient results can be obtained or excessive searching will affect latency. The original idea comes from VBASE: Unifying Online Vector Similarity Search and Relational Queries via Relaxed Monotonicity.
You can enable vbase by a SQL statement SET vectors.search_mode = vbase;. Then you can get the correct behavior. This mode is used in immich’s image search feature. vbase is the default search mode in 0.2.
Real-world applications
Image intelligent search is used in immich to enable users to search for images based on their visual content. The code snippets provided here are inspired by the implementation of the image search feature in immich.
The query retrieves data from the asset_entity, smart_search, and exif_info tables based on specified conditions and ordering. Let’s break down the query:
This part of the query specifies the columns to be selected from the tables asset_entity, smart_search, and exif_info. The aliases a, s, and e are used to refer to each table respectively.
Here, the asset_entity table is aliased as a, the smart_search table as s, and the exif_info table as e. The INNER JOIN is used to combine asset_entity and smart_search based on the condition s.assetId = a.id. The LEFT JOIN is used to include matching records from the exif_info table based on the condition e.assetId = a.id.
The table asset_entity has the following schema.
In this part, the query applies filters to the asset_entity table. It selects rows where the ownerId column is among the specified userIds, isArchived is false, isVisible is true, and fileCreatedAt is earlier than the current time (NOW()).
The query orders the results based on the embedding column of the smart_search table, comparing it to the provided :embedding value. The <=> operator is used for the comparison.
Finally, limit the number of rows returned by the query to the value specified by the :numResults parameter.
This is an real-world use case to show how image intelligent search is implemented in a production system.
4 - Multi Tenancy
Multi-tenancy is essential for SaaS applications, allowing a single instance to serve multiple users or groups while ensuring data privacy and security. This blog outlines the design and implementation a simple multi-tenant vector search system with pgvecto.rs.
Designing the Database Schema
The success of user-based isolation in multi-tenant systems hinges on a well-structured database schema:
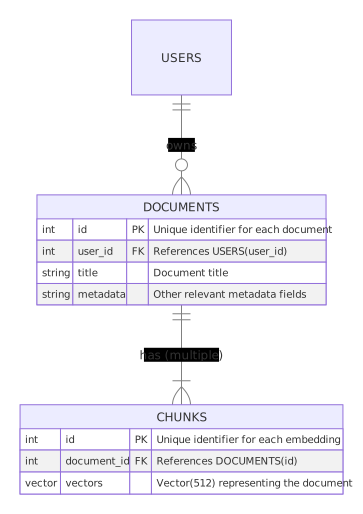
Users and Documents
Each user is identified by a unique user_id, which directly links them to their documents for private access. The documents table contains each user’s documents, each with a distinct id, title, and content. Additional metadata can be included in the documents table to improve search functionality. The user_id is linked to the documents instead of chunk embeddings to replicate real-world scenarios more accurately.
Chunks
Embeddings store vectorized representations of chunks of documents, and use document_id to reference its document.
Entity-Relation Diagram
Implementing Multi-Tenancy
Create Index
Create vector index on chunks.embedding to accelerate query process. Here we use dot product as the similarity measure.
Run the query with user_id
In this query:
- The
SELECTstatement now includes chunks.id AS chunk_id, documents.id AS document_id, and documents.title to return the chunk ID, the document ID, and the document title, respectively. - The
INNER JOINensures that only chunks associated with documents owned by the specified user (‘alice’) are considered. - The
ORDER BYclause calculates the distance between the chunk’s embedding and the provided vector [3,2,1], sorting the results by similarity. The closest or most similar embeddings are returned first. - Replace
[3,2,1]with the query embedding and ‘specific_user_id’ with the actual ID of the user for whom you are performing the search.
Performance Tip
The vector search will scan through additional points and evaluate the conditions individually. Consequently, if there is a large number of user IDs or the filter criteria are challenging to meet, the query speed may be impacted. To enhance performance, you may want to explore utilizing PostgreSQL’s partition table function.
5 - Sparse Vector Search
In the past, hybrid search combined two search methods: traditional keyword-based search and vector-based similarity search. However, sparse vector can act as a substitute for keyword search, unlocking the full potential of the data pipeline with pure vector search.
For more information about keyword-based hybrid search, please refer to Hybrid Search
This post explores how to use how BGE-M3 and pgvecto.rs to exploit the potential of hybrid search using both sparse and dense vectors.
Let’s dive in.
An Overview of Sparse and Dense Vector Embedding
Sparse vectors are high-dimensional vectors that contain few non-zero values. They are suitable for traditional information retrieval use cases. For example, a vector with 32,000 dimensions but only 2 non-zero elements is a typical sparse vector.
Dense vectors are embeddings from neural networks. They are generated by text embedding models and have most or all elements non-zero. They have fewer dimensions, such as 256 or 1536, much less than sparse vectors.
Dense vectors and sparse vectors are both used to represent features of text chunks, but they have significant differences. A single dimension in a dense vector embedding does not mean anything, as it is too abstract to determine its meaning. However, when we take all the dimensions together, they provide the semantic meaning of the input text.
Sparse vectors have dimensions equal to the vocabulary size, with each element representing the weight of a word in the text.
Generally, words with higher weights indicate greater importance in the text. Sparse vectors simplify the analysis and visualization of the relationship between text and vocabulary. To visualize dense vectors, additional dimension reduction algorithms are necessary, such as:
- Principal component analysis (PCA)
- T-distributed stochastic neighbor embedding (T-SNE)
- Uniform Manifold Approximation and Projection (UMAP)
| Dense Vector | Sparse Vector | |
|---|---|---|
| Dimension | Hundreds to thousands | Tens of thousands |
| Element Meaning | Nothing | Word Weight |
| Interpretability | Hard | Easy |
| Usage | Vector Distance | Vector Distance / Visualize |
| Semantic sensitivity | High | Low |
Sparse vectors are generally less effective at capturing the relationships between words, particularly for synonyms and related terms, compared to dense vectors.
For instance, both rocket and SPACE X are related to space exploration, but Dense vectors are more likely to reveal similarities and assign a closer vector distance to corresponding texts.
How to create a vector embedding?
A vector embedding is the internal representation of input data in deep learning models, also known as embedding models. Most embedding models, such as text-embedding-3-small, only output dense embeddings.
SPLADE and BGE-M3 can generate sparse embeddings, sometimes called lexical weights. In this section, we will introduce the BGE-M3 model for generating dense and sparse vectors.
BGE-M3 is a multi-functionality model, which can simultaneously perform the three common retrieval functionalities of the embedding model: dense retrieval, multi-vector retrieval, and sparse retrieval. We will learn how to generate dense and sparse embeddings from it.
For all sentences and words, a text-word matrix was created:
| TEXT | What | is | BM | 25 | ? | Definition | of | … |
|---|---|---|---|---|---|---|---|---|
| What is BM25? | 0.08 | 0.08 | 0.13 | 0.25 | 0.04 | 0 | 0 | … |
| Definition of BM25 | 0 | 0 | 0.25 | 0.33 | 0 | 0.14 | 0.06 | … |
The matrix is highly sparse, especially when all vocabularies are included. Most words only appear in a few sentences, resulting in non-zero weights.
By feeding text into sparse embedding models like BGE-M3, we can easily obtain sparse embeddings from it.
Now we have both the sparse and dense embeddings. It’s time to insert them into the vector database.
Storing vectors in pgvecto.rs
First, a deployed pgvecto.rs instance is required for vector storage and retrieval. This can be achieved by the official pgvecto-rs Docker image:
Now the only necessary dependency is installed. Let’s create a table to store the vectors.
pgvecto.rs supports dense or sparse vectors with different data types:
vectorfor dense vectorsvectorfor sparse vector
The BGE-M3 model has a dense embedding dimension of 1024. The sparse embedding dimension is 250002, which matches the size of tokenizer vocabulary.
In this example, we create a table named documents with four columns: an ID column(id), a text column(text) and two vector columns(sparse for sparse vector and dense for dense vector).
With the table created, we can now insert embeddings into the table and create indexes for vector columns.
For dense vectors, vector_l2_ops calculates the Squared Euclidean distance, which is the most commonly used distance metric.
For sparse vectors, vector_dot_ops calculates the dot product, which is a more efficient method.
For more information about index types in pgvecto.rs, please check out our documentation.
Retrieving and Mixing Results
With the vectors stored in the database, we can efficiently query them using the pgvecto.rs extension. To find the nearest vectors to a given input text, we need to encode the text with the same model.
This process is identical to the one described in the previous chapter:
The pgvecto.rs extension provides a simple SELECT statement to get sparse and dense vectors like this:
To rerank the merged result, you can use popular fusion methods such as Reciprocal Ranked Fusion (RRF). However, to make better use of BGE-M3, let’s introduce the Reranker model of BGE-M3. Unlike the embedding model, Reranker uses text input and directly outputs their similarity or score.
We can initialize a Reranker model and feed it with mixed candidate texts. With this method, reranking can be as simple as sorting by the Reranker model’s estimated score.
Congratulations! We have now completed our first step into the world of sparse vector search.
6 - Generative Question-Answering
Vector search can also be used to provide context to generative models such as OpenAI’s GPT series, improving the quality of the outputs.
This post will explore the use of pgvecto.rs in building and retrieving from a vector knowledge base to bolster the performance of generative models in question-answering tasks. A knowledge base serves as “long-term memory” for generative models, providing them persistent, curated, and accurate information as context to draw from when generating an answer to a question. This results in answers that are more accurate, reduces the possibility of the model producing “hallucinations” (statements with no basis in reality), and increases user trust in the outputs. This technique is known as Retrieval-Augmented Generation, or RAG: see this post or the related paper for more information.
Overview of the Question-Answering task
The generative model question-answering (QA) task is a method of Information Retrieval. The model is presented with a question, and generates an answer based on some context: typically, documents or other information sources the model can look at to retrieve the information necessary to answer the question.
This use case will involve giving the OpenAI gpt-3.5-turbo-instruct model context to answer questions about movies from the vishnupriyavr/wiki-movie-plots-with-summaries-faiss-embeddings Huggingface dataset.
The overall workflow will look something like this:
Question-Answering without Context
First, let’s try having the model answer some questions without providing it context.
We begin with defining a function to streamline getting a response for a given prompt:
The api_key requires an OpenAI account. Once logged in, sign up for an API key from the top-right drop-down menu, and paste it in place of YOUR_API_KEY_HERE.
Let’s start with asking about a relatively popular movie:
The release year of Skyfall is 2012. The overall plot follows James Bond as he investigates an attack on MI6 and uncovers a sinister plot by a former agent seeking revenge on M and the entire agency. Bond must confront his past and protect MI6 from destruction.
Accurate, if somewhat vague in the plot summary. However, what about a movie that’s much less known?
The release year of Cat Napping is unknown. The overall plot of Cat Napping is about a group of cats who go on a mission to rescue their friend who has been kidnapped by a group of evil dogs. Along the way, they encounter various challenges and obstacles, but with their cleverness and teamwork, they are able to save their friend and defeat the dogs.
Cat Napping is actually a Tom and Jerry movie from 1951, where the two fight over a hammock.
We have found the limits of what the model “knows”: it is unable to produce the release year, and invents a potential plot based on the title. We will remedy this by creating a knowledge base for the model to draw on.
There are two options for allowing the model to better answer our question:
- Fine-tune the model on text data in the domain of interest (movies in this case).
- Employ retrieval augmented generation, which adds an information retrieval component to the process. This will allow us to retrieve and feed relevant information to the model as a secondary source of information.
We will be taking the second option in this post.
Building the Knowledge Base
Let’s build a knowledge base of movies to retrieve relevant information from, using the vishnupriyavr/wiki-movie-plots-with-summaries-faiss-embeddings Huggingface dataset. This dataset contains titles, release years, casts, Wikipedia pages, plot summaries/lengths, and vector embeddings of this information for 33,155 movies. Each movie also has text data, which encompasses title, release year, cast, and plot summary in one. We will be using the text and embeddings data for this application.
Load the Data
Start by loading the data:
Generate Embeddings
This particular dataset comes with embeddings, so you can skip this step and use the embeddings directly.
If you want to generate embeddings from the text data, you can use the OpenAI, Cohere or other embeddings APIs. We provide an example using the Cohere API, you can get Cohere API key from here.
The embeddings in this user case are dense vectors. For creating sparse vectors, you can see this page.
Insert Data into the Database
A deployed pgvecto.rs instance is required for vector storage and retrieval. We can use the official pgvecto-rs Docker image:
Install the required psycopg library to interact with Postgres, and ensure the extension is running:
Now, we create a table movies with a few columns: an ID column(id), a text column(texts), and a vector column(embeddings).
We use type vector(n), as we are working with dense vector embeddings, where n is the dimension of each embedding (768 in this case).
With the table created, we can now insert the embeddings from the dataset and create indexes for vector columns:
This may take a while, depending on how much data is to be inserted.
Create Index
Recall that for dense vectors, vector_l2_ops calculates the Squared Euclidean distance, which is the most commonly used distance metric.
$$
D_{L2} = \Sigma (x_i - y_i) ^ 2
$$
Question-Answering with Context
To make use of our knowledge base, queries must first be encoded to determine what texts to retrieve:
Now, we define a function to streamline adding the retrieved context to the initial prompt:
Recall the options for distance operators:
<->for squared Euclidean distance<#>for negative dot product<=>for cosine distance
For definitions, please see the overview.
Now, let’s try the prompt again, with added context:
The release year of Cat Napping is 1951 and the overall plot involves Tom and Jerry fighting over a hammock, with Jerry ultimately getting revenge on Tom.
Now the model has given us a more accurate answer! We can even ask further questions:
Tom tries to send Jerry sliding into a nearby pond by unhooking the hammock he is sleeping in. He also tries to whack the hammock to send Jerry flying into the air, but Jerry lands in a bird’s nest. Tom then picks Jerry up on a spatula and places him onto a walking army of ants, causing Jerry to wake up as he bumps his head on a sprinkler. Tom also tries to chase Jerry with a lawn mower and a baseball bat.
As we saw earlier in this post, LLMs do work very well by themselves, but can struggle with niche or specific questions, creating “hallucinations” that may not be noticed. The use of the knowledge base improves factuality and subsequently user trust in the generated outputs.
Further Applications
This method is not only for asking about movies, of course. Other applications could include extracting summaries of scientific papers (try this dataset!), or answering questions about company policies provided a database of company literature.