跳转到主要内容

这是本节的多页打印视图。 .

返回本页常规视图.

运维管理

从 pgvecto.rs 或 pgvector 迁移、水平读取扩展架构以及 Kubernetes 部署指南。

1 - 迁移指南

VectorChord 的绝大多数向量数据类型均由 pgvector 原生支持,本文介绍如何从 PGVecto.rs 平滑迁移至 VectorChord。

outline: [2,3]

VectorChord 迁移概览

从 PGVecto.rs 迁移

VectorChord 的绝大多数向量类型均由 pgvector 提供支持。 因此,从 PGVecto.rs 迁移到 VectorChord 的过程,基本上就是从 pgvector 迁移到 PGVecto.rs 的逆向操作。

提示

我们提供了专用的迁移镜像 modelzai/pgvectors-vchord,用于支持在 pgvecto.rs 与 VectorChord 之间进行双向迁移。

前置条件

假设您已经拥有包含向量数据的表,并且安装了 PGVecto.rs 扩展。一个简单的示例如下:

CREATE TABLE table_vector (id bigserial PRIMARY KEY, vec_f32 vectors.vector(3));
CREATE TABLE table_float16 (id bigserial PRIMARY KEY, vec_f16 vectors.vecf16(3));
CREATE TABLE table_binary (id bigserial PRIMARY KEY, vec_bits vectors.bvector(3));

此外,表中还插入了一些数据行,如下所示:

INSERT INTO table_vector (vec_f32) VALUES ('[0.1, 0.1, 0.1]'), ('[0.2, 0.2, 0.2]');
INSERT INTO table_float16 (vec_f16) VALUES ('[0.1, 0.1, 0.1]'), ('[-0.2, 0.2, 0.2]');
INSERT INTO table_binary (vec_bits) VALUES ('[0, 0, 0]'), ('[0, 0, 1]');

在大多数情况下,表上还会建有一个或多个向量索引:

CREATE INDEX index_vector ON table_vector USING vectors (vec_f32 vectors.vector_l2_ops) WITH (options = "[indexing.hnsw]");
-- CREATE INDEX index_float16 ON table_float16 USING vectors (vec_f16 vectors.vecf16_cos_ops) WITH (options = "[indexing.hnsw]");
-- CREATE INDEX index_binary ON table_binary USING vectors (vec_bits vectors.bvector_hamming_ops) WITH (options = "[indexing.hnsw]");

这是使用 PGVecto.rs 时的典型场景。如果满足以下条件,即可开始执行迁移:

  • 请注意,您的 pgvector 和 VectorChord 扩展不能安装在 vectors 模式(schema)下。这意味着您可以在同一个数据库中同时安装 pgvector 和 PGVecto.rs。

迁移步骤

1. 安装 VectorChord

请按照安装说明安装 VectorChord,并确保 PostgreSQL 已加载该扩展。

CREATE EXTENSION vchord CASCADE;
说明

上述命令会将 vectorchord 和 pgvector 安装在 public 模式下。如果您选择了其他模式,请在后续迁移命令中将 public 替换为您实际使用的模式名。

详情

此时,VectorChord 和 PGVecto.rs 这两个扩展已同时安装在 PostgreSQL 中,但位于不同的模式下。 若要验证这一点,请在 psql 中运行 \dx。您将看到已安装以下 3 个扩展:

  • 位于 vectors 模式下的 vectors(即 PGVecto.rs)
  • 位于 public 模式下的 vector(即 pgvector)
  • 位于 public 模式下的 vchord(即 VectorChord)
postgres=# \dx
                                                 List of installed extensions
  Name   | Version |   Schema   |                                         Description                                          
---------+---------+------------+----------------------------------------------------------------------------------------------
 plpgsql | 1.0     | pg_catalog | PL/pgSQL procedural language
 vchord  | 0.1.0   | public     | vchord: Vector database plugin for Postgres, written in Rust, specifically designed for LLM
 vector  | 0.8.0   | public     | vector data type and ivfflat and hnsw access methods
 vectors | 0.4.0   | vectors    | vectors: Vector database plugin for Postgres, written in Rust, specifically designed for LLM

2. 检查现有索引

对于在向量列上创建的索引,请先查询其定义并将其记录在安全的地方。 在后续恢复重建索引的阶段,您将需要用到这些信息。

postgres=# \di
                       List of relations
 Schema |        Name        | Type  |  Owner   |     Table     
--------+--------------------+-------+----------+---------------
 public | index_float16      | index | postgres | table_float16
 public | index_vector       | index | postgres | table_vector
 public | table_binary_pkey  | index | postgres | table_binary
 public | table_float16_pkey | index | postgres | table_float16
 public | table_vector_pkey  | index | postgres | table_vector

3. 迁移向量列

要从 PGVecto.rs 的向量列进行迁移,第一步是在不同扩展之间转换列的数据类型。

以下列出了 VectorChord 各向量类型的转换路径:

  • vector(PGVecto.rs) -> real[] -> vector(pgvector)
  • vecf16 -> vector(PGVecto.rs) -> real[] -> halfvec
  • bvector -> vector(PGVecto.rs) -> text[] -> real[] -> bit
  • svector -> text -> index++ -> text -> sparsevec

对于稀疏向量类型 svector,我们需要编写一个额外的辅助函数来完成类型转换,具体请参阅附录。

列类型迁移可通过单条命令完成,且无需消耗额外内存。 但是,您需要预先删除该向量列上的现有索引。

警告

此步骤会导致一定的停机时间,原因在于:

  • ALTER TABLE ALTER COLUMN 会持有较长时间的 ACCESS EXCLUSIVE 排他锁
-- 索引名称可在第 2 步中查得
DROP INDEX IF EXISTS index_vector;

-- 转换常规 vector 类型
ALTER TABLE table_vector ALTER COLUMN vec_f32 TYPE public.vector(3) USING vec_f32::real[]::public.vector;

-- 转换半精度 halfvec 类型
ALTER TABLE table_float16 ALTER COLUMN vec_f16 TYPE public.halfvec(3) USING vec_f16::vectors.vector::real[]::public.halfvec;

-- 转换二值 bit 类型
ALTER TABLE table_binary ALTER COLUMN vec_bits TYPE bit(3) USING array_to_string(vec_bits::vectors.vector::real[], '')::bit(3);

4. 重建索引

下一步是在转换后的 vector 列上使用 VectorChord 重新创建索引。

CREATE INDEX ON index_vector USING vchordrq (vec_f32 vector_l2_ops) WITH (options = $$
residual_quantization = true
[build.internal]
lists = [4096]
spherical_centroids = false
$$);

关于在 VectorChord 中创建索引的更多信息,请参阅构建索引。

5. 清理环境

如果不再需要 PGVecto.rs 扩展,现在您可以安全地将其移除:

DROP extension vectors;

附录:稀疏向量的类型转换

上文已经讨论了大多数向量类型,唯独还没有涉及稀疏向量(Sparse Vector)。它的转换比其他类型稍显复杂。假设我们有一张包含稀疏向量列的表:

CREATE TABLE table_sparse (id bigserial PRIMARY KEY, vec_sparse vectors.svector(3));
INSERT INTO table_sparse (vec_sparse) VALUES ('{0:-0.1, 1:0.1, 2:0.1}/3'), ('{0:-0.4, 1:-0.4, 2:-0.4}/3');

稀疏向量在 PGVecto.rs 和 pgvector 之间具有不同的文本表示格式:在 PGVecto.rs 中,维度下标从 0 开始;而在 pgvector 中,维度下标从 1 开始。

例如,一个典型的稀疏向量 [-1, 0, 1, 0, 2] 的文本表示分别为:

  • 在 PGVecto.rs 中:{0:-1, 2:1, 4:2}/5
  • 在 pgvector 中:{1:-1, 3:1, 5:2}/5

因此,我们需要创建一个辅助函数,通过处理字符串将下标整体加 1:

CREATE OR REPLACE FUNCTION migrate_sparse(input_text text) RETURNS text AS $$
DECLARE
    output_text text := '';
    cache_index_number text := '';
    number_started boolean := false;
BEGIN
    FOR i IN 1..length(input_text) LOOP
        IF substring(input_text from i for 1) = ':' THEN
            output_text := output_text || (cache_index_number::int + 1)::text || ':';
            number_started := false;
        ELSIF substring(input_text from i for 1) ~ '[,{]' THEN
            cache_index_number := '';
            number_started := true;
            output_text := output_text || substring(input_text from i for 1);
        ELSIF substring(input_text from i for 1) ~ '[0-9]' THEN
            IF number_started THEN
                cache_index_number := cache_index_number || substring(input_text from i for 1);
            ELSE
                output_text := output_text || substring(input_text from i for 1);
            END IF;
        ELSE
            output_text := output_text || substring(input_text from i for 1);
        END IF;
    END LOOP;
    RETURN output_text;
END;
$$ LANGUAGE plpgsql;

创建该函数后,即可顺利完成稀疏向量列的迁移:

ALTER TABLE table_sparse ALTER COLUMN vec_sparse TYPE public.sparsevec USING migrate_sparse(vec_sparse::text)::public.sparsevec;

2 - 可扩展性

结合 CloudNativePG 与 PgBouncer 构建高可用、可水平扩展的 PostgreSQL + VectorChord 分布式向量检索集群,轻松突破 10,000+ QPS。

背景

高每秒查询数(QPS)的向量检索对于推荐引擎、图像识别和自然语言处理等实时应用至关重要。这类应用要求快速、高效的检索能力以即时返回结果,这对于保持用户互动体验与业务运转效率尤为关键。通过利用 PostgreSQL 进行向量检索,您不仅能够受益于其成熟稳健的关系型数据库能力和高级索引机制,还能避免额外维护一套独立专用向量数据库的运维开销。这种统一的架构在满足现代应用高性能需求的同时,大幅简化了系统集成并降低了整体复杂度。

架构设计

在多节点集群上使用 VectorChord 比在单机上部署更具挑战性。与其他分布式服务类似,一套可靠的分布式向量检索系统通常需要满足以下核心要求:

  • 易用性(Usability):支持声明式配置管理

  • 弹性(Elasticity):能够根据 QPS 需求自动扩缩容节点

  • 负载均衡(Load Balancing):将查询请求高效地分发到不同的只读副本实例上处理

  • 高可用性(High Availability):维护数据库的多个副本,并在发生故障时自动从副本恢复

  • 持久性(Durability):提供安全、持久化的存储,确保数据完整性并防止故障时发生数据丢失

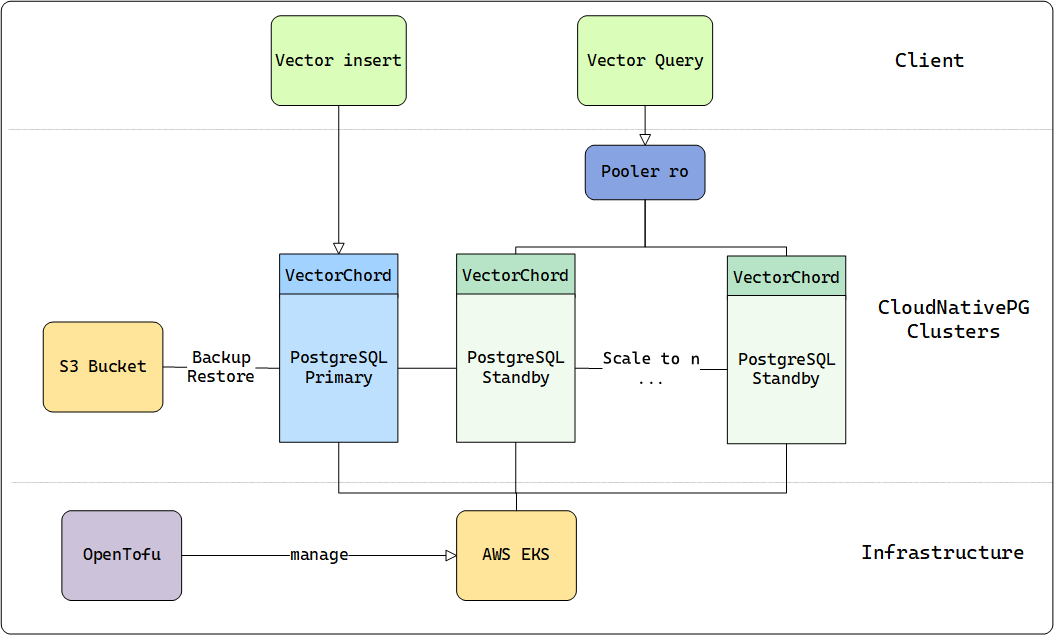
为此,我们在 AWS EKS 上结合使用 OpenTofu 和 CloudNativePG 来部署 VectorChord 服务,由它们统一管理提供上述能力的基础设施。构建示例集群的核心组件如下:

  • OpenTofu:Terraform 的开源替代方案,用于在 AWS EKS 上实现基础设施即代码(IaC)

  • CloudNativePG:基于主从(Primary/Standby)架构,管理高可用 PostgreSQL 数据库集群的全生命周期

  • PgBouncer:轻量级 PostgreSQL 连接池,由 CloudNativePG 的 Pooler 模块直接提供支持

Architecture

与 DiskANN 类似,VectorChord 能够充分利用磁盘资源,在内存不足时依然保持极具竞争力的检索性能。此外,VectorChord 也可以将索引缓存在内存中,以获得极致的高并发查询吞吐。

关于 VectorChord 的更多技术细节,请参阅我们此前的博文。

为了冲击极限 QPS,我们假设内存能够完全容纳数据集,并以此为标准选择对应的 AWS 机型。

在下表中,我们列出了针对不同规模数据集能够将数据完全缓存在内存中的推荐机型:

数据集 维度 / 规模 机型 / 内存
LAION-5m 768 / 5,000,000 r7i.xlarge / 32GB
LAION-100m 768 / 100,000,000 r7i.16xlarge / 512GB

测试结果

正如我们的调优文档所述,VectorChord 接受两个关键查询参数:nprob 和 epsilon。其中,nprob 定义了查询期间需要扫描的候选聚类中心(列表)数量,而 epsilon 则作为决定是否对候选结果进行重排序的阈值。这两个参数对 QPS 和**召回率(Recall)**都有着决定性影响,允许用户在检索速度与准确性之间进行精细权衡:

  • 降低 nprob 会带来更高的 QPS,但召回率会有所下降。

  • 降低 epsilon 会带来更高但波动更大的 QPS,同时召回率也会有所下降。

当固定这两个参数时,每次实验的检索精度将保持一致,但实际 QPS 仍会随底层硬件的 CPU 和 I/O 性能而变化。为了确保召回率始终保持在 0.9 以上,我们根据此前在小规模数据集上的实验经验配置了如下参数:

数据集 nprob / epsilon 召回率(Recall)
LAION-5m 20 / 1.0 0.9324
LAION-100m 20 / 1.0 0.9042

我们在同一个可用区内部署了一台 r7i.4xlarge 实例作为客户端,用于向 VectorChord 集群发起压测查询。测试使用了从 16 到 128 不等的并发工作线程数(Workers),以模拟真实生产场景下数据库通常承受的并发压力。这一设置使我们能够全面评估 VectorChord 在不同工作负载与并发条件下的表现。

提示

配备 16 个 vCPU 的 r7i.4xlarge 实例能够在并发请求高达 128 时有效避免客户端侧的 CPU 争用瓶颈。

遵循通用的 PgBouncer 最佳实践,我们部署了两种类型的实例:一个主实例(Primary)专门用于数据写入,以及多个只读副本实例(Replica)专门处理只读查询负载。PgBouncer 充当负载均衡器,将查询高效地分发至后端的各个副本实例。在基准测试期间,我们将查询端点指向 read-only (ro) 连接池,而 read-write (rw) 主实例在测试过程中保持空闲。这种读写分离架构确保了读密集型工作负载下的最优资源利用率与水平扩展能力。

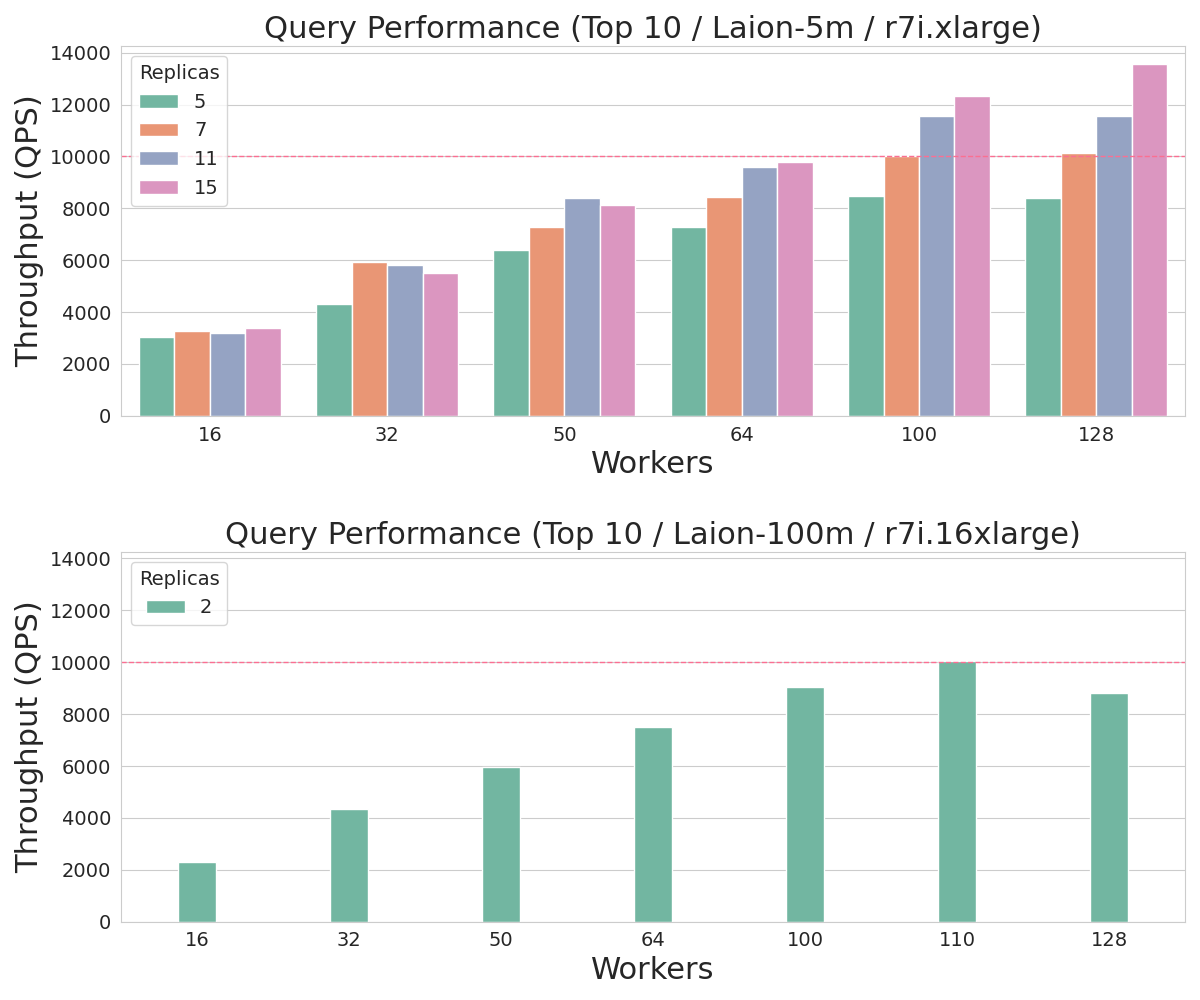
对于 500 万规模的数据集(LAION-5m),我们将副本实例数量从 5 台扩展到 15 台,成功突破了 10,000 QPS。相比之下,对于 1 亿规模的数据集(LAION-100m),仅需 2 台大规格实例便足以达到这一性能标准。下图展示了这些实验的结果,充分证明了 VectorChord 在不同数据集规模下的线性扩展能力与卓越效率。

Result

成本分析

综上所述,如果您需要在这两类数据集上实现 10,000+ QPS 的吞吐量,所需的最低硬件成本如下:

数据集 达到 10,000+ QPS 的最低硬件配置 vCPU 数量 预估月度成本
LAION-5m r7i.xlarge × 7 4 × 7 = 28 vcpu $0.2646 × 7 × 720 = $1334
LAION-100m r7i.16xlarge × 2 64 × 2 = 128 vcpu $4.2336 × 2 × 720 = $6096
提示

上述成本计算未包含主实例(Primary)的开销,因为主实例可以与其他 PostgreSQL 连接池共享复用,从而进一步优化资源配置并降低整体开支。

无论是在公有云还是私有数据中心,本次实验都为您规划和扩展自己的集群以达到理想的 VectorChord 检索性能提供了可靠参考。即使在将性能置于首位的严苛场景下,VectorChord 依然展现出了极具竞争力的价格优势,是高性能向量检索需求的高性价比之选。

总结

无论您是在高性价比的 VPS 上启动初创项目,还是为追求极致性能而扩展大规模集群,VectorChord 都能为您打开无限可能。虽然本文重点探讨了 10,000 QPS 的架构实践,但这远非 VectorChord 的性能上限。

凭借强大的索引算法,VectorChord 不仅通过高效利用内存与高速 SSD 超越了 pgvector 等标准 PostgreSQL 方案,还在处理海量数据规模与高并发 QPS 需求时胜过了众多专用向量数据库。在同等成本下,它既能提供更卓越的性能,又彻底消除了维护独立向量检索系统的架构复杂度。

如果您渴望探索大规模向量检索解决方案,欢迎加入我们的 Discord 社区或发送邮件至 [email protected] 与我们联系。让我们携手释放您数据的全部潜能!

3 - Kubernetes

使用 CloudNative-PG 在 Kubernetes 中部署内置 VectorChord 扩展或挂载轻量级扩展镜像卷的 PostgreSQL 集群教程。

如果您希望在运行于 Kubernetes 上的 PostgreSQL 中使用 vectorchord,本教程将为您提供完整的操作指引。在本教程中,我们将使用 CloudNative-PG 在 Kubernetes 中部署 PostgreSQL 集群。

环境要求

组件名称 版本要求
helm >= 2.4.1
kubectl >= 1.14
Kubernetes >= 1.24.0
Kubernetes(使用镜像卷扩展 Image Volume Extensions) >= 1.31.0

安装 CloudNative-PG

我们使用 CloudNative-PG (cnpg) 在 Kubernetes 中部署 PostgreSQL 集群。您可以通过 Helm 安装它:

$ sudo helm repo add cnpg https://cloudnative-pg.github.io/charts
$ sudo helm upgrade --install cnpg   --namespace cnpg-system   --create-namespace   cnpg/cloudnative-pg
$ helm list --all-namespaces
NAME                    NAMESPACE       REVISION        UPDATED                                 STATUS          CHART                         APP VERSION
cnpg                    cnpg-system     1               2024-12-30 16:37:55.9520917 +0800 CST   deployed        cloudnative-pg-0.23.0               1.25.0   
$ kubectl get pod -n cnpg-system   
NAME                                   READY   STATUS    RESTARTS   AGE
cnpg-cloudnative-pg-54f97dbcdf-jm97n   1/1     Running   0          1m

内置 vectorchord 的 PostgreSQL 镜像

在官方镜像仓库中,我们已经提供了预装 vectorchord 的 Docker 镜像,您可以在 ghcr.io/tensorchord/cloudnative-vectorchord 中找到它。如果您希望构建自己的自定义镜像,可以参考以下 Dockerfile:

ARG CNPG_TAG

FROM ghcr.io/cloudnative-pg/postgresql:$CNPG_TAG-bookworm

ARG CNPG_TAG
ARG VECTORCHORD_TAG
ARG TARGETARCH

# 切换为 root 用户以安装软件包
USER root
ADD https://github.com/tensorchord/VectorChord/releases/download/$VECTORCHORD_TAG/postgresql-${CNPG_TAG%.*}-vchord_${VECTORCHORD_TAG#"v"}-1_$TARGETARCH.deb /tmp/vchord.deb
RUN apt-get install -y /tmp/vchord.deb && rm -f /tmp/vchord.deb

USER postgres

创建 PostgreSQL 集群

我们提供了一份用于在 Kubernetes 中创建 PostgreSQL 集群的示例 YAML 文件,您可以根据实际需求进行修改。请重点注意以下配置项:

  • 设置 shared_preload_libraries 以加载 vchord 共享库。
  • 执行 CREATE EXTENSION IF NOT EXISTS vchord CASCADE; 以创建 vchord 扩展。
apiVersion: v1
kind: Secret
metadata:
  name: tensorchord
type: kubernetes.io/basic-auth
data:
  password: dGVuc29yY2hvcmQ= # tensorchord
  username: dGVuc29yY2hvcmQ= # tensorchord
---
apiVersion: postgresql.cnpg.io/v1
kind: Cluster
metadata:
  name: vchord
spec:
  instances: 1
  bootstrap:
    initdb:
      database: tensorchord
      postInitApplicationSQL:
        - CREATE EXTENSION IF NOT EXISTS vchord CASCADE;
      owner: tensorchord
      secret:
        name: tensorchord
      dataChecksums: true
      encoding: 'UTF8'
  storage:
    size: 1Gi
  imageName: ghcr.io/tensorchord/cloudnative-vectorchord:17
  postgresql:
    shared_preload_libraries: # 加载 vchord 共享库
    - "vchord"

您可以安装 cnpg 的 kubectl 插件来管理您的 PostgreSQL 集群。现在,我们可以检查集群的运行状态:

$ sudo kubectl get pod
vchord-1                                                 1/1     Running     0             42s

$ kubectl cnpg status vchord
Cluster Summary
Name:                vchord
Namespace:           default
System ID:           7527554386501582867
PostgreSQL Image:    ghcr.io/tensorchord/cloudnative-vectorchord:17
Primary instance:    vchord-1
Primary start time:  2025-07-16 05:55:51 +0000 UTC (uptime 53s)
Status:              Cluster in healthy state
Instances:           1
Ready instances:     1
Current Write LSN:   0/204FB50 (Timeline: 1 - WAL File: 000000010000000000000002)

Certificates Status
Certificate Name    Expiration Date                Days Left Until Expiration
----------------    ---------------                --------------------------
vchord-ca           2025-10-14 05:50:08 +0000 UTC  90.00
vchord-replication  2025-10-14 05:50:08 +0000 UTC  90.00
vchord-server       2025-10-14 05:50:08 +0000 UTC  90.00

Continuous Backup status
Not configured

Physical backups
No running physical backups found

Streaming Replication status
Not configured

Unmanaged Replication Slot Status
No unmanaged replication slots found

Managed roles status
No roles managed

Tablespaces status
No managed tablespaces

Instances status
Name      Database Size  Current LSN  Replication role  Status  QoS         Manager Version  Node
----      -------------  -----------  ----------------  ------  ---         ---------------  ----
vchord-1                 0/204FB50    Primary           OK      BestEffort  1.25.0           ip-10-0-2-29.ec2.internal

注意:本文仅提供最简配置示例,未包含逻辑复制、流式复制以及备份与恢复等高级配置。我们将在后续文章中专门介绍这些内容。您也可以参考 CloudNative-PG 官方文档了解更多关于 Cluster 资源的配置选项。

连接到 PostgreSQL 集群

您可以使用 kubectl port-forward 转发端口并连接到 PostgreSQL 集群:

$ kubectl port-forward services/vchord-rw 5432:5432
$ psql -h 127.0.0.1 -d tensorchord -U tensorchord
tensorchord=> \dx
                                                 List of installed extensions
  Name   | Version |   Schema   |                                         Description                                         
---------+---------+------------+---------------------------------------------------------------------------------------------
 plpgsql | 1.0     | pg_catalog | PL/pgSQL procedural language
 vchord  | 1.1.1   | public     | vchord: Vector database plugin for Postgres, written in Rust, specifically designed for LLM
 vector  | 0.8.1   | public     | vector data type and ivfflat and hnsw access methods
(3 rows)
可以看到 vchord 扩展已成功安装。现在您无需额外安装步骤,即可直接按照快速开始体验各项功能。

轻量级扩展镜像

在 Kubernetes 上运行 PostgreSQL 时,扩展管理往往是最大的挑战之一。如果您想向上述一体式镜像中添加一个新扩展,通常必须重新构建镜像、备份 PostgreSQL 集群、应用包含新扩展的镜像,然后再恢复集群。这一繁琐流程源于 Kubernetes 中不可变容器(Immutable Containers)的设计理念。

得益于 Andrew Dunstan 和 Matheus Alcantara 的贡献,一项针对 PostgreSQL 18 的提案引入了一个新的配置选项(GUC)extension_control_path,允许用户为扩展控制文件指定额外的搜索目录。

与此同时,在 Kubernetes 侧,ImageVolume 特性允许我们将容器镜像作为只读且不可变的卷直接挂载到运行中的 Pod 内部。这使得打包为独立 OCI 兼容容器镜像的 PostgreSQL 扩展,能够直接挂载到 CloudNativePG 集群内的指定目录中。

基于这两项特性,我们构建了轻量级的 vectorchord 扩展镜像 vchord-scratch。

提示

如果您希望使用镜像卷扩展(Image Volume Extensions),需要满足以下要求:

  • 使用 Kubernetes 1.31.0 或更高版本(推荐使用 1.33.0),并确保已启用 ImageVolume 特性门控(Feature Gate)。
  • 使用 CloudNative-PG Helm Chart 0.26.0 或更高版本。

使用镜像卷扩展创建 PostgreSQL 集群

您可以使用以下示例 YAML 文件创建一个挂载 vectorchord 扩展镜像的 PostgreSQL 集群,并根据实际需求进行修改。请重点注意以下配置项:

  • 设置 shared_preload_libraries 以加载 vchord 共享库。
  • 执行 CREATE EXTENSION IF NOT EXISTS vchord CASCADE; 以创建 vchord 扩展。
  • 设置 extensions 字段以指定 vchord-scratch 扩展镜像。
  • 设置 extension_control_path 和 dynamic_library_path,以指定扩展控制文件和共享库文件在镜像内的路径。
apiVersion: v1
kind: Secret
metadata:
  name: tensorchord
type: kubernetes.io/basic-auth
data:
  password: dGVuc29yY2hvcmQ= # tensorchord 
  username: dGVuc29yY2hvcmQ= # tensorchord
---
apiVersion: postgresql.cnpg.io/v1
kind: Cluster
metadata:
  name: vchord 
spec:
  instances: 1 
  imageName: ghcr.io/cloudnative-pg/postgresql:18-system-bookworm
  bootstrap:
    initdb:
      database: tensorchord
      postInitApplicationSQL:
        - CREATE EXTENSION IF NOT EXISTS vchord CASCADE;
      owner: tensorchord
      secret:
        name: tensorchord
      dataChecksums: true
      encoding: 'UTF8'
  storage:
    size: 1Gi
  postgresql:
    extensions:
      - name: vchord
        image:
          reference: ghcr.io/tensorchord/vchord-scratch:pg18-v1.1.1
        dynamic_library_path:
          - /usr/lib/postgresql/18/lib/
        extension_control_path:
          - /usr/share/postgresql/18/
    shared_preload_libraries:
    - "vchord"

接下来,我们可以验证扩展是否已成功安装:

$ kubectl port-forward services/vchord-rw 5432:5432
$ psql -h
$ psql -h 0.0.0.0 -U tensorchord -d tensorchord
Password for user tensorchord: 
psql (13.3 (Ubuntu 13.3-1.pgdg16.04+1), server 18.0 (Debian 18.0-1.pgdg12+3))
WARNING: psql major version 13, server major version 18.
         Some psql features might not work.
SSL connection (protocol: TLSv1.3, cipher: TLS_AES_256_GCM_SHA384, bits: 256, compression: off)
Type "help" for help.

tensorchord=> \dx
                                                 List of installed extensions
  Name   | Version |   Schema   |                                         Description                                         
---------+---------+------------+---------------------------------------------------------------------------------------------
 plpgsql | 1.0     | pg_catalog | PL/pgSQL procedural language
 vchord  | 1.1.1   | public     | vchord: Vector database plugin for Postgres, written in Rust, specifically designed for LLM
 vector  | 0.8.1   | public     | vector data type and ivfflat and hnsw access methods
(3 rows)
警告

镜像 ghcr.io/cloudnative-pg/postgresql:18-system-bookworm 默认已内置了 vchord 所需的 pgvector 扩展。不过,未来的版本中该基础镜像可能会移除内置的 pgvector(但短期内我们尚未看到这一趋势)。