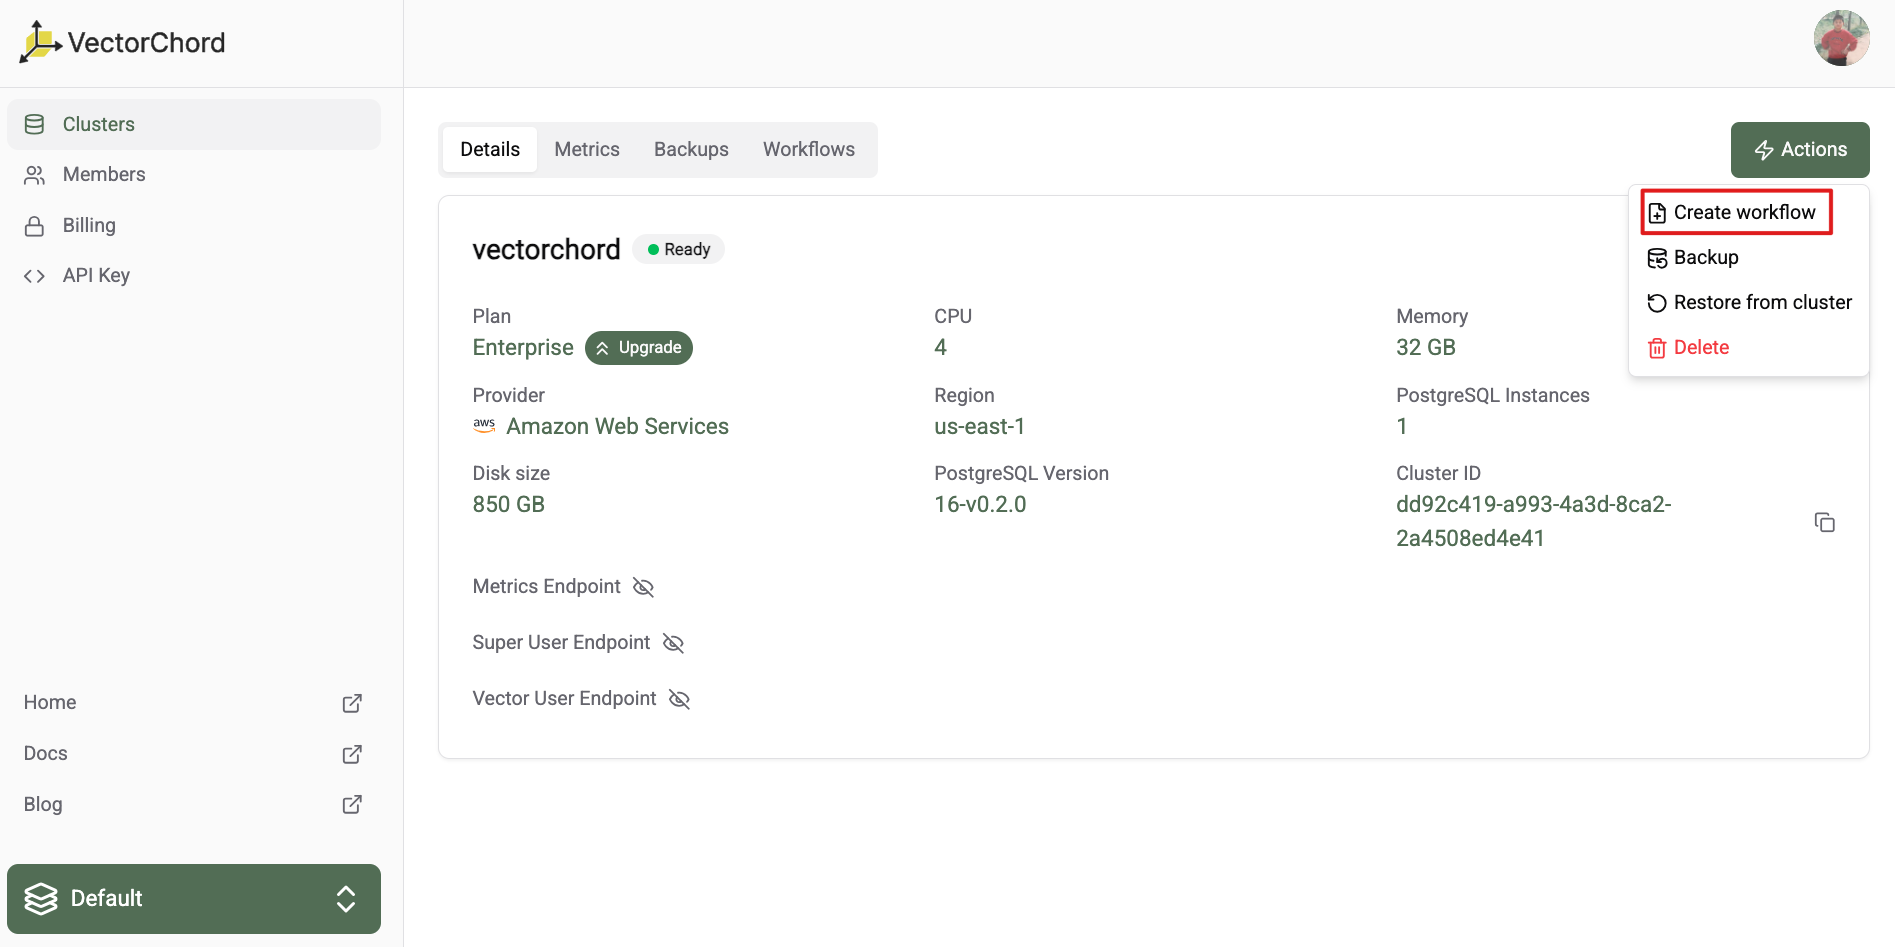
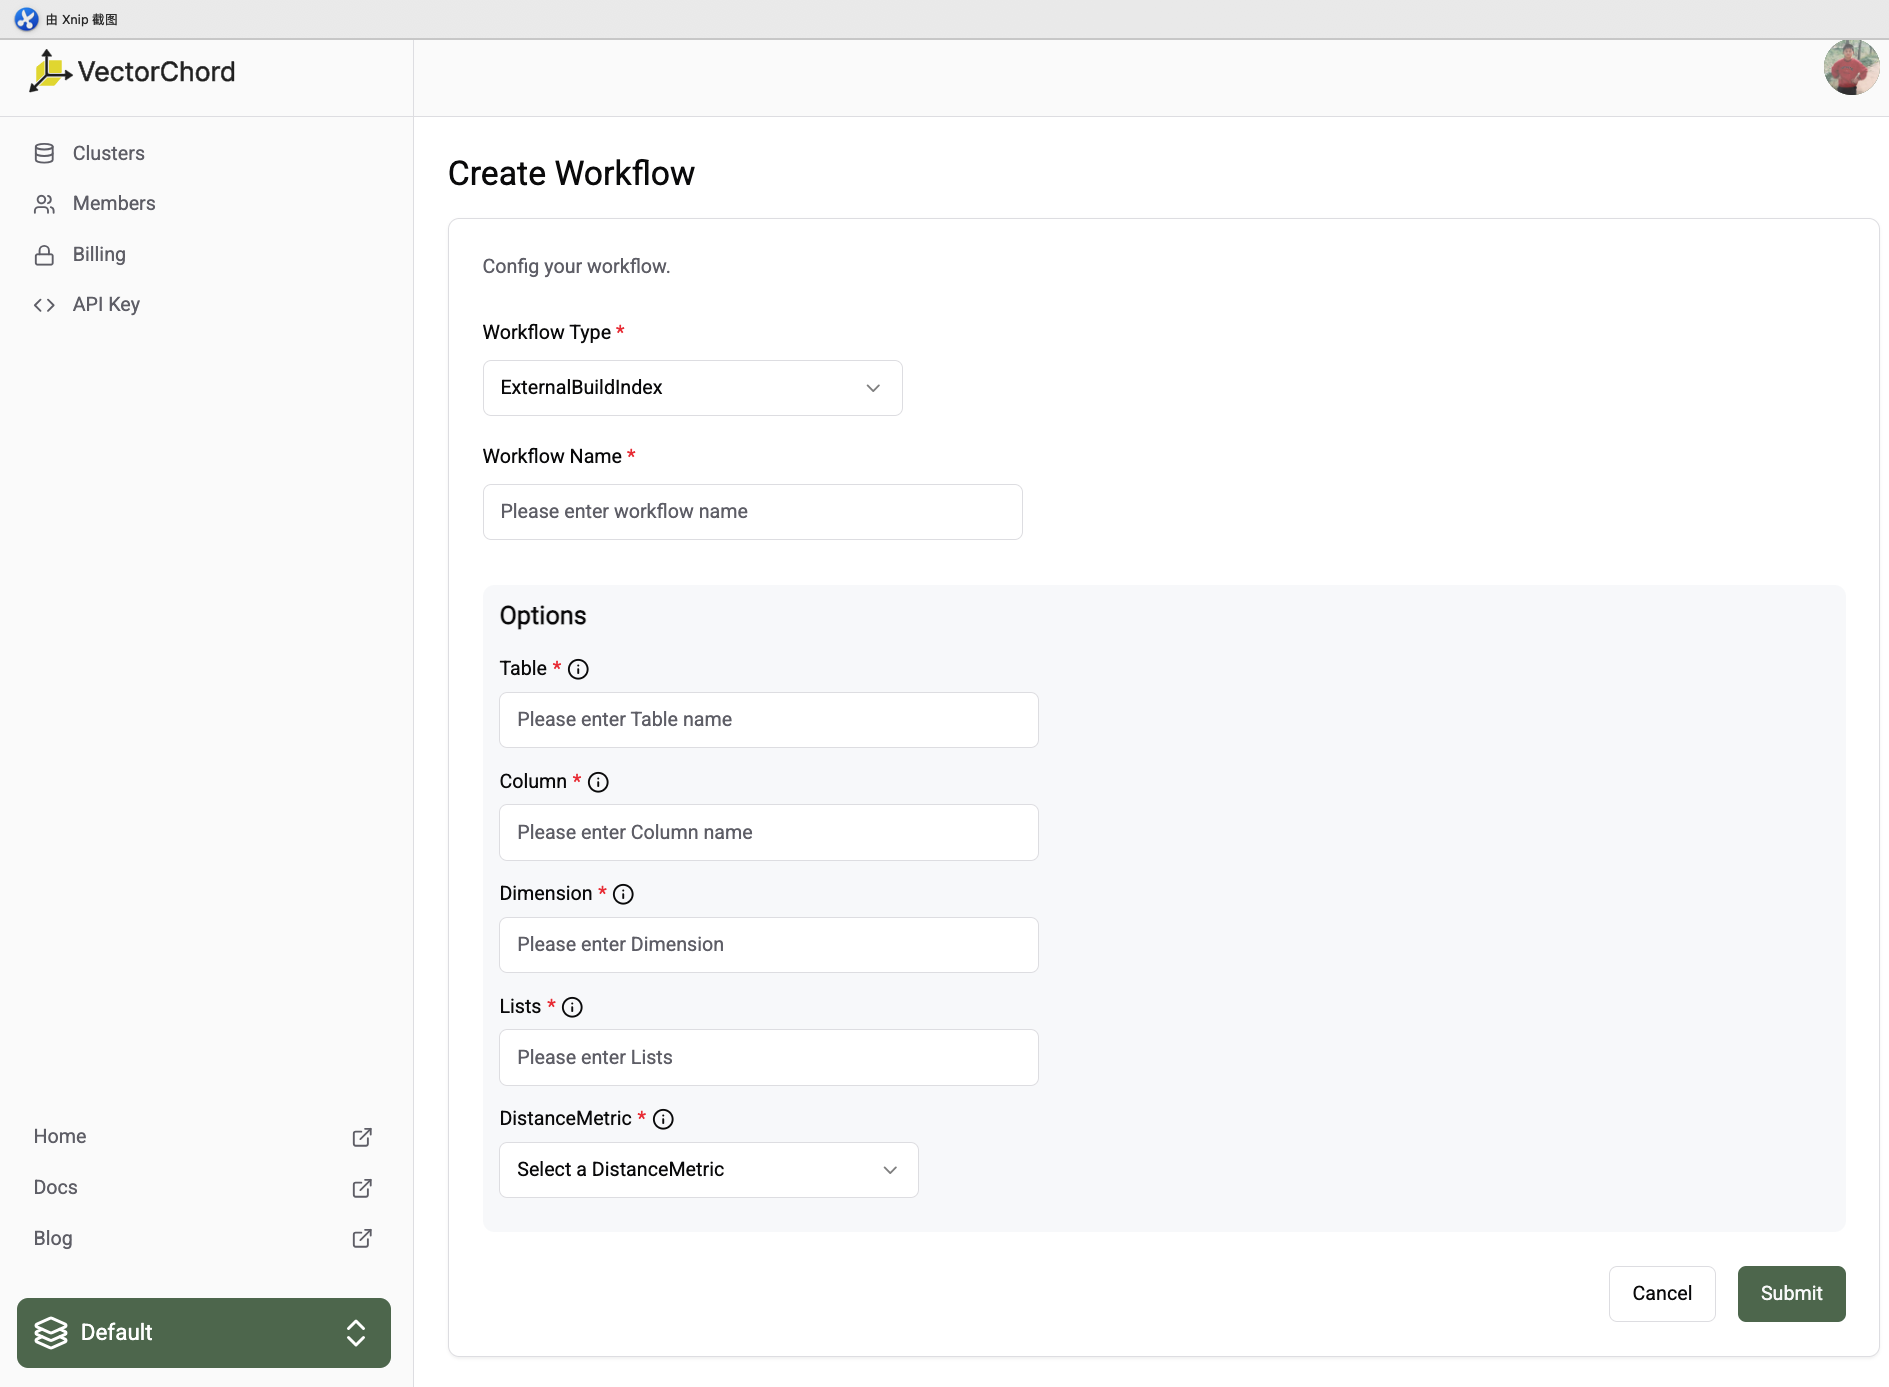
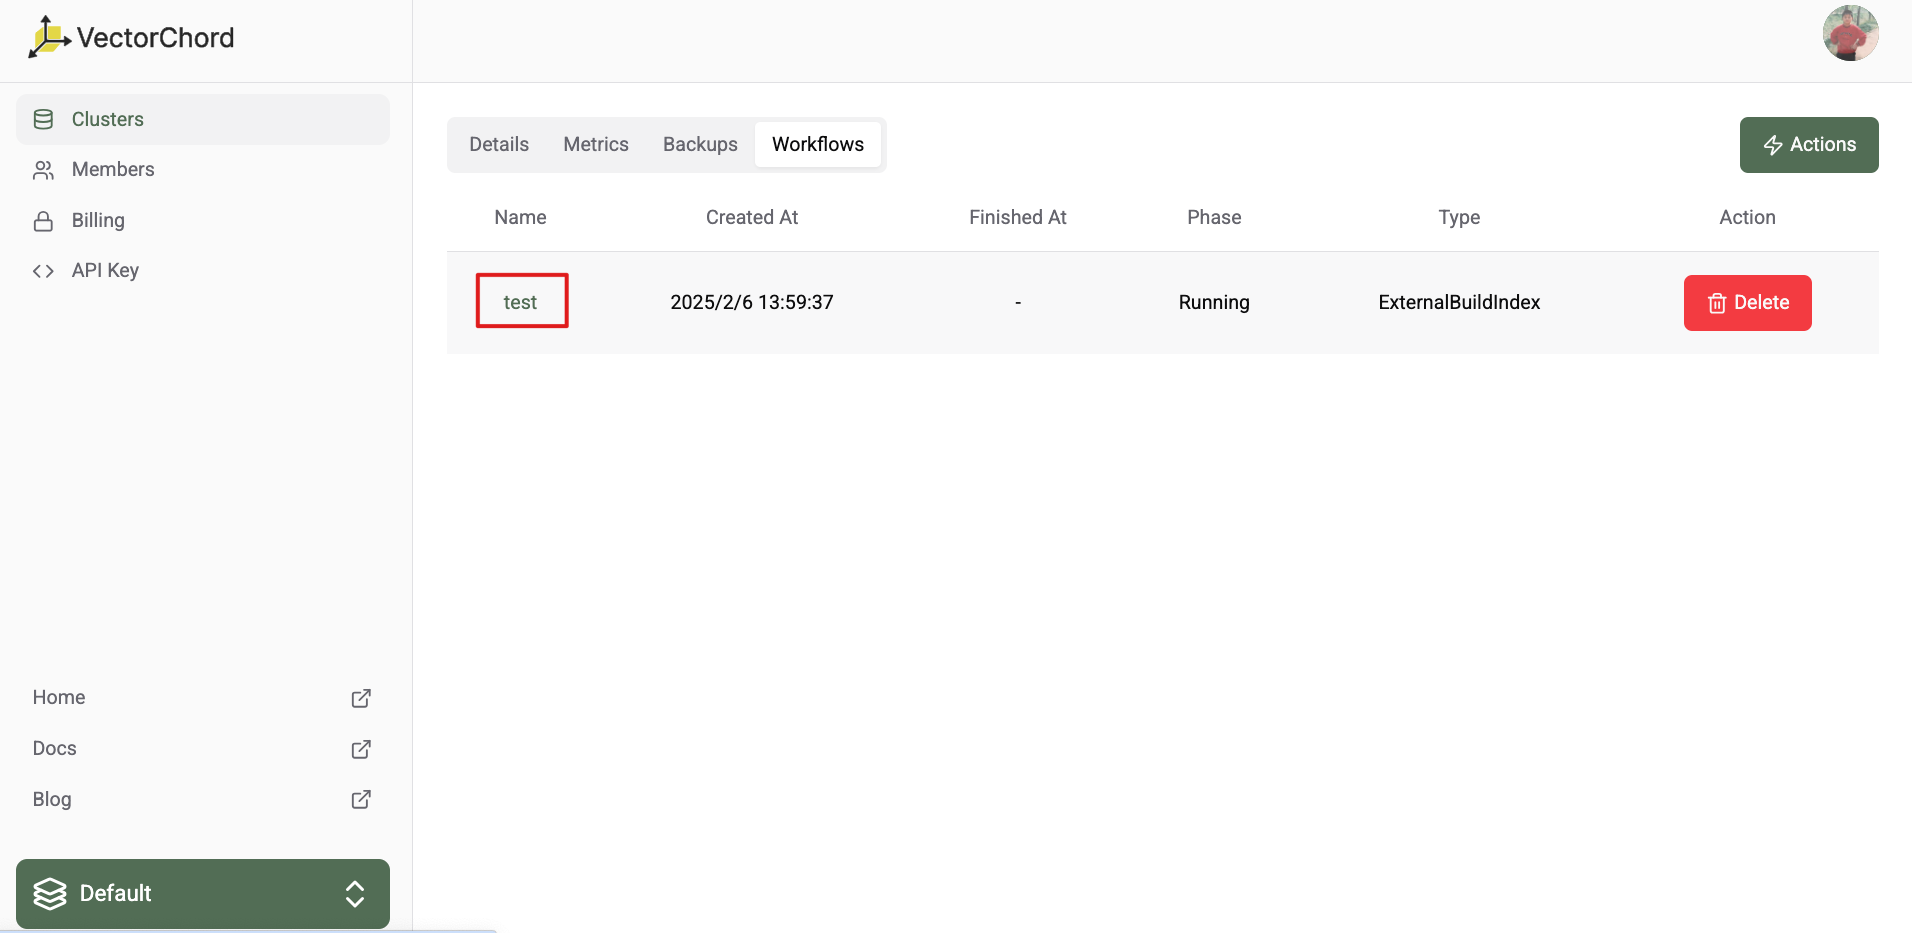
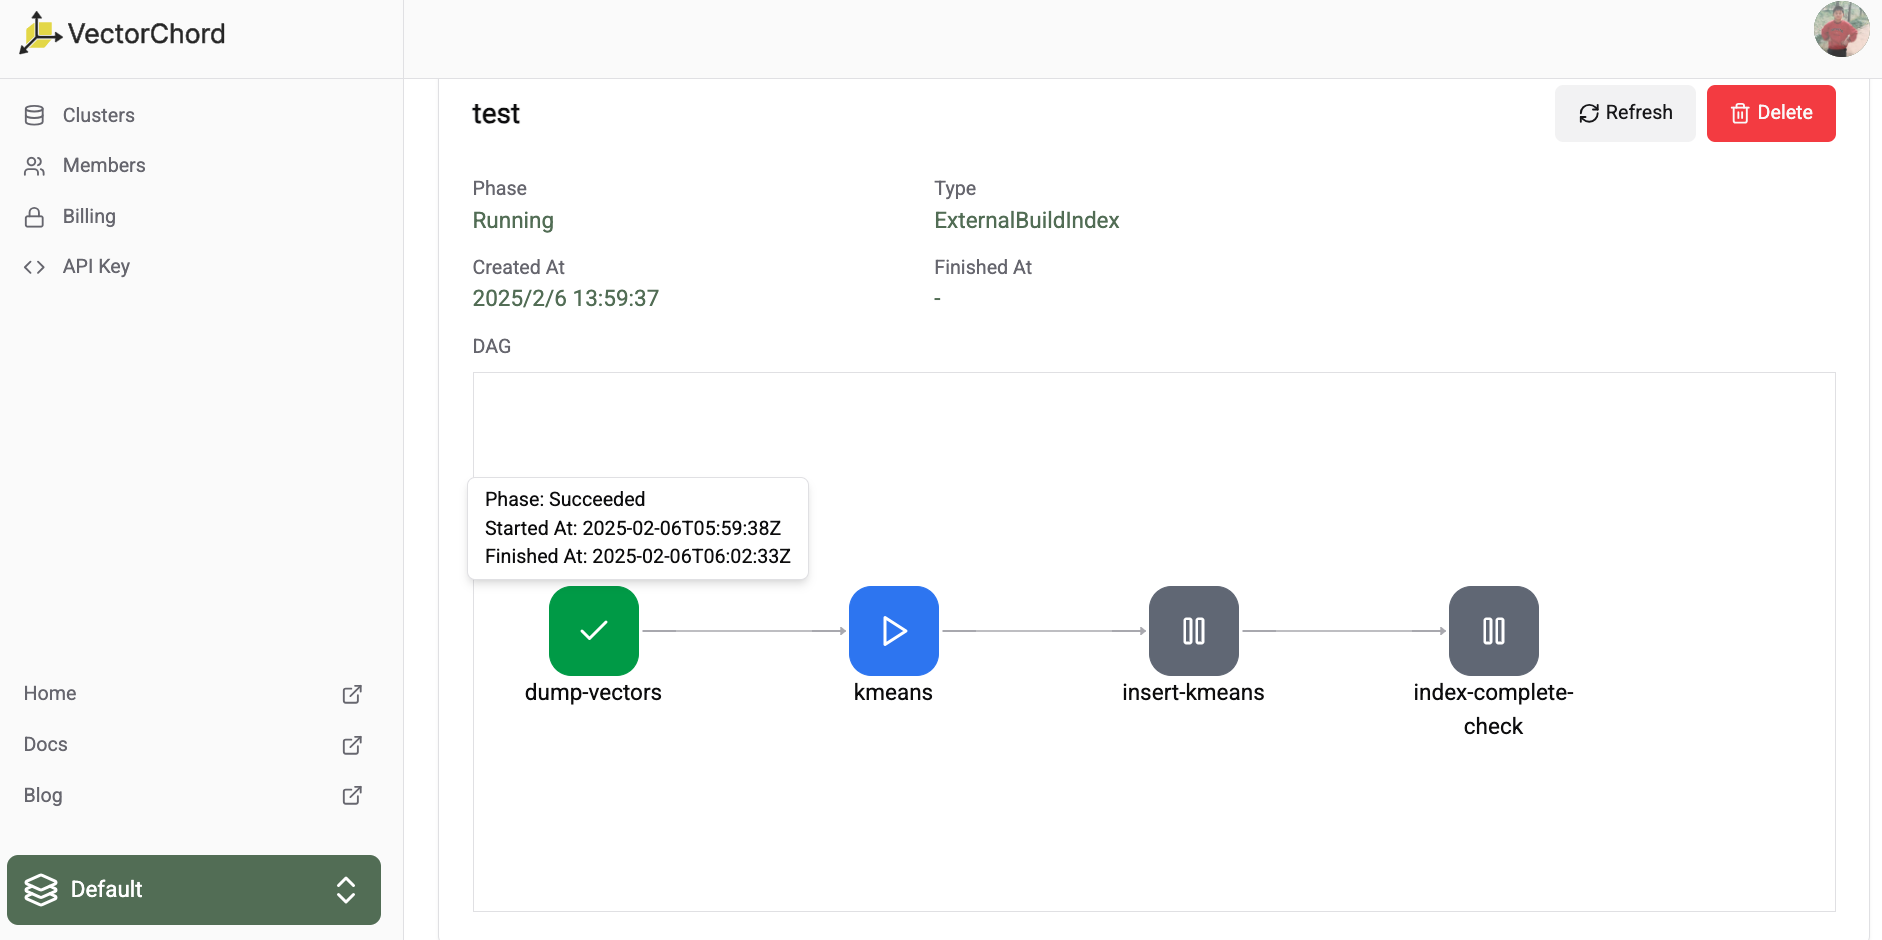
This guide will help you get started with VectorChord Cloud. First, you need to sign up for a VectorChord Cloud account. If you haven’t done so already, you can
This guide will help you get started with VectorChord Cloud. First, you need to sign up for a VectorChord Cloud account. If you haven’t done so already, you can sign up for a free account here.
Create a cluster
Tip
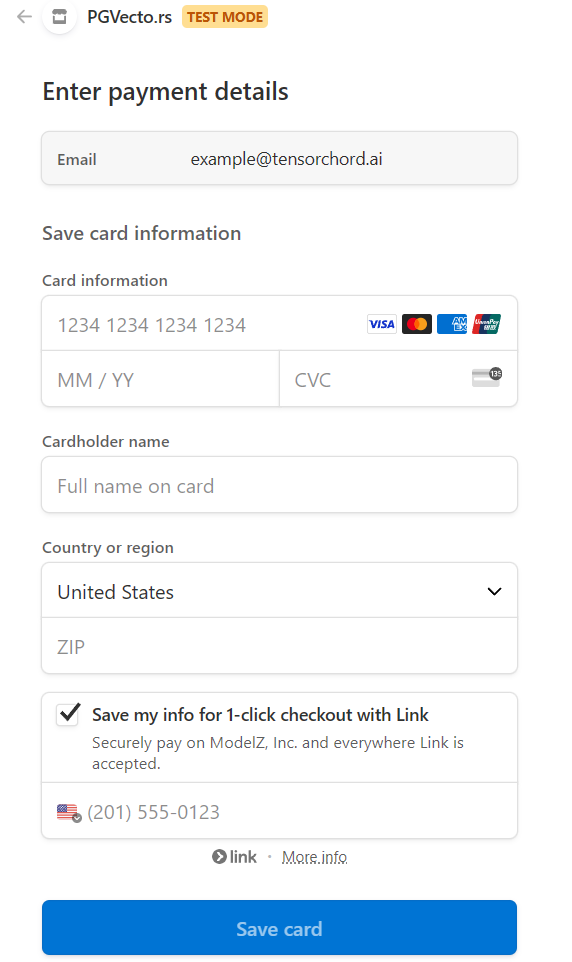
You can only create Enterprise plan after you bind a credit card.
To create a new cluster, navigate to the VectorChord Cloud Console and click on the “Create Cluster” button.
You need to specify the following information:
Required:
Plan: The plan you want to use for your cluster, for information about Cloud’s paid plan options, see Cloud plans.
Cluster Name: A unique name for your cluster.
Extension Settings:
Extension: We support two Vector Search extensions, pgvectors and its successor vectorchord
vectorchord: Scalable, Fast, and Disk-friendly Vector search in Postgres
pgvectors: Scalable, Low-latency and Hybrid-enabled Vector Search in Postgres. Revolutionize Vector Search, not Database.
Warning
The vectorchord only support server resource with NVMe SSD.
Image:
VectorChord, we provide a tag in a semantic version format, for example 16-v0.1.0:
16 indicates the version number of Postgres major
v0.1.0 indicates VectorChord version number
pgvecto.rs, we provide a tag in a semantic version format, for example 16-v0.4.0-vectors-exts:
16 indicates the version number of Postgres major
v0.4.0 indicates pgvecto.rs version number
vectors indicates the installation location of pgvecto.rs scheme, optional vectors,extensions, public. Please choose public if you want to use VectorChord Cloud on AWS RDS. If you’re going to use fdw on Supabase, please choose extensions.
exts indicates the cluster can install extensions from https://pgt.dev/.
Cloud Provider Settings:
Cloud Provider: The cloud provider where your cluster will be deployed, currently only AWS is supported.
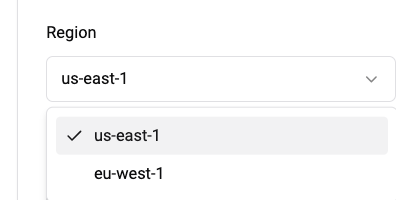
Region: The region where your cluster will be deployed.
Resource Settings:
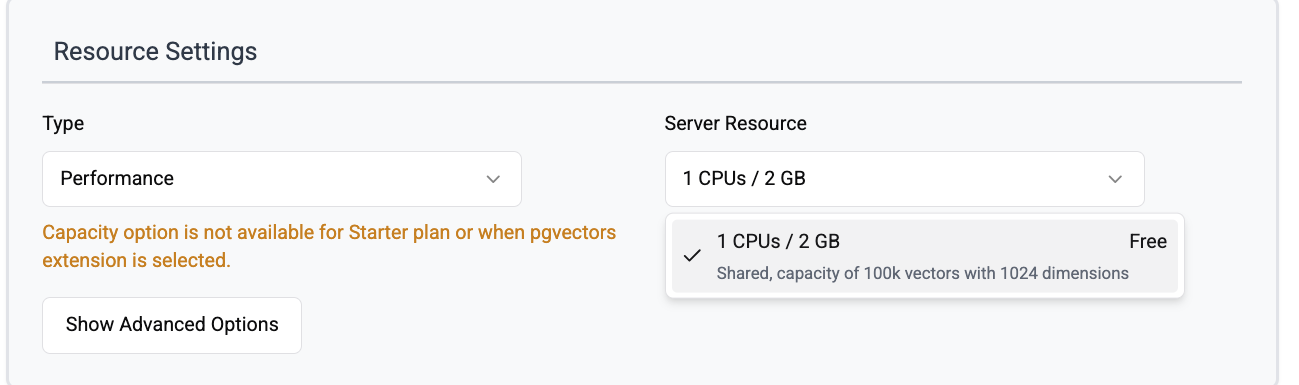
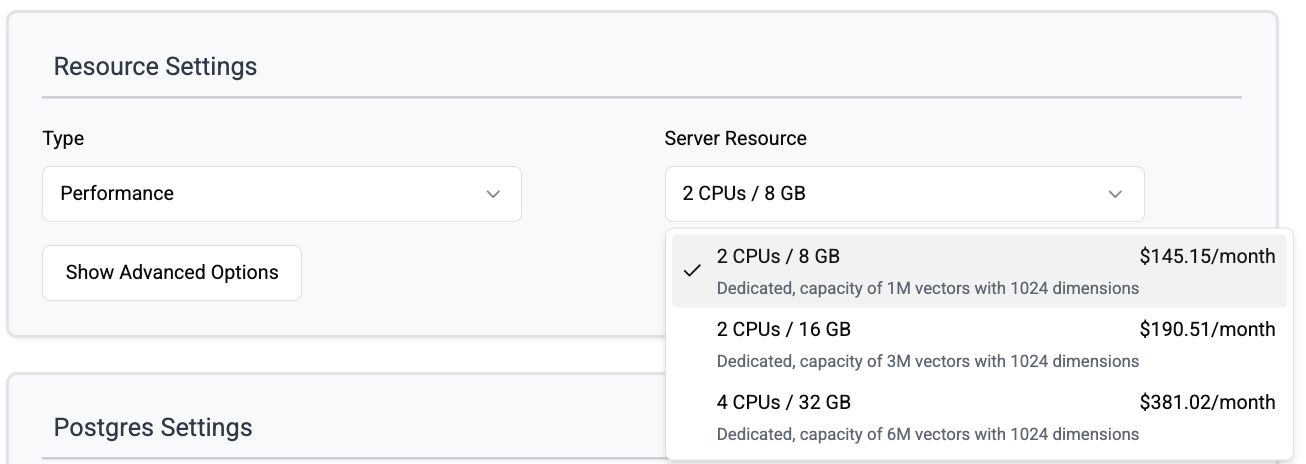
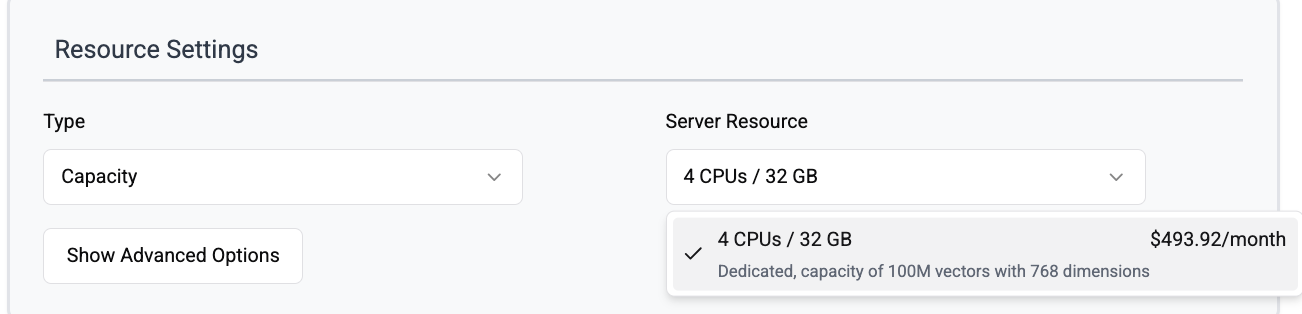
Type: We provide two types of resources, Performance and Capacity.
Server Resource:
Performance:
1C/2G: Free tier, 1 core CPU, 2GB memory and 3Gi disk space.
2C/8G: Enterprise tier, 2 core CPU, 8GB memory and 15Gi disk space.
2C/16G: Enterprise tier, 2 core CPU, 16GB memory and 15Gi disk space.
4C/32G: Enterprise tier, 4 core CPU, 32GB memory and 90Gi disk space.
Capacity:
4C/32G NVMe SSD: Enterprise tier, 4 core CPU, 32GB memory and 850Gi NVMe SSD disk space.
Postgres Settings:
Database Name: The name of the database that you will store vector data in.
Enable Connection Pooler: (default: false): Enable the connection pooler for your cluster.
Enable Restore Config: (default: false): Enable the restore config for your backup created in other clusters.
Optional:
Disk Size: Postgres PGData disk size, will change the default disk size.
Instances: The number of instances in the cluster. The default is 1.
Warning
Currently, vector index not support streaming replication.
Cluster Info
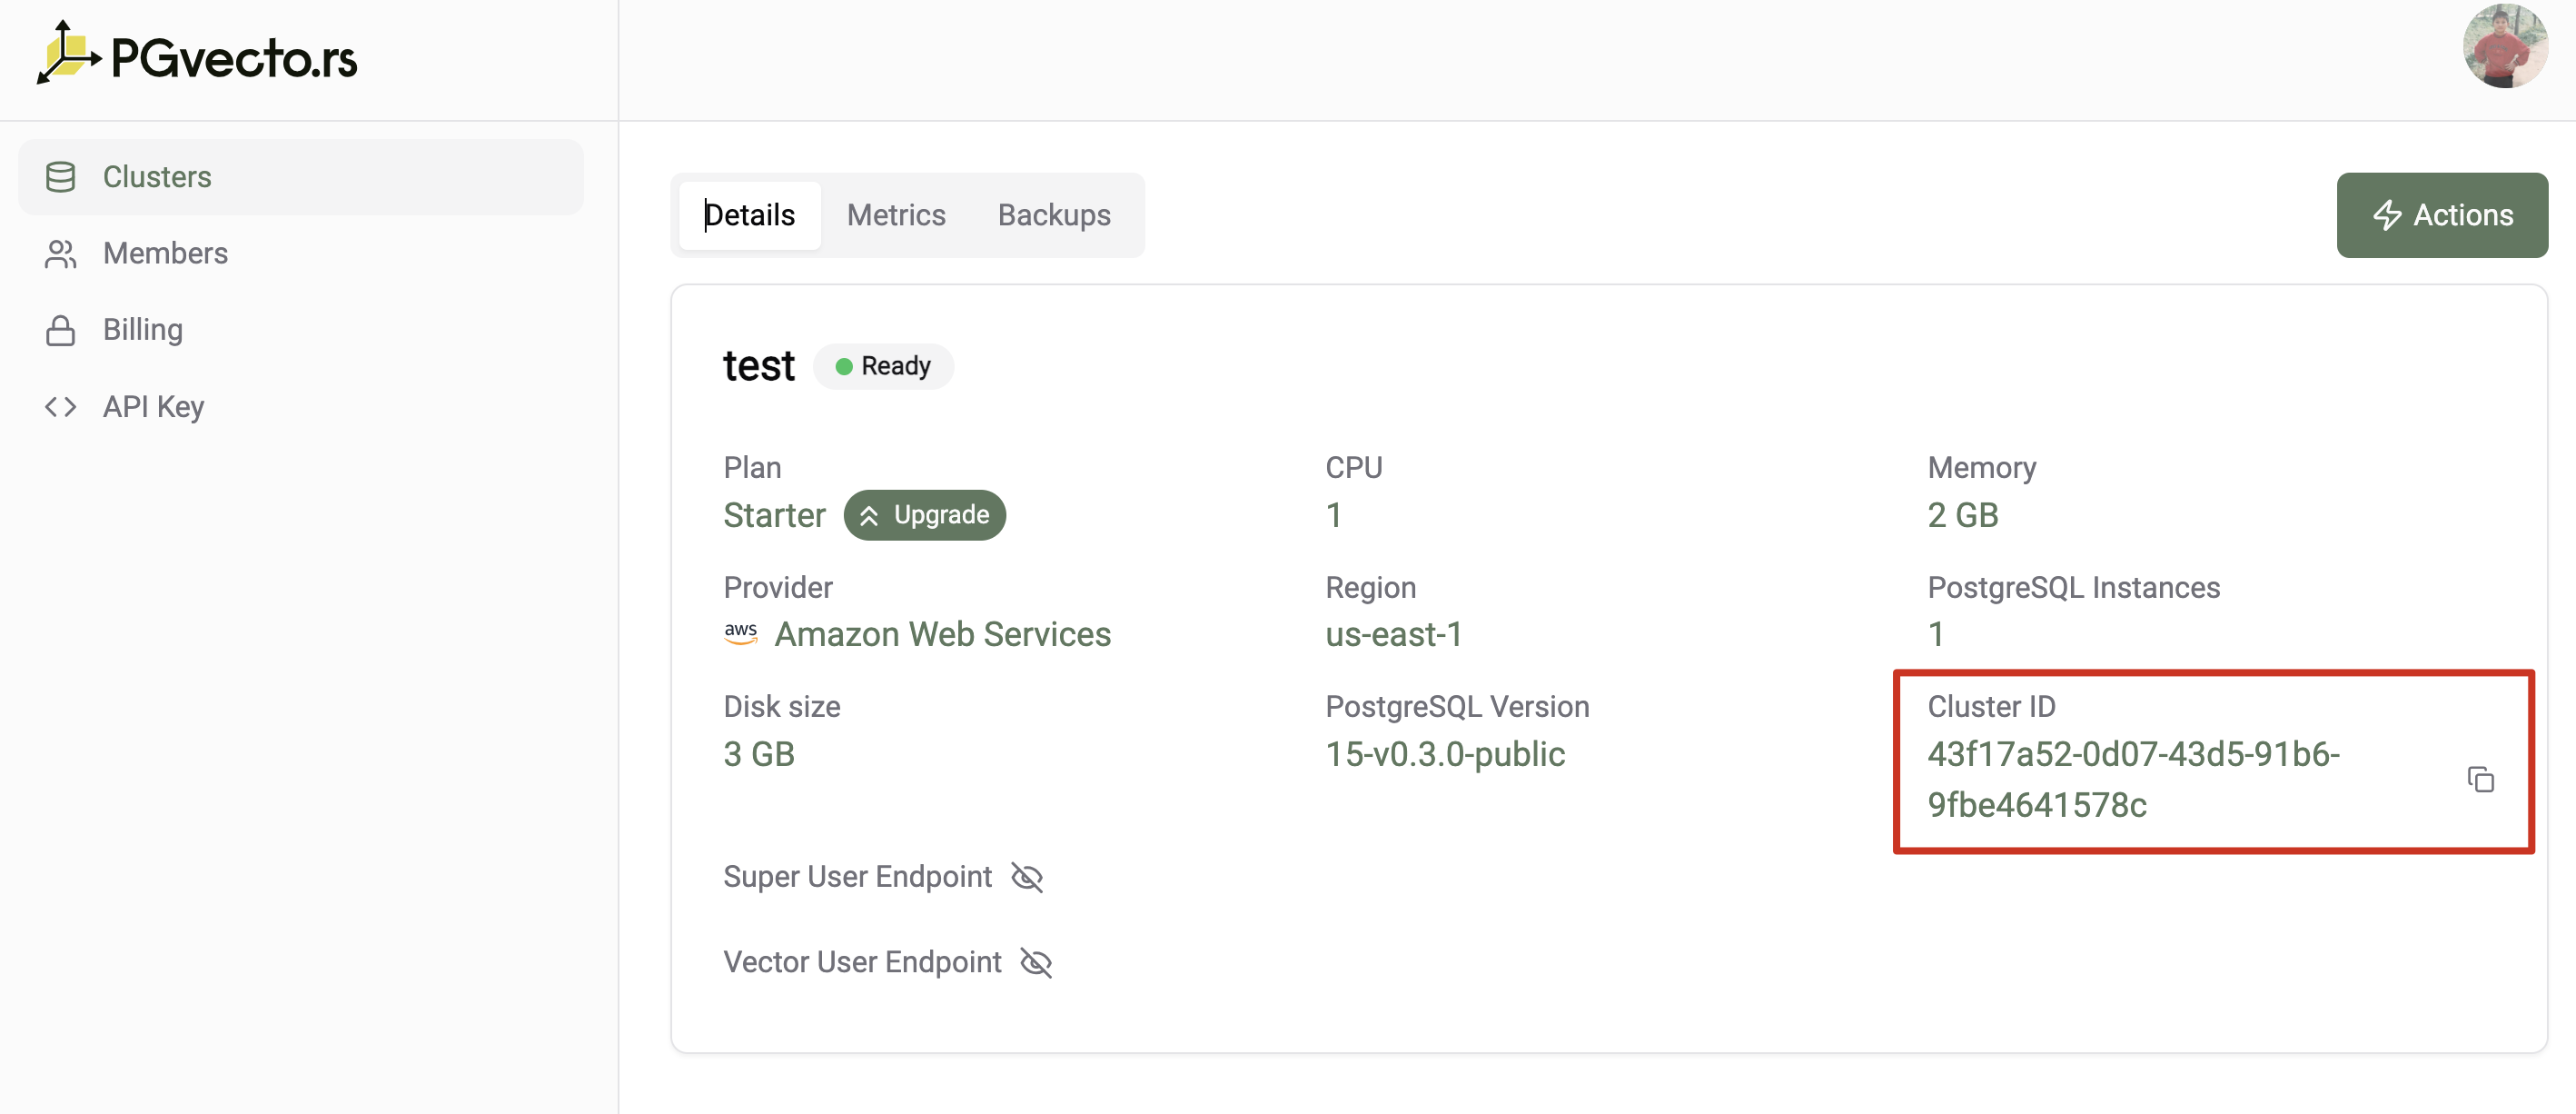
After creating a cluster, you will be directed to the cluster info page. Here you can find the details of your cluster, such as the connection string, the status of the cluster, and resource usage of the cluster.
We provide two types of connection endpoints, Super User Endpoint and Vector User Endpoint respectively. For more information about the two types of connections, see Connecting with psql.
If Enable Connection Pooler is selected when create cluster, you can get the pooler connection endpoint via clicking the Show Pooler Endpoint button.
Connect to the cluster
To connect to the cluster, you can use the provided connection strings. You can connect to the cluster using the psql command-line tool. For detailed instructions on how to connect to the cluster, see Connect to VectorChord Cloud with psql. After connecting to the cluster, we can execute the following SQL query \dx to validate you have successfully installed the vectors extension.
$ psql 'postgres://test_user:vaBgs6CcrtMu@test-f5ys31pvbca4x6f9.us-east-1-dev.aws.vectorchord.com:5432/test?sslmode=require'psql (15.3, server 16.5)WARNING: psql major version 15, server major version 16.
Some psql features might not work.
SSL connection (protocol: TLSv1.3, cipher: TLS_AES_256_GCM_SHA384, compression: off)Type "help"for help.
test=> \dx
List of installed extensions
Name | Version | Schema | Description
---------+---------+------------+----------------------------------------------------------------------------------------------
pgaudit | 16.0 | public | provides auditing functionality
plpgsql | 1.0 | pg_catalog | PL/pgSQL procedural language
vectors | 0.4.0 | vectors | vectors: Vector database plugin for Postgres, written in Rust, specifically designed for LLM
(3 rows)
Create Index
In quick start, we will create a simple index. If you want to create a more advanced index, see Reference. We provide rich user cases, see Use Cases.
You can view the cpu utilization, memory usage and PGData disk total and usage of your cluster in the metrics page. And you can also view the index info for example the number of vectors in the index, the dimension of the vectors etc. For detailed information about monitoring, see Monitoring.
2 - Connecting to the Cluster
Connect to VectorChord Cloud via direct PostgreSQL endpoints or PgBouncer connection poolers.
2.1 - Connecting with psql
The following instructions require a working installation of psql. The psql client is the native command-line client for Postgres. It provides an interactive se
The following instructions require a working installation of psql. The psql client is the native command-line client for Postgres. It provides an interactive session for sending commands to Postgres and running ad-hoc queries. For more information about psql, refer to the psql reference, in the PostgreSQL Documentation.
Warning
Cluster instance runs Postgres, which means that any Postgres application or standard utility such as psql is compatible with VectorChord Cloud. You can also use Postgres client libraries and drivers to connect. However, please be aware that some older client libraries and drivers, including older psql executables, are built without Server Name Indication (SNI) support and require a workaround.
The easiest way to connect to VectorChord Cloud using psql is to use a connection endpoint. You can obtain a connection endpoint from the cluster details on the dashboard.
We provide two types of connection endpoints:
Super User Endpoint: This connection string is used to connect to the cluster as a superuser(postgres). You can use this connection string to create databases, users, and manage the cluster.
Vector User Endpoint: This connection string is used to connect to the cluster as a vector user. You can use this connection string to store and query vector data.
If Enable Connection Pooler is selected when create cluster, you can get the pooler connection endpoint via clicking the Show Pooler Endpoint button.
From your terminal or command prompt, run the psql client with the connection endpoint copied from the Dashboard.
VectorChord Cloud requires that all connections use SSL/TLS encryption, but you can increase the level of protection by appending an sslmode parameter setting to your connection string.
3 - Monitoring
Monitor CPU, memory, storage, and scrape Prometheus metrics from VectorChord Cloud.
3.1 - Monitoring
The VectorChord Cloud provides several graphs for monitoring system and database metrics. You can access the Metrics dashboard from the cluster details in the V
The VectorChord Cloud provides several graphs for monitoring system and database metrics. You can access the Metrics dashboard from the cluster details in the VectorChord Cloud Console. Observable metrics include:
This graph shows the total and usage of the storage of Postgres instance.
RAM
This graph shows the average memory usage of the Postgres instance, the unit is in MB.
CPU
This graph shows the average CPU utilization percentage of the Postgres instance in past 5 minutes.
Vector
This graph shows the details of the vector index, including following metrics:
Index Name: The name of the index.
Index Dimension: The dimension of the vectors in the index.
Index Vector Count: The number of vectors in the index.
Index Options: Details of the index options can be found in the Index Options
Indexing: If True, it means the index is in the process of indexing the data.
3.2 - Collect Metrics
VectorChord Cloud shows some database metrics on cloud.vectorchord.ai. If you want to collect metrics from your database into your self-hosted metrics system, y
VectorChord Cloud shows some database metrics on cloud.vectorchord.ai. If you want to collect metrics from your database into your self-hosted metrics system, you can follow this guide. Metrics detail can be found in the Appendix section.
Where to find your metrics
You can find your metrics on your database’s domain name with the metrics endpoint. You must provide a VectorChord Cloud API Key in order to access these metrics. You can generate a API Key from the API Keys section.
You can find the metrics endpoint in cluster details.
# Your Tembo Cloud tokenAPIKey="****"curl -H "X-API-Key: ${APIKey}"\
https://cloud.vectorchord.ai/api/v1/users/5c3cb62b-d00b-4dda-85e6-2c0452d50138/cnpgs/e057eb0d-4a00-423a-b854-0f64b905f51a/metrics
Configuring Prometheus
Prometheus is a metrics server which collects metrics on a schedule. To configure Prometheus to collect metrics from a VectorChord Cloud instance, you must configure the target with the authentication token.
Here is a sample Prometheus configuration file:
global:scrape_interval:30sscrape_configs:- job_name:'example_target'scheme:httpsstatic_configs:# Use the domain name from your Postgres connection string- targets:['cloud.vectorchord.ai']metrics_path:'/api/v1/users/5c3cb62b-d00b-4dda-85e6-2c0452d50138/cnpgs/e057eb0d-4a00-423a-b854-0f64b905f51a/metrics'authorization:type:Bearer# Replace by your vectorchord.ai API Keycredentials:pgrs-57cc0d484e7e1d00444201eexxxxxxxx
You may also avoid including the token in your configuration file by loading it from a file. Please consult the Prometheus documentation for more information, specifically the authorization section of scrape_config.
Prometheus quick start
Follow this part of the guide to quickly understand how to connect a Prometheus server to VectorChord Cloud by example.
To quickly get up and running with a local Prometheus server, you can follow these steps:
Install Docker
Generate a vectorchord.ai API Key
Create a file, docker-compose.yml, with the following content
Create a file prometheus.yml in the same directory with the Prometheus configuration. This should look like the configuration example in the previous section. Replace the target by your Postgres cluster metrics along with the token by your VectorChord Cloud API Key.
Run docker-compose up
Within 30 seconds, you should be able to see Prometheus is collecting the metrics if you access the local Prometheus server in your web browser here: http://localhost:9090/targets.
Appendix
Click to view all metrics
Tip
In addition to specific indicators of the Postgres cluster database, we also provide the overall metrics for your cluster, such as the total or used PGData size, cpu utilization, and memory usage.
# HELP cnpg_backends_max_tx_duration_seconds Maximum duration of a transaction in seconds# TYPE cnpg_backends_max_tx_duration_seconds gaugecnpg_backends_max_tx_duration_seconds{application_name="cnpg_metrics_exporter",datname="bb",state="active",usename="postgres"}0# HELP cnpg_backends_total Number of backends# TYPE cnpg_backends_total gaugecnpg_backends_total{application_name="cnpg_metrics_exporter",datname="bb",state="active",usename="postgres"}1# HELP cnpg_backends_waiting_total Total number of backends that are currently waiting on other queries# TYPE cnpg_backends_waiting_total gaugecnpg_backends_waiting_total 0# HELP cnpg_collector_collection_duration_seconds Collection time duration in seconds# TYPE cnpg_collector_collection_duration_seconds gaugecnpg_collector_collection_duration_seconds{collector="Collect.cnpg"} 0.05290234
cnpg_collector_collection_duration_seconds{collector="Collect.up"} 0.002278657
# HELP cnpg_collector_collections_total Total number of times PostgreSQL was accessed for metrics.# TYPE cnpg_collector_collections_total countercnpg_collector_collections_total 272# HELP cnpg_collector_fencing_on 1 if the instance is fenced, 0 otherwise# TYPE cnpg_collector_fencing_on gaugecnpg_collector_fencing_on 0# HELP cnpg_collector_first_recoverability_point The first point of recoverability for the cluster as a unix timestamp# TYPE cnpg_collector_first_recoverability_point gaugecnpg_collector_first_recoverability_point 1.733281603e+09
# HELP cnpg_collector_last_available_backup_timestamp The last available backup as a unix timestamp# TYPE cnpg_collector_last_available_backup_timestamp gaugecnpg_collector_last_available_backup_timestamp 1.733281603e+09
# HELP cnpg_collector_last_collection_error 1 if the last collection ended with error, 0 otherwise.# TYPE cnpg_collector_last_collection_error gaugecnpg_collector_last_collection_error 0# HELP cnpg_collector_last_failed_backup_timestamp The last failed backup as a unix timestamp# TYPE cnpg_collector_last_failed_backup_timestamp gaugecnpg_collector_last_failed_backup_timestamp 0# HELP cnpg_collector_lo_pages Estimated number of pages in the pg_largeobject table# TYPE cnpg_collector_lo_pages gaugecnpg_collector_lo_pages{datname="bb"}0cnpg_collector_lo_pages{datname="postgres"}0# HELP cnpg_collector_manual_switchover_required 1 if a manual switchover is required, 0 otherwise# TYPE cnpg_collector_manual_switchover_required gaugecnpg_collector_manual_switchover_required 0# HELP cnpg_collector_nodes_used NodesUsed represents the count of distinct nodes accommodating the instances. A value of '-1' suggests that the metric is not available. A value of '1' suggests that all instances are hosted on a single node, implying the absence of High Availability (HA). Ideally this value should match the number of instances in the cluster.# TYPE cnpg_collector_nodes_used gaugecnpg_collector_nodes_used 1# HELP cnpg_collector_pg_wal Total size in bytes of WAL segments in the '/var/lib/postgresql/data/pgdata/pg_wal' directory computed as (wal_segment_size * count)# TYPE cnpg_collector_pg_wal gaugecnpg_collector_pg_wal{value="count"}7cnpg_collector_pg_wal{value="keep"}32cnpg_collector_pg_wal{value="max"}512cnpg_collector_pg_wal{value="min"}128cnpg_collector_pg_wal{value="size"} 1.17440512e+08
cnpg_collector_pg_wal{value="slots_max"} NaN
cnpg_collector_pg_wal{value="volume_max"} NaN
cnpg_collector_pg_wal{value="volume_size"} NaN
# HELP cnpg_collector_pg_wal_archive_status Number of WAL segments in the '/var/lib/postgresql/data/pgdata/pg_wal/archive_status' directory (ready, done)# TYPE cnpg_collector_pg_wal_archive_status gaugecnpg_collector_pg_wal_archive_status{value="done"}7cnpg_collector_pg_wal_archive_status{value="ready"}0# HELP cnpg_collector_postgres_version Postgres version# TYPE cnpg_collector_postgres_version gaugecnpg_collector_postgres_version{cluster="bb",full="16.5"} 16.5
# HELP cnpg_collector_replica_mode 1 if the cluster is in replica mode, 0 otherwise# TYPE cnpg_collector_replica_mode gaugecnpg_collector_replica_mode 0# HELP cnpg_collector_sync_replicas Number of requested synchronous replicas (synchronous_standby_names)# TYPE cnpg_collector_sync_replicas gaugecnpg_collector_sync_replicas{value="expected"}0cnpg_collector_sync_replicas{value="max"}0cnpg_collector_sync_replicas{value="min"}0cnpg_collector_sync_replicas{value="observed"}0# HELP cnpg_collector_up 1 if PostgreSQL is up, 0 otherwise.# TYPE cnpg_collector_up gaugecnpg_collector_up{cluster="bb"}1# HELP cnpg_collector_wal_buffers_full Number of times WAL data was written to disk because WAL buffers became full. Only available on PG 14+# TYPE cnpg_collector_wal_buffers_full gaugecnpg_collector_wal_buffers_full{stats_reset="2024-12-04T03:05:50.40867Z"}0# HELP cnpg_collector_wal_bytes Total amount of WAL generated in bytes. Only available on PG 14+# TYPE cnpg_collector_wal_bytes gaugecnpg_collector_wal_bytes{stats_reset="2024-12-04T03:05:50.40867Z"} 1.3429908e+07
# HELP cnpg_collector_wal_fpi Total number of WAL full page images generated. Only available on PG 14+# TYPE cnpg_collector_wal_fpi gaugecnpg_collector_wal_fpi{stats_reset="2024-12-04T03:05:50.40867Z"}1867# HELP cnpg_collector_wal_records Total number of WAL records generated. Only available on PG 14+# TYPE cnpg_collector_wal_records gaugecnpg_collector_wal_records{stats_reset="2024-12-04T03:05:50.40867Z"}32123# HELP cnpg_collector_wal_sync Number of times WAL files were synced to disk via issue_xlog_fsync request (if fsync is on and wal_sync_method is either fdatasync, fsync or fsync_writethrough, otherwise zero). Only available on PG 14+# TYPE cnpg_collector_wal_sync gaugecnpg_collector_wal_sync{stats_reset="2024-12-04T03:05:50.40867Z"}54# HELP cnpg_collector_wal_sync_time Total amount of time spent syncing WAL files to disk via issue_xlog_fsync request, in milliseconds (if track_wal_io_timing is enabled, fsync is on, and wal_sync_method is either fdatasync, fsync or fsync_writethrough, otherwise zero). Only available on PG 14+# TYPE cnpg_collector_wal_sync_time gaugecnpg_collector_wal_sync_time{stats_reset="2024-12-04T03:05:50.40867Z"}0# HELP cnpg_collector_wal_write Number of times WAL buffers were written out to disk via XLogWrite request. Only available on PG 14+# TYPE cnpg_collector_wal_write gaugecnpg_collector_wal_write{stats_reset="2024-12-04T03:05:50.40867Z"}792# HELP cnpg_collector_wal_write_time Total amount of time spent writing WAL buffers to disk via XLogWrite request, in milliseconds (if track_wal_io_timing is enabled, otherwise zero). This includes the sync time when wal_sync_method is either open_datasync or open_sync. Only available on PG 14+# TYPE cnpg_collector_wal_write_time gaugecnpg_collector_wal_write_time{stats_reset="2024-12-04T03:05:50.40867Z"}0# HELP cnpg_last_error 1 if the last collection ended with error, 0 otherwise.# TYPE cnpg_last_error gaugecnpg_last_error 0# HELP cnpg_pg_database_mxid_age Number of multiple transactions (Multixact) from the frozen XID to the current one# TYPE cnpg_pg_database_mxid_age gaugecnpg_pg_database_mxid_age{datname="bb"}0cnpg_pg_database_mxid_age{datname="postgres"}0cnpg_pg_database_mxid_age{datname="template0"}0cnpg_pg_database_mxid_age{datname="template1"}0# HELP cnpg_pg_database_size_bytes Disk space used by the database# TYPE cnpg_pg_database_size_bytes gaugecnpg_pg_database_size_bytes{datname="bb"} 7.934435e+06
cnpg_pg_database_size_bytes{datname="postgres"} 7.688675e+06
cnpg_pg_database_size_bytes{datname="template0"} 7.504399e+06
cnpg_pg_database_size_bytes{datname="template1"} 7.754211e+06
# HELP cnpg_pg_database_xid_age Number of transactions from the frozen XID to the current one# TYPE cnpg_pg_database_xid_age gaugecnpg_pg_database_xid_age{datname="bb"}34cnpg_pg_database_xid_age{datname="postgres"}34cnpg_pg_database_xid_age{datname="template0"}34cnpg_pg_database_xid_age{datname="template1"}34# HELP cnpg_pg_postmaster_start_time Time at which postgres started (based on epoch)# TYPE cnpg_pg_postmaster_start_time gaugecnpg_pg_postmaster_start_time 1.733281559515339e+09
# HELP cnpg_pg_replication_in_recovery Whether the instance is in recovery# TYPE cnpg_pg_replication_in_recovery gaugecnpg_pg_replication_in_recovery 0# HELP cnpg_pg_replication_is_wal_receiver_up Whether the instance wal_receiver is up# TYPE cnpg_pg_replication_is_wal_receiver_up gaugecnpg_pg_replication_is_wal_receiver_up 0# HELP cnpg_pg_replication_lag Replication lag behind primary in seconds# TYPE cnpg_pg_replication_lag gaugecnpg_pg_replication_lag 0# HELP cnpg_pg_replication_streaming_replicas Number of streaming replicas connected to the instance# TYPE cnpg_pg_replication_streaming_replicas gaugecnpg_pg_replication_streaming_replicas 0# HELP cnpg_pg_settings_setting Setting value# TYPE cnpg_pg_settings_setting gaugecnpg_pg_settings_setting{name="allow_in_place_tablespaces"}0cnpg_pg_settings_setting{name="allow_system_table_mods"}0cnpg_pg_settings_setting{name="archive_timeout"}300cnpg_pg_settings_setting{name="array_nulls"}1cnpg_pg_settings_setting{name="authentication_timeout"}60cnpg_pg_settings_setting{name="autovacuum"}1cnpg_pg_settings_setting{name="autovacuum_analyze_scale_factor"} 0.1
cnpg_pg_settings_setting{name="autovacuum_analyze_threshold"}50cnpg_pg_settings_setting{name="autovacuum_freeze_max_age"} 2e+08
cnpg_pg_settings_setting{name="autovacuum_max_workers"}3cnpg_pg_settings_setting{name="autovacuum_multixact_freeze_max_age"} 4e+08
cnpg_pg_settings_setting{name="autovacuum_naptime"}60cnpg_pg_settings_setting{name="autovacuum_vacuum_cost_delay"}2cnpg_pg_settings_setting{name="autovacuum_vacuum_cost_limit"} -1
cnpg_pg_settings_setting{name="autovacuum_vacuum_insert_scale_factor"} 0.2
cnpg_pg_settings_setting{name="autovacuum_vacuum_insert_threshold"}1000cnpg_pg_settings_setting{name="autovacuum_vacuum_scale_factor"} 0.2
cnpg_pg_settings_setting{name="autovacuum_vacuum_threshold"}50cnpg_pg_settings_setting{name="autovacuum_work_mem"} -1
cnpg_pg_settings_setting{name="backend_flush_after"}0cnpg_pg_settings_setting{name="bgwriter_delay"}200cnpg_pg_settings_setting{name="bgwriter_flush_after"}64cnpg_pg_settings_setting{name="bgwriter_lru_maxpages"}100cnpg_pg_settings_setting{name="bgwriter_lru_multiplier"}2cnpg_pg_settings_setting{name="block_size"}8192cnpg_pg_settings_setting{name="bonjour"}0cnpg_pg_settings_setting{name="check_function_bodies"}1cnpg_pg_settings_setting{name="checkpoint_completion_target"} 0.9
cnpg_pg_settings_setting{name="checkpoint_flush_after"}32cnpg_pg_settings_setting{name="checkpoint_timeout"}1800cnpg_pg_settings_setting{name="checkpoint_warning"}30cnpg_pg_settings_setting{name="client_connection_check_interval"}0cnpg_pg_settings_setting{name="commit_delay"}0cnpg_pg_settings_setting{name="commit_siblings"}5cnpg_pg_settings_setting{name="cpu_index_tuple_cost"} 0.005
cnpg_pg_settings_setting{name="cpu_operator_cost"} 0.0025
cnpg_pg_settings_setting{name="cpu_tuple_cost"} 0.01
cnpg_pg_settings_setting{name="cursor_tuple_fraction"} 0.1
cnpg_pg_settings_setting{name="data_checksums"}1cnpg_pg_settings_setting{name="data_directory_mode"}700cnpg_pg_settings_setting{name="data_sync_retry"}0cnpg_pg_settings_setting{name="db_user_namespace"}0cnpg_pg_settings_setting{name="deadlock_timeout"}1000cnpg_pg_settings_setting{name="debug_assertions"}0cnpg_pg_settings_setting{name="debug_discard_caches"}0cnpg_pg_settings_setting{name="debug_pretty_print"}1cnpg_pg_settings_setting{name="debug_print_parse"}0cnpg_pg_settings_setting{name="debug_print_plan"}0cnpg_pg_settings_setting{name="debug_print_rewritten"}0cnpg_pg_settings_setting{name="default_statistics_target"}100cnpg_pg_settings_setting{name="default_transaction_deferrable"}0cnpg_pg_settings_setting{name="default_transaction_read_only"}0cnpg_pg_settings_setting{name="effective_cache_size"}786432cnpg_pg_settings_setting{name="effective_io_concurrency"}200cnpg_pg_settings_setting{name="enable_async_append"}1cnpg_pg_settings_setting{name="enable_bitmapscan"}1cnpg_pg_settings_setting{name="enable_gathermerge"}1cnpg_pg_settings_setting{name="enable_hashagg"}1cnpg_pg_settings_setting{name="enable_hashjoin"}1cnpg_pg_settings_setting{name="enable_incremental_sort"}1cnpg_pg_settings_setting{name="enable_indexonlyscan"}1cnpg_pg_settings_setting{name="enable_indexscan"}1cnpg_pg_settings_setting{name="enable_material"}1cnpg_pg_settings_setting{name="enable_memoize"}1cnpg_pg_settings_setting{name="enable_mergejoin"}1cnpg_pg_settings_setting{name="enable_nestloop"}1cnpg_pg_settings_setting{name="enable_parallel_append"}1cnpg_pg_settings_setting{name="enable_parallel_hash"}1cnpg_pg_settings_setting{name="enable_partition_pruning"}1cnpg_pg_settings_setting{name="enable_partitionwise_aggregate"}0cnpg_pg_settings_setting{name="enable_partitionwise_join"}0cnpg_pg_settings_setting{name="enable_presorted_aggregate"}1cnpg_pg_settings_setting{name="enable_seqscan"}1cnpg_pg_settings_setting{name="enable_sort"}1cnpg_pg_settings_setting{name="enable_tidscan"}1cnpg_pg_settings_setting{name="escape_string_warning"}1cnpg_pg_settings_setting{name="exit_on_error"}0cnpg_pg_settings_setting{name="extra_float_digits"}1cnpg_pg_settings_setting{name="from_collapse_limit"}8cnpg_pg_settings_setting{name="fsync"}1cnpg_pg_settings_setting{name="full_page_writes"}1cnpg_pg_settings_setting{name="geqo"}1cnpg_pg_settings_setting{name="geqo_effort"}5cnpg_pg_settings_setting{name="geqo_generations"}0cnpg_pg_settings_setting{name="geqo_pool_size"}0cnpg_pg_settings_setting{name="geqo_seed"}0cnpg_pg_settings_setting{name="geqo_selection_bias"}2cnpg_pg_settings_setting{name="geqo_threshold"}12cnpg_pg_settings_setting{name="gin_fuzzy_search_limit"}0cnpg_pg_settings_setting{name="gin_pending_list_limit"}4096cnpg_pg_settings_setting{name="gss_accept_delegation"}0cnpg_pg_settings_setting{name="hash_mem_multiplier"}2cnpg_pg_settings_setting{name="hot_standby"}1cnpg_pg_settings_setting{name="hot_standby_feedback"}0cnpg_pg_settings_setting{name="huge_page_size"}0cnpg_pg_settings_setting{name="idle_in_transaction_session_timeout"}0cnpg_pg_settings_setting{name="idle_session_timeout"}0cnpg_pg_settings_setting{name="ignore_checksum_failure"}0cnpg_pg_settings_setting{name="ignore_invalid_pages"}0cnpg_pg_settings_setting{name="ignore_system_indexes"}0cnpg_pg_settings_setting{name="in_hot_standby"}0cnpg_pg_settings_setting{name="integer_datetimes"}1cnpg_pg_settings_setting{name="jit"}1cnpg_pg_settings_setting{name="jit_above_cost"}100000cnpg_pg_settings_setting{name="jit_debugging_support"}0cnpg_pg_settings_setting{name="jit_dump_bitcode"}0cnpg_pg_settings_setting{name="jit_expressions"}1cnpg_pg_settings_setting{name="jit_inline_above_cost"}500000cnpg_pg_settings_setting{name="jit_optimize_above_cost"}500000cnpg_pg_settings_setting{name="jit_profiling_support"}0cnpg_pg_settings_setting{name="jit_tuple_deforming"}1cnpg_pg_settings_setting{name="join_collapse_limit"}8cnpg_pg_settings_setting{name="krb_caseins_users"}0cnpg_pg_settings_setting{name="lo_compat_privileges"}0cnpg_pg_settings_setting{name="lock_timeout"}0cnpg_pg_settings_setting{name="log_autovacuum_min_duration"}600000cnpg_pg_settings_setting{name="log_checkpoints"}1cnpg_pg_settings_setting{name="log_connections"}0cnpg_pg_settings_setting{name="log_disconnections"}0cnpg_pg_settings_setting{name="log_duration"}0cnpg_pg_settings_setting{name="log_executor_stats"}0cnpg_pg_settings_setting{name="log_file_mode"}600cnpg_pg_settings_setting{name="log_hostname"}0cnpg_pg_settings_setting{name="log_lock_waits"}0cnpg_pg_settings_setting{name="log_min_duration_sample"} -1
cnpg_pg_settings_setting{name="log_min_duration_statement"} -1
cnpg_pg_settings_setting{name="log_parameter_max_length"} -1
cnpg_pg_settings_setting{name="log_parameter_max_length_on_error"}0cnpg_pg_settings_setting{name="log_parser_stats"}0cnpg_pg_settings_setting{name="log_planner_stats"}0cnpg_pg_settings_setting{name="log_recovery_conflict_waits"}0cnpg_pg_settings_setting{name="log_replication_commands"}0cnpg_pg_settings_setting{name="log_rotation_age"}0cnpg_pg_settings_setting{name="log_rotation_size"}0cnpg_pg_settings_setting{name="log_startup_progress_interval"}10000cnpg_pg_settings_setting{name="log_statement_sample_rate"}1cnpg_pg_settings_setting{name="log_statement_stats"}0cnpg_pg_settings_setting{name="log_temp_files"} -1
cnpg_pg_settings_setting{name="log_transaction_sample_rate"}0cnpg_pg_settings_setting{name="log_truncate_on_rotation"}0cnpg_pg_settings_setting{name="logging_collector"}1cnpg_pg_settings_setting{name="logical_decoding_work_mem"}65536cnpg_pg_settings_setting{name="maintenance_io_concurrency"}10cnpg_pg_settings_setting{name="maintenance_work_mem"}524288cnpg_pg_settings_setting{name="max_connections"}100cnpg_pg_settings_setting{name="max_files_per_process"}1000cnpg_pg_settings_setting{name="max_function_args"}100cnpg_pg_settings_setting{name="max_identifier_length"}63cnpg_pg_settings_setting{name="max_index_keys"}32cnpg_pg_settings_setting{name="max_locks_per_transaction"}64cnpg_pg_settings_setting{name="max_logical_replication_workers"}4cnpg_pg_settings_setting{name="max_parallel_apply_workers_per_subscription"}2cnpg_pg_settings_setting{name="max_parallel_maintenance_workers"}1cnpg_pg_settings_setting{name="max_parallel_workers"}2cnpg_pg_settings_setting{name="max_parallel_workers_per_gather"}1cnpg_pg_settings_setting{name="max_pred_locks_per_page"}2cnpg_pg_settings_setting{name="max_pred_locks_per_relation"} -2
cnpg_pg_settings_setting{name="max_pred_locks_per_transaction"}64cnpg_pg_settings_setting{name="max_prepared_transactions"}0cnpg_pg_settings_setting{name="max_replication_slots"}32cnpg_pg_settings_setting{name="max_slot_wal_keep_size"} -1
cnpg_pg_settings_setting{name="max_stack_depth"}2048cnpg_pg_settings_setting{name="max_standby_archive_delay"}30000cnpg_pg_settings_setting{name="max_standby_streaming_delay"}30000cnpg_pg_settings_setting{name="max_sync_workers_per_subscription"}2cnpg_pg_settings_setting{name="max_wal_senders"}10cnpg_pg_settings_setting{name="max_wal_size"}8192cnpg_pg_settings_setting{name="max_worker_processes"}2cnpg_pg_settings_setting{name="min_dynamic_shared_memory"}0cnpg_pg_settings_setting{name="min_parallel_index_scan_size"}64cnpg_pg_settings_setting{name="min_parallel_table_scan_size"}1024cnpg_pg_settings_setting{name="min_wal_size"}2048cnpg_pg_settings_setting{name="old_snapshot_threshold"} -1
cnpg_pg_settings_setting{name="parallel_leader_participation"}1cnpg_pg_settings_setting{name="parallel_setup_cost"}1000cnpg_pg_settings_setting{name="parallel_tuple_cost"} 0.1
cnpg_pg_settings_setting{name="pgaudit.log_catalog"}0cnpg_pg_settings_setting{name="pgaudit.log_client"}0cnpg_pg_settings_setting{name="pgaudit.log_parameter"}1cnpg_pg_settings_setting{name="pgaudit.log_parameter_max_size"}0cnpg_pg_settings_setting{name="pgaudit.log_relation"}1cnpg_pg_settings_setting{name="pgaudit.log_rows"}0cnpg_pg_settings_setting{name="pgaudit.log_statement"}1cnpg_pg_settings_setting{name="pgaudit.log_statement_once"}0cnpg_pg_settings_setting{name="port"}5432cnpg_pg_settings_setting{name="post_auth_delay"}0cnpg_pg_settings_setting{name="pre_auth_delay"}0cnpg_pg_settings_setting{name="quote_all_identifiers"}0cnpg_pg_settings_setting{name="random_page_cost"} 1.1
cnpg_pg_settings_setting{name="recovery_min_apply_delay"}0cnpg_pg_settings_setting{name="recovery_target_inclusive"}1cnpg_pg_settings_setting{name="recursive_worktable_factor"}10cnpg_pg_settings_setting{name="remove_temp_files_after_crash"}1cnpg_pg_settings_setting{name="reserved_connections"}0cnpg_pg_settings_setting{name="restart_after_crash"}0cnpg_pg_settings_setting{name="row_security"}1cnpg_pg_settings_setting{name="scram_iterations"}4096cnpg_pg_settings_setting{name="segment_size"}131072cnpg_pg_settings_setting{name="send_abort_for_crash"}0cnpg_pg_settings_setting{name="send_abort_for_kill"}0cnpg_pg_settings_setting{name="seq_page_cost"}1cnpg_pg_settings_setting{name="server_version_num"}160005cnpg_pg_settings_setting{name="shared_buffers"}262144cnpg_pg_settings_setting{name="shared_memory_size"}2120cnpg_pg_settings_setting{name="shared_memory_size_in_huge_pages"}1060cnpg_pg_settings_setting{name="ssl"}1cnpg_pg_settings_setting{name="ssl_passphrase_command_supports_reload"}0cnpg_pg_settings_setting{name="ssl_prefer_server_ciphers"}1cnpg_pg_settings_setting{name="standard_conforming_strings"}1cnpg_pg_settings_setting{name="statement_timeout"}0cnpg_pg_settings_setting{name="superuser_reserved_connections"}3cnpg_pg_settings_setting{name="synchronize_seqscans"}1cnpg_pg_settings_setting{name="syslog_sequence_numbers"}1cnpg_pg_settings_setting{name="syslog_split_messages"}1cnpg_pg_settings_setting{name="tcp_keepalives_count"}0cnpg_pg_settings_setting{name="tcp_keepalives_idle"}0cnpg_pg_settings_setting{name="tcp_keepalives_interval"}0cnpg_pg_settings_setting{name="tcp_user_timeout"}0cnpg_pg_settings_setting{name="temp_buffers"}1024cnpg_pg_settings_setting{name="temp_file_limit"} -1
cnpg_pg_settings_setting{name="trace_notify"}0cnpg_pg_settings_setting{name="trace_sort"}0cnpg_pg_settings_setting{name="track_activities"}1cnpg_pg_settings_setting{name="track_activity_query_size"}1024cnpg_pg_settings_setting{name="track_commit_timestamp"}0cnpg_pg_settings_setting{name="track_counts"}1cnpg_pg_settings_setting{name="track_io_timing"}0cnpg_pg_settings_setting{name="track_wal_io_timing"}0cnpg_pg_settings_setting{name="transaction_deferrable"}0cnpg_pg_settings_setting{name="transaction_read_only"}1cnpg_pg_settings_setting{name="transform_null_equals"}0cnpg_pg_settings_setting{name="unix_socket_permissions"}777cnpg_pg_settings_setting{name="update_process_title"}1cnpg_pg_settings_setting{name="vacuum_buffer_usage_limit"}256cnpg_pg_settings_setting{name="vacuum_cost_delay"}0cnpg_pg_settings_setting{name="vacuum_cost_limit"}200cnpg_pg_settings_setting{name="vacuum_cost_page_dirty"}20cnpg_pg_settings_setting{name="vacuum_cost_page_hit"}1cnpg_pg_settings_setting{name="vacuum_cost_page_miss"}2cnpg_pg_settings_setting{name="vacuum_failsafe_age"} 1.6e+09
cnpg_pg_settings_setting{name="vacuum_freeze_min_age"} 5e+07
cnpg_pg_settings_setting{name="vacuum_freeze_table_age"} 1.5e+08
cnpg_pg_settings_setting{name="vacuum_multixact_failsafe_age"} 1.6e+09
cnpg_pg_settings_setting{name="vacuum_multixact_freeze_min_age"} 5e+06
cnpg_pg_settings_setting{name="vacuum_multixact_freeze_table_age"} 1.5e+08
cnpg_pg_settings_setting{name="vectors.enable_index"}1cnpg_pg_settings_setting{name="vectors.hnsw_ef_search"}100cnpg_pg_settings_setting{name="vectors.ivf_nprobe"}10cnpg_pg_settings_setting{name="vectors.pgvector_compatibility"}1cnpg_pg_settings_setting{name="vectors.pq_fast_scan"}0cnpg_pg_settings_setting{name="vectors.pq_rerank_size"}0cnpg_pg_settings_setting{name="vectors.rq_fast_scan"}0cnpg_pg_settings_setting{name="vectors.sq_fast_scan"}0cnpg_pg_settings_setting{name="vectors.sq_rerank_size"}0cnpg_pg_settings_setting{name="wal_block_size"}8192cnpg_pg_settings_setting{name="wal_buffers"}2048cnpg_pg_settings_setting{name="wal_decode_buffer_size"}524288cnpg_pg_settings_setting{name="wal_init_zero"}1cnpg_pg_settings_setting{name="wal_keep_size"}512cnpg_pg_settings_setting{name="wal_log_hints"}1cnpg_pg_settings_setting{name="wal_receiver_create_temp_slot"}0cnpg_pg_settings_setting{name="wal_receiver_status_interval"}10cnpg_pg_settings_setting{name="wal_receiver_timeout"}5000cnpg_pg_settings_setting{name="wal_recycle"}1cnpg_pg_settings_setting{name="wal_retrieve_retry_interval"}5000cnpg_pg_settings_setting{name="wal_segment_size"} 1.6777216e+07
cnpg_pg_settings_setting{name="wal_sender_timeout"}5000cnpg_pg_settings_setting{name="wal_skip_threshold"}2048cnpg_pg_settings_setting{name="wal_writer_delay"}200cnpg_pg_settings_setting{name="wal_writer_flush_after"}128cnpg_pg_settings_setting{name="work_mem"}20971cnpg_pg_settings_setting{name="zero_damaged_pages"}0# HELP cnpg_pg_stat_archiver_archived_count Number of WAL files that have been successfully archived# TYPE cnpg_pg_stat_archiver_archived_count countercnpg_pg_stat_archiver_archived_count 7# HELP cnpg_pg_stat_archiver_failed_count Number of failed attempts for archiving WAL files# TYPE cnpg_pg_stat_archiver_failed_count countercnpg_pg_stat_archiver_failed_count 0# HELP cnpg_pg_stat_archiver_last_archived_time Epoch of the last time WAL archiving succeeded# TYPE cnpg_pg_stat_archiver_last_archived_time gaugecnpg_pg_stat_archiver_last_archived_time 1.733283406713513e+09
# HELP cnpg_pg_stat_archiver_last_archived_wal_start_lsn Archived WAL start LSN# TYPE cnpg_pg_stat_archiver_last_archived_wal_start_lsn gaugecnpg_pg_stat_archiver_last_archived_wal_start_lsn 6# HELP cnpg_pg_stat_archiver_last_failed_time Epoch of the last time WAL archiving failed# TYPE cnpg_pg_stat_archiver_last_failed_time gaugecnpg_pg_stat_archiver_last_failed_time -1
# HELP cnpg_pg_stat_archiver_last_failed_wal_start_lsn Last failed WAL LSN# TYPE cnpg_pg_stat_archiver_last_failed_wal_start_lsn gaugecnpg_pg_stat_archiver_last_failed_wal_start_lsn -1
# HELP cnpg_pg_stat_archiver_seconds_since_last_archival Seconds since the last successful archival operation# TYPE cnpg_pg_stat_archiver_seconds_since_last_archival gaugecnpg_pg_stat_archiver_seconds_since_last_archival 6104.299629
# HELP cnpg_pg_stat_archiver_seconds_since_last_failure Seconds since the last failed archival operation# TYPE cnpg_pg_stat_archiver_seconds_since_last_failure gaugecnpg_pg_stat_archiver_seconds_since_last_failure -1
# HELP cnpg_pg_stat_archiver_stats_reset_time Time at which these statistics were last reset# TYPE cnpg_pg_stat_archiver_stats_reset_time gaugecnpg_pg_stat_archiver_stats_reset_time 1.73328155040867e+09
# HELP cnpg_pg_stat_bgwriter_buffers_alloc Number of buffers allocated# TYPE cnpg_pg_stat_bgwriter_buffers_alloc countercnpg_pg_stat_bgwriter_buffers_alloc 2770# HELP cnpg_pg_stat_bgwriter_buffers_backend Number of buffers written directly by a backend# TYPE cnpg_pg_stat_bgwriter_buffers_backend countercnpg_pg_stat_bgwriter_buffers_backend 346# HELP cnpg_pg_stat_bgwriter_buffers_backend_fsync Number of times a backend had to execute its own fsync call (normally the background writer handles those even when the backend does its own write)# TYPE cnpg_pg_stat_bgwriter_buffers_backend_fsync countercnpg_pg_stat_bgwriter_buffers_backend_fsync 0# HELP cnpg_pg_stat_bgwriter_buffers_checkpoint Number of buffers written during checkpoints# TYPE cnpg_pg_stat_bgwriter_buffers_checkpoint countercnpg_pg_stat_bgwriter_buffers_checkpoint 1145# HELP cnpg_pg_stat_bgwriter_buffers_clean Number of buffers written by the background writer# TYPE cnpg_pg_stat_bgwriter_buffers_clean countercnpg_pg_stat_bgwriter_buffers_clean 0# HELP cnpg_pg_stat_bgwriter_checkpoint_sync_time Total amount of time that has been spent in the portion of checkpoint processing where files are synchronized to disk, in milliseconds# TYPE cnpg_pg_stat_bgwriter_checkpoint_sync_time countercnpg_pg_stat_bgwriter_checkpoint_sync_time 11# HELP cnpg_pg_stat_bgwriter_checkpoint_write_time Total amount of time that has been spent in the portion of checkpoint processing where files are written to disk, in milliseconds# TYPE cnpg_pg_stat_bgwriter_checkpoint_write_time countercnpg_pg_stat_bgwriter_checkpoint_write_time 18902# HELP cnpg_pg_stat_bgwriter_checkpoints_req Number of requested checkpoints that have been performed# TYPE cnpg_pg_stat_bgwriter_checkpoints_req countercnpg_pg_stat_bgwriter_checkpoints_req 2# HELP cnpg_pg_stat_bgwriter_checkpoints_timed Number of scheduled checkpoints that have been performed# TYPE cnpg_pg_stat_bgwriter_checkpoints_timed countercnpg_pg_stat_bgwriter_checkpoints_timed 4# HELP cnpg_pg_stat_bgwriter_maxwritten_clean Number of times the background writer stopped a cleaning scan because it had written too many buffers# TYPE cnpg_pg_stat_bgwriter_maxwritten_clean countercnpg_pg_stat_bgwriter_maxwritten_clean 0# HELP cnpg_pg_stat_database_blk_read_time Time spent reading data file blocks by backends in this database, in milliseconds# TYPE cnpg_pg_stat_database_blk_read_time countercnpg_pg_stat_database_blk_read_time{datname=""}0cnpg_pg_stat_database_blk_read_time{datname="bb"}0cnpg_pg_stat_database_blk_read_time{datname="postgres"}0cnpg_pg_stat_database_blk_read_time{datname="template0"}0cnpg_pg_stat_database_blk_read_time{datname="template1"}0# HELP cnpg_pg_stat_database_blk_write_time Time spent writing data file blocks by backends in this database, in milliseconds# TYPE cnpg_pg_stat_database_blk_write_time countercnpg_pg_stat_database_blk_write_time{datname=""}0cnpg_pg_stat_database_blk_write_time{datname="bb"}0cnpg_pg_stat_database_blk_write_time{datname="postgres"}0cnpg_pg_stat_database_blk_write_time{datname="template0"}0cnpg_pg_stat_database_blk_write_time{datname="template1"}0# HELP cnpg_pg_stat_database_blks_hit Number of times disk blocks were found already in the buffer cache, so that a read was not necessary (this only includes hits in the PostgreSQL buffer cache, not the operating system's file system cache)# TYPE cnpg_pg_stat_database_blks_hit countercnpg_pg_stat_database_blks_hit{datname=""}195433cnpg_pg_stat_database_blks_hit{datname="bb"} 1.284724e+06
cnpg_pg_stat_database_blks_hit{datname="postgres"}226804cnpg_pg_stat_database_blks_hit{datname="template0"}0cnpg_pg_stat_database_blks_hit{datname="template1"}99880# HELP cnpg_pg_stat_database_blks_read Number of disk blocks read in this database# TYPE cnpg_pg_stat_database_blks_read countercnpg_pg_stat_database_blks_read{datname=""}94cnpg_pg_stat_database_blks_read{datname="bb"}316cnpg_pg_stat_database_blks_read{datname="postgres"}402cnpg_pg_stat_database_blks_read{datname="template0"}0cnpg_pg_stat_database_blks_read{datname="template1"}891# HELP cnpg_pg_stat_database_conflicts Number of queries canceled due to conflicts with recovery in this database# TYPE cnpg_pg_stat_database_conflicts countercnpg_pg_stat_database_conflicts{datname=""}0cnpg_pg_stat_database_conflicts{datname="bb"}0cnpg_pg_stat_database_conflicts{datname="postgres"}0cnpg_pg_stat_database_conflicts{datname="template0"}0cnpg_pg_stat_database_conflicts{datname="template1"}0# HELP cnpg_pg_stat_database_deadlocks Number of deadlocks detected in this database# TYPE cnpg_pg_stat_database_deadlocks countercnpg_pg_stat_database_deadlocks{datname=""}0cnpg_pg_stat_database_deadlocks{datname="bb"}0cnpg_pg_stat_database_deadlocks{datname="postgres"}0cnpg_pg_stat_database_deadlocks{datname="template0"}0cnpg_pg_stat_database_deadlocks{datname="template1"}0# HELP cnpg_pg_stat_database_temp_bytes Total amount of data written to temporary files by queries in this database# TYPE cnpg_pg_stat_database_temp_bytes countercnpg_pg_stat_database_temp_bytes{datname=""}0cnpg_pg_stat_database_temp_bytes{datname="bb"}0cnpg_pg_stat_database_temp_bytes{datname="postgres"}0cnpg_pg_stat_database_temp_bytes{datname="template0"}0cnpg_pg_stat_database_temp_bytes{datname="template1"}0# HELP cnpg_pg_stat_database_temp_files Number of temporary files created by queries in this database# TYPE cnpg_pg_stat_database_temp_files countercnpg_pg_stat_database_temp_files{datname=""}0cnpg_pg_stat_database_temp_files{datname="bb"}0cnpg_pg_stat_database_temp_files{datname="postgres"}0cnpg_pg_stat_database_temp_files{datname="template0"}0cnpg_pg_stat_database_temp_files{datname="template1"}0# HELP cnpg_pg_stat_database_tup_deleted Number of rows deleted by queries in this database# TYPE cnpg_pg_stat_database_tup_deleted countercnpg_pg_stat_database_tup_deleted{datname=""}0cnpg_pg_stat_database_tup_deleted{datname="bb"}41cnpg_pg_stat_database_tup_deleted{datname="postgres"}0cnpg_pg_stat_database_tup_deleted{datname="template0"}0cnpg_pg_stat_database_tup_deleted{datname="template1"}34# HELP cnpg_pg_stat_database_tup_fetched Number of rows fetched by queries in this database# TYPE cnpg_pg_stat_database_tup_fetched countercnpg_pg_stat_database_tup_fetched{datname=""}51500cnpg_pg_stat_database_tup_fetched{datname="bb"}807164cnpg_pg_stat_database_tup_fetched{datname="postgres"}121616cnpg_pg_stat_database_tup_fetched{datname="template0"}0cnpg_pg_stat_database_tup_fetched{datname="template1"}29147# HELP cnpg_pg_stat_database_tup_inserted Number of rows inserted by queries in this database# TYPE cnpg_pg_stat_database_tup_inserted countercnpg_pg_stat_database_tup_inserted{datname=""}36cnpg_pg_stat_database_tup_inserted{datname="bb"}1401cnpg_pg_stat_database_tup_inserted{datname="postgres"}15cnpg_pg_stat_database_tup_inserted{datname="template0"}0cnpg_pg_stat_database_tup_inserted{datname="template1"}17593# HELP cnpg_pg_stat_database_tup_returned Number of rows returned by queries in this database# TYPE cnpg_pg_stat_database_tup_returned countercnpg_pg_stat_database_tup_returned{datname=""}60743cnpg_pg_stat_database_tup_returned{datname="bb"} 1.045589e+06
cnpg_pg_stat_database_tup_returned{datname="postgres"}240174cnpg_pg_stat_database_tup_returned{datname="template0"}0cnpg_pg_stat_database_tup_returned{datname="template1"}191401# HELP cnpg_pg_stat_database_tup_updated Number of rows updated by queries in this database# TYPE cnpg_pg_stat_database_tup_updated countercnpg_pg_stat_database_tup_updated{datname=""}7cnpg_pg_stat_database_tup_updated{datname="bb"}107cnpg_pg_stat_database_tup_updated{datname="postgres"}4cnpg_pg_stat_database_tup_updated{datname="template0"}0cnpg_pg_stat_database_tup_updated{datname="template1"}754# HELP cnpg_pg_stat_database_xact_commit Number of transactions in this database that have been committed# TYPE cnpg_pg_stat_database_xact_commit countercnpg_pg_stat_database_xact_commit{datname=""}0cnpg_pg_stat_database_xact_commit{datname="bb"}7887cnpg_pg_stat_database_xact_commit{datname="postgres"}5928cnpg_pg_stat_database_xact_commit{datname="template0"}0cnpg_pg_stat_database_xact_commit{datname="template1"}1177# HELP cnpg_pg_stat_database_xact_rollback Number of transactions in this database that have been rolled back# TYPE cnpg_pg_stat_database_xact_rollback countercnpg_pg_stat_database_xact_rollback{datname=""}0cnpg_pg_stat_database_xact_rollback{datname="bb"}0cnpg_pg_stat_database_xact_rollback{datname="postgres"}0cnpg_pg_stat_database_xact_rollback{datname="template0"}0cnpg_pg_stat_database_xact_rollback{datname="template1"}0# HELP go_gc_duration_seconds A summary of the pause duration of garbage collection cycles.# TYPE go_gc_duration_seconds summarygo_gc_duration_seconds{quantile="0"} 1.6777e-05
go_gc_duration_seconds{quantile="0.25"} 4.737e-05
go_gc_duration_seconds{quantile="0.5"} 6.074e-05
go_gc_duration_seconds{quantile="0.75"} 7.1193e-05
go_gc_duration_seconds{quantile="1"} 0.000370254
go_gc_duration_seconds_sum 0.005222777
go_gc_duration_seconds_count 76# HELP go_goroutines Number of goroutines that currently exist.# TYPE go_goroutines gaugego_goroutines 77# HELP go_info Information about the Go environment.# TYPE go_info gaugego_info{version="go1.22.4"}1# HELP go_memstats_alloc_bytes Number of bytes allocated and still in use.# TYPE go_memstats_alloc_bytes gaugego_memstats_alloc_bytes 7.9226e+06
# HELP go_memstats_alloc_bytes_total Total number of bytes allocated, even if freed.# TYPE go_memstats_alloc_bytes_total countergo_memstats_alloc_bytes_total 3.23233208e+08
# HELP go_memstats_buck_hash_sys_bytes Number of bytes used by the profiling bucket hash table.# TYPE go_memstats_buck_hash_sys_bytes gaugego_memstats_buck_hash_sys_bytes 1.532818e+06
# HELP go_memstats_frees_total Total number of frees.# TYPE go_memstats_frees_total countergo_memstats_frees_total 3.568269e+06
# HELP go_memstats_gc_sys_bytes Number of bytes used for garbage collection system metadata.# TYPE go_memstats_gc_sys_bytes gaugego_memstats_gc_sys_bytes 3.737056e+06
# HELP go_memstats_heap_alloc_bytes Number of heap bytes allocated and still in use.# TYPE go_memstats_heap_alloc_bytes gaugego_memstats_heap_alloc_bytes 7.9226e+06
# HELP go_memstats_heap_idle_bytes Number of heap bytes waiting to be used.# TYPE go_memstats_heap_idle_bytes gaugego_memstats_heap_idle_bytes 8.634368e+06
# HELP go_memstats_heap_inuse_bytes Number of heap bytes that are in use.# TYPE go_memstats_heap_inuse_bytes gaugego_memstats_heap_inuse_bytes 1.1190272e+07
# HELP go_memstats_heap_objects Number of allocated objects.# TYPE go_memstats_heap_objects gaugego_memstats_heap_objects 38430# HELP go_memstats_heap_released_bytes Number of heap bytes released to OS.# TYPE go_memstats_heap_released_bytes gaugego_memstats_heap_released_bytes 5.758976e+06
# HELP go_memstats_heap_sys_bytes Number of heap bytes obtained from system.# TYPE go_memstats_heap_sys_bytes gaugego_memstats_heap_sys_bytes 1.982464e+07
# HELP go_memstats_last_gc_time_seconds Number of seconds since 1970 of last garbage collection.# TYPE go_memstats_last_gc_time_seconds gaugego_memstats_last_gc_time_seconds 1.7332894597458868e+09
# HELP go_memstats_lookups_total Total number of pointer lookups.# TYPE go_memstats_lookups_total countergo_memstats_lookups_total 0# HELP go_memstats_mallocs_total Total number of mallocs.# TYPE go_memstats_mallocs_total countergo_memstats_mallocs_total 3.606699e+06
# HELP go_memstats_mcache_inuse_bytes Number of bytes in use by mcache structures.# TYPE go_memstats_mcache_inuse_bytes gaugego_memstats_mcache_inuse_bytes 2400# HELP go_memstats_mcache_sys_bytes Number of bytes used for mcache structures obtained from system.# TYPE go_memstats_mcache_sys_bytes gaugego_memstats_mcache_sys_bytes 15600# HELP go_memstats_mspan_inuse_bytes Number of bytes in use by mspan structures.# TYPE go_memstats_mspan_inuse_bytes gaugego_memstats_mspan_inuse_bytes 156960# HELP go_memstats_mspan_sys_bytes Number of bytes used for mspan structures obtained from system.# TYPE go_memstats_mspan_sys_bytes gaugego_memstats_mspan_sys_bytes 212160# HELP go_memstats_next_gc_bytes Number of heap bytes when next garbage collection will take place.# TYPE go_memstats_next_gc_bytes gaugego_memstats_next_gc_bytes 1.488544e+07
# HELP go_memstats_other_sys_bytes Number of bytes used for other system allocations.# TYPE go_memstats_other_sys_bytes gaugego_memstats_other_sys_bytes 651750# HELP go_memstats_stack_inuse_bytes Number of bytes in use by the stack allocator.# TYPE go_memstats_stack_inuse_bytes gaugego_memstats_stack_inuse_bytes 1.114112e+06
# HELP go_memstats_stack_sys_bytes Number of bytes obtained from system for stack allocator.# TYPE go_memstats_stack_sys_bytes gaugego_memstats_stack_sys_bytes 1.114112e+06
# HELP go_memstats_sys_bytes Number of bytes obtained from system.# TYPE go_memstats_sys_bytes gaugego_memstats_sys_bytes 2.7088136e+07
# HELP go_threads Number of OS threads created.# TYPE go_threads gaugego_threads 12# HELP cluster_pg_data_disk_size_total The total size of the data disk of the cluster, unit: GiB.# TYPE cluster_pg_data_disk_size_total gaugecluster_pg_data_disk_size_total 15# HELP cluster_pg_data_disk_size_used The used size of the data disk of the cluster, unit: GiB.# TYPE cluster_pg_data_disk_size_used gaugecluster_pg_data_disk_size_used 0.77
# HELP cluster_cpu_utilization The CPU utilization of the cluster, percentage.# TYPE cluster_cpu_utilization gaugecluster_cpu_utilization 0.39
# HELP cluster_memory_usage The memory usage of the cluster, unit: MiB.# TYPE cluster_memory_usage gaugecluster_memory_usage 108.34
4 - Management
Manage projects, clusters, RBAC authorization, backups, upgrades, API keys, Terraform, and external index workflows.
4.1 - Overview of the cloud object hierarchy
Managing your VectorChord Cloud project requires an understanding of the object hierarchy. The following diagram shows how objects in cloud are related. See bel
Managing your VectorChord Cloud project requires an understanding of the object hierarchy. The following diagram shows how objects in cloud are related. See below for a description of each object.
VectorChord Cloud Account
This is the account you used to sign up with VectorChord Cloud. Now supports signing up with an GitHub account.
Projects
A project is the top-level object in the hierarchy. It is a container for all clusters in the project and billing information. For more information, see Projects.
Clusters
A project can contain one or more clusters. A cluster is a collection of nodes that run one Postgres cluster. For more information, see Clusters.
Compute Instances
A cluster can contain one or more compute instances. A compute instance is a virtual machine that runs a Postgres instance.
Databases
Every cluster contains two default databases: postgres and a database what you named when you created the cluster. You can create additional databases in a cluster with psql after the cluster is ready.
4.2 - Projects
With VectorChord Cloud, everything starts with the project. It is the top-level object in the hierarchy. A project can hold as many Postgres clusters as needed.
With VectorChord Cloud, everything starts with the project. It is the top-level object in the hierarchy. A project can hold as many Postgres clusters as needed. The maximum number of projects you can create and join is 5.
Learn more about projects and how to manage them in these sections:
In project setting, you can view and edit the project information. You can switch to another project by clicking the project name in the bottom left corner of the page. The default project is the first project we created for you when you signed up. In below diagram, you can change the name, invite members to the project, and leave the project.
Project Permissions
You can invite other users to your project by clicking the Invite button. You can invite users by their email address. The invited user will receive an email with an invitation link. The invited user can accept the invitation by clicking the link.
Warning
If the invited user does not have a VectorChord Cloud account, they will need to sign up for an account before they can accept the invitation.
For more information on access levels of each role, see Authorization.
Project Billing
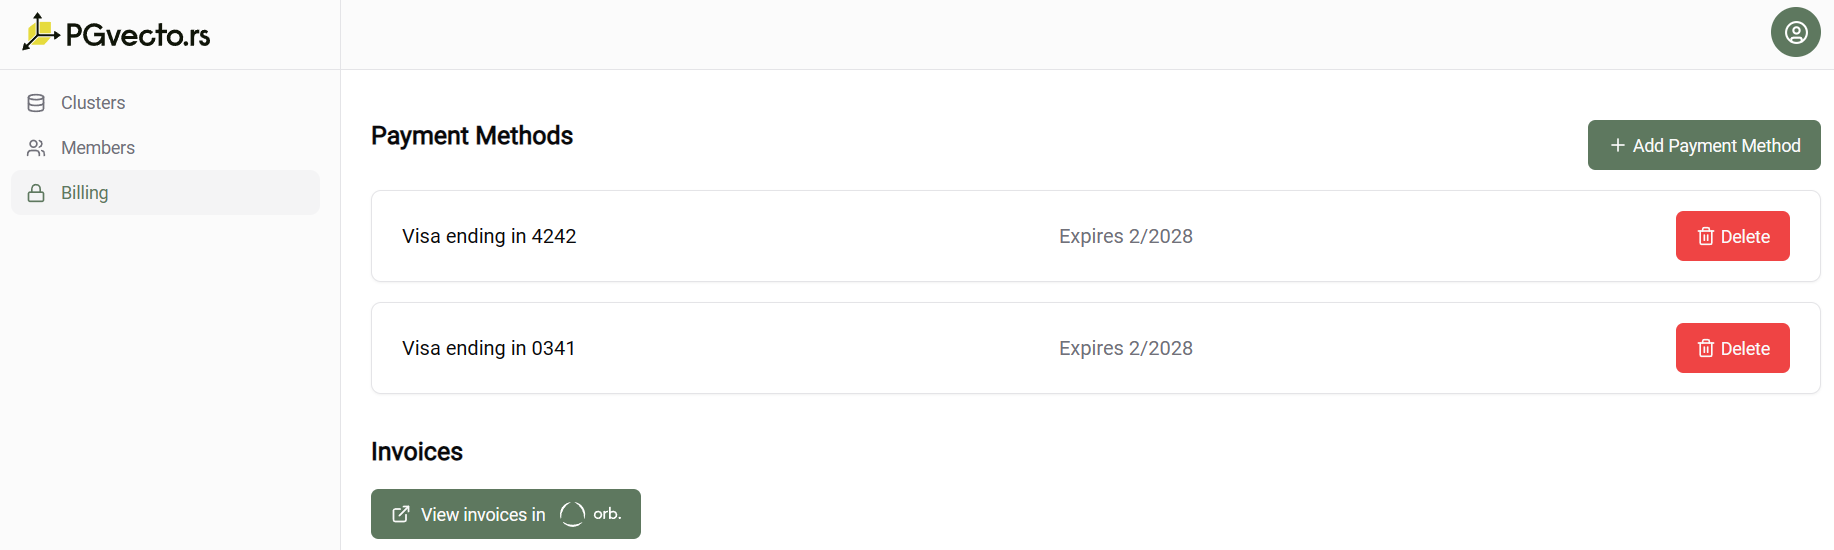
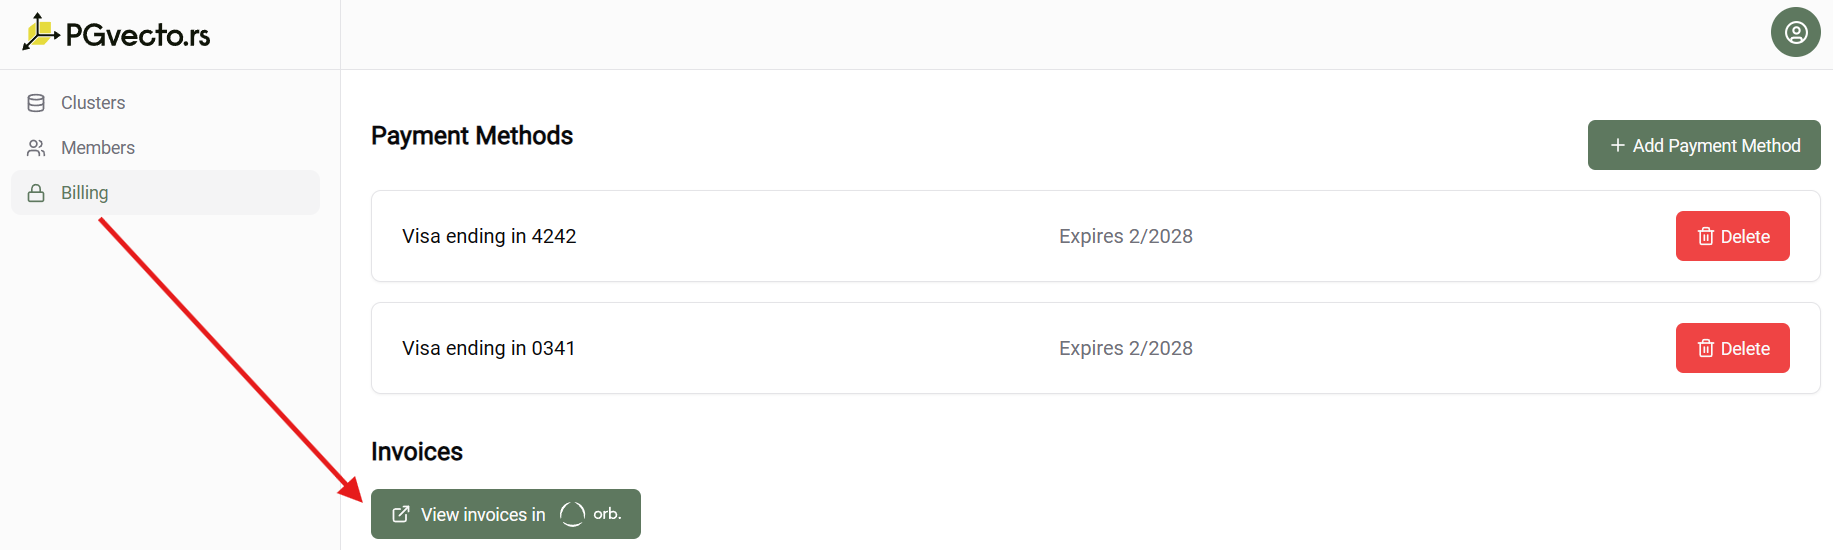
Every project has a billing page where you can view the billing information. In the billing page, you can add a payment method, view the billing invoices.
4.3 - Clusters
One or more clusters can be created in a project. A cluster is a collection of nodes that run a Postgres cluster.
One or more clusters can be created in a project. A cluster is a collection of nodes that run a Postgres cluster.
Create a cluster
To create a new cluster, navigate to the VectorChord Cloud Console and click on the “Create Cluster” button.
You need to specify the following information:
Required:
Plan: The plan you want to use for your cluster, for information about Cloud’s paid plan options, see Cloud plans.
Cluster Name: A unique name for your cluster.
Extension Settings:
Extension: We support two Vector Search extensions, pgvectors and its successor vectorchord
vectorchord: Scalable, Fast, and Disk-friendly Vector search in Postgres
pgvectors: Scalable, Low-latency and Hybrid-enabled Vector Search in Postgres. Revolutionize Vector Search, not Database.
Warning
The vectorchord only support server resource with NVMe SSD.
Image:
VectorChord, we provide a tag in a semantic version format, for example 16-v0.1.0:
16 indicates the version number of Postgres major
v0.1.0 indicates VectorChord version number
pgvecto.rs, we provide a tag in a semantic version format, for example 16-v0.4.0-vectors-exts:
16 indicates the version number of Postgres major
v0.4.0 indicates pgvecto.rs version number
vectors indicates the installation location of pgvecto.rs scheme, optional vectors,extensions, public. Please choose public if you want to use VectorChord Cloud on AWS RDS. If you’re going to use fdw on Supabase, please choose extensions.
exts indicates the cluster can install extensions from https://pgt.dev/.
Cloud Provider Settings:
Cloud Provider: The cloud provider where your cluster will be deployed, currently only AWS is supported.
Region: The region where your cluster will be deployed.
Resource Settings:
Type: We provide two types of resources, Performance and Capacity.
Server Resource:
Performance:
1C/2G: Free tier, 1 core CPU, 2GB memory and 3Gi disk space.
2C/8G: Enterprise tier, 2 core CPU, 8GB memory and 15Gi disk space.
2C/16G: Enterprise tier, 2 core CPU, 16GB memory and 15Gi disk space.
4C/32G: Enterprise tier, 4 core CPU, 32GB memory and 90Gi disk space.
Capacity:
4C/32G NVMe SSD: Enterprise tier, 4 core CPU, 32GB memory and 850Gi NVMe SSD disk space.
Postgres Settings:
Database Name: The name of the database that you will store vector data in.
Enable Connection Pooler: (default: false): Enable the connection pooler for your cluster.
Enable Restore Config: (default: false): Enable the restore config for your backup created in other clusters.
Optional:
Disk Size: Postgres PGData disk size, will change the default disk size.
Instances: The number of instances in the cluster. The default is 1.
Warning
Currently, vector index not support streaming replication.
Delete a cluster
If you want to delete a cluster, navigate to the VectorChord Cloud Console and click on the “Delete” button.
Warning
Once you delete this cluster, all data including WAL in Postgres and automatically or on-demand created backups in the cluster will be deleted as well.
Cluster Monitoring
You can view the cpu and memory usage of your cluster in the cluster info page, and you can also view the index info for example the number of vectors in the index, the dimension of the vectors etc. For detailed information about monitoring, see Monitoring.
4.4 - Authorization
Topics related to role-based access control (RBAC) on your VectorChord Cloud clusters.
Topics related to role-based access control (RBAC) on your VectorChord Cloud clusters.
User Roles
We provide two types of roles for the project: Owner and Member.
Owner: The owner has full access to the project. The owner can invite members, create or delete clusters, and view the billing information.
Member: The member has read-only access to the project. The member can view the cluster information, but cannot create or delete clusters.
API Key Roles
API Key provide more fine-grained control over access to resources by assigning roles with specific permissions to users within the projects. We provide two types of roles for the API Key: Owner and Member.
Owner: The owner has full access to the project cluster.
Member: The member has read-only access to the project cluster. However, you can specify clusters to which the member has full access.
Database backups are an integral part of any disaster recovery plan. Disasters come in many shapes and sizes. It could be as simple as accidentally deleting a t
Database backups are an integral part of any disaster recovery plan. Disasters come in many shapes and sizes. It could be as simple as accidentally deleting a table column, the database crashing, or even a natural calamity wiping out the underlying hardware a database is running on. The risks and impact brought by these scenarios can never be fully eliminated, but only minimized or even mitigated. Having database backups is a form of insurance policy. They are essentially snapshots of the database at various points in time. When disaster strikes, database backups allow the project to be brought back to any of these points in time, therefore averting the crisis.
Warning
Once you delete this cluster or your project, all data including WAL in Postgres and automatically or on-demand created backups in the cluster will be deleted as well.
Backup
Concepts
WAL archive: a location containing the WAL files (transactional logs) that are continuously written by Postgres and archived for data durability
Physical base backups: a copy of all the files that PostgreSQL uses to store the data in the database (primarily the PGDATA and any tablespace)
Automatic Backups
Once the cluster is created, automatic backups are enabled by default. Automatic physical base backups are taken daily and retained for 7 days. The backups are stored in AWS S3, and the retention policy for AWS S3 is set to 90 days.
At the same time, the WAL (Write-Ahead Logging) will be archived every 5 minutes. If these files cross a certain file size threshold, they are backed up immediately. As such, during periods of high amount of transactions, WAL file backups become more frequent. Conversely, when there is no activity in the database, WAL file backups are not made. Overall, this would mean that at the worst case scenario or disaster, the PITR(Point-In-Time Recovery) achieves a Recovery Point Objective (RPO) of five minutes.
On-demand Backups
If you want to create a backup at a specific point in time, you can create an on-demand backup. On-demand backups are physical base backups of the database cluster and retained for 7 days. They are stored in AWS S3 and can be retained for up to 90 days.
You can follow the steps below to create an on-demand backup:
Clicking the Actions button and selecting Backup.
Set the unique name for the backup.
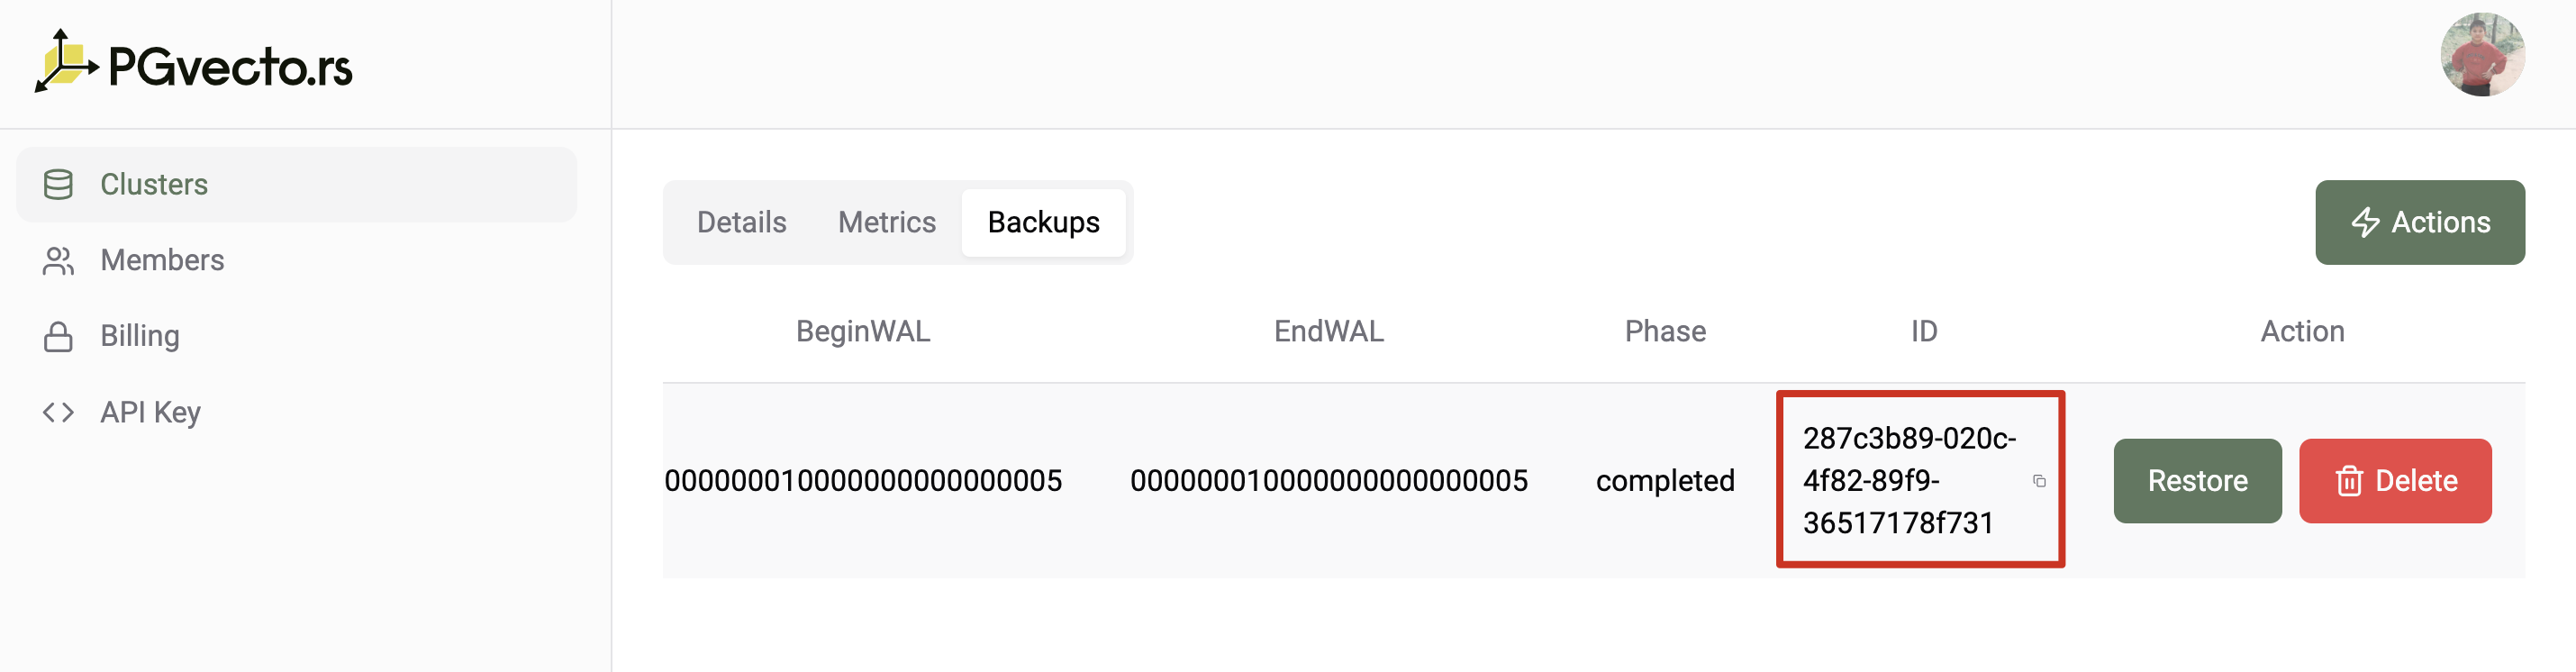
You can get the backup info in the Backups tab. The information includes:
Backup name
The cluster that the backup belongs to
Backup start time
Backup end time
The begin LSN(Log Sequence Number) of the backup
The end LSN of the backup
The begin WAL segment of the backup
The end WAL segment of the backup
The backup phase
Restore
Restore from a cluster
Point-in-Time Recovery (PITR) allows a cluster to be backed up at much shorter intervals. This provides users an option to restore to any chosen point of up to seconds in granularity. Even with daily backups, a day’s worth of data could still be lost. With PITR, backups could be performed up to the point of disaster.
If you want to do a PITR for a cluster, you can follow the steps below:
Enter cluster details page.
Click the Actions button and select Restore from Cluster.
Select the server resource that you want to restore to.
Select the target time that you want to restore to.
Warning
The target time should be within the first recoverability point and last archived wal time.
Restore from an on-demand backup
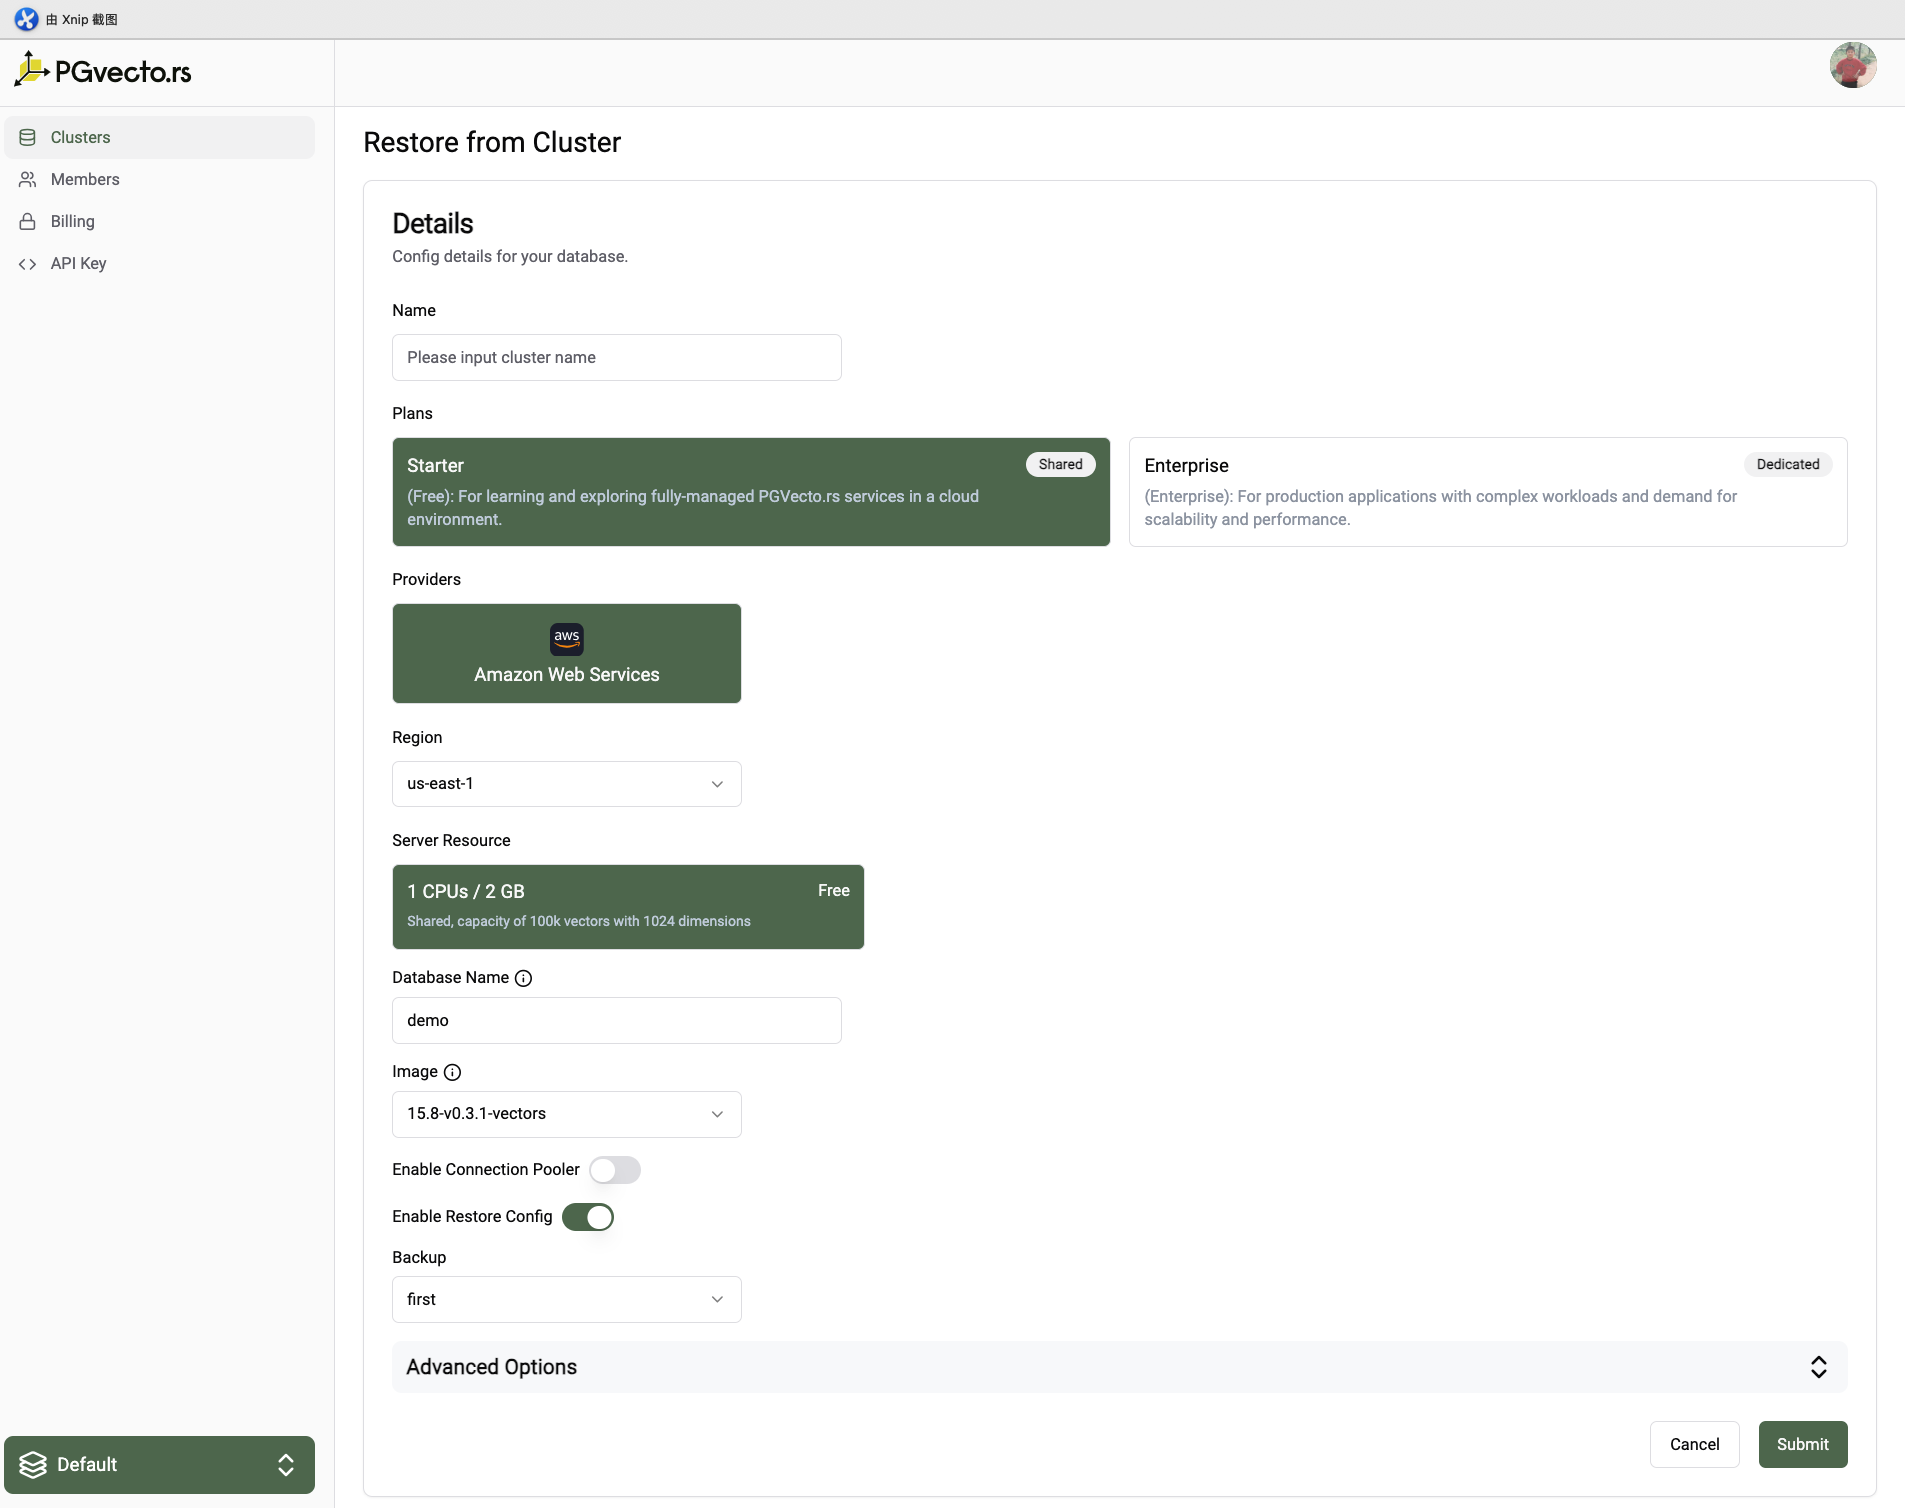
If you want to restore from an on-demand backup, you can follow the steps below:
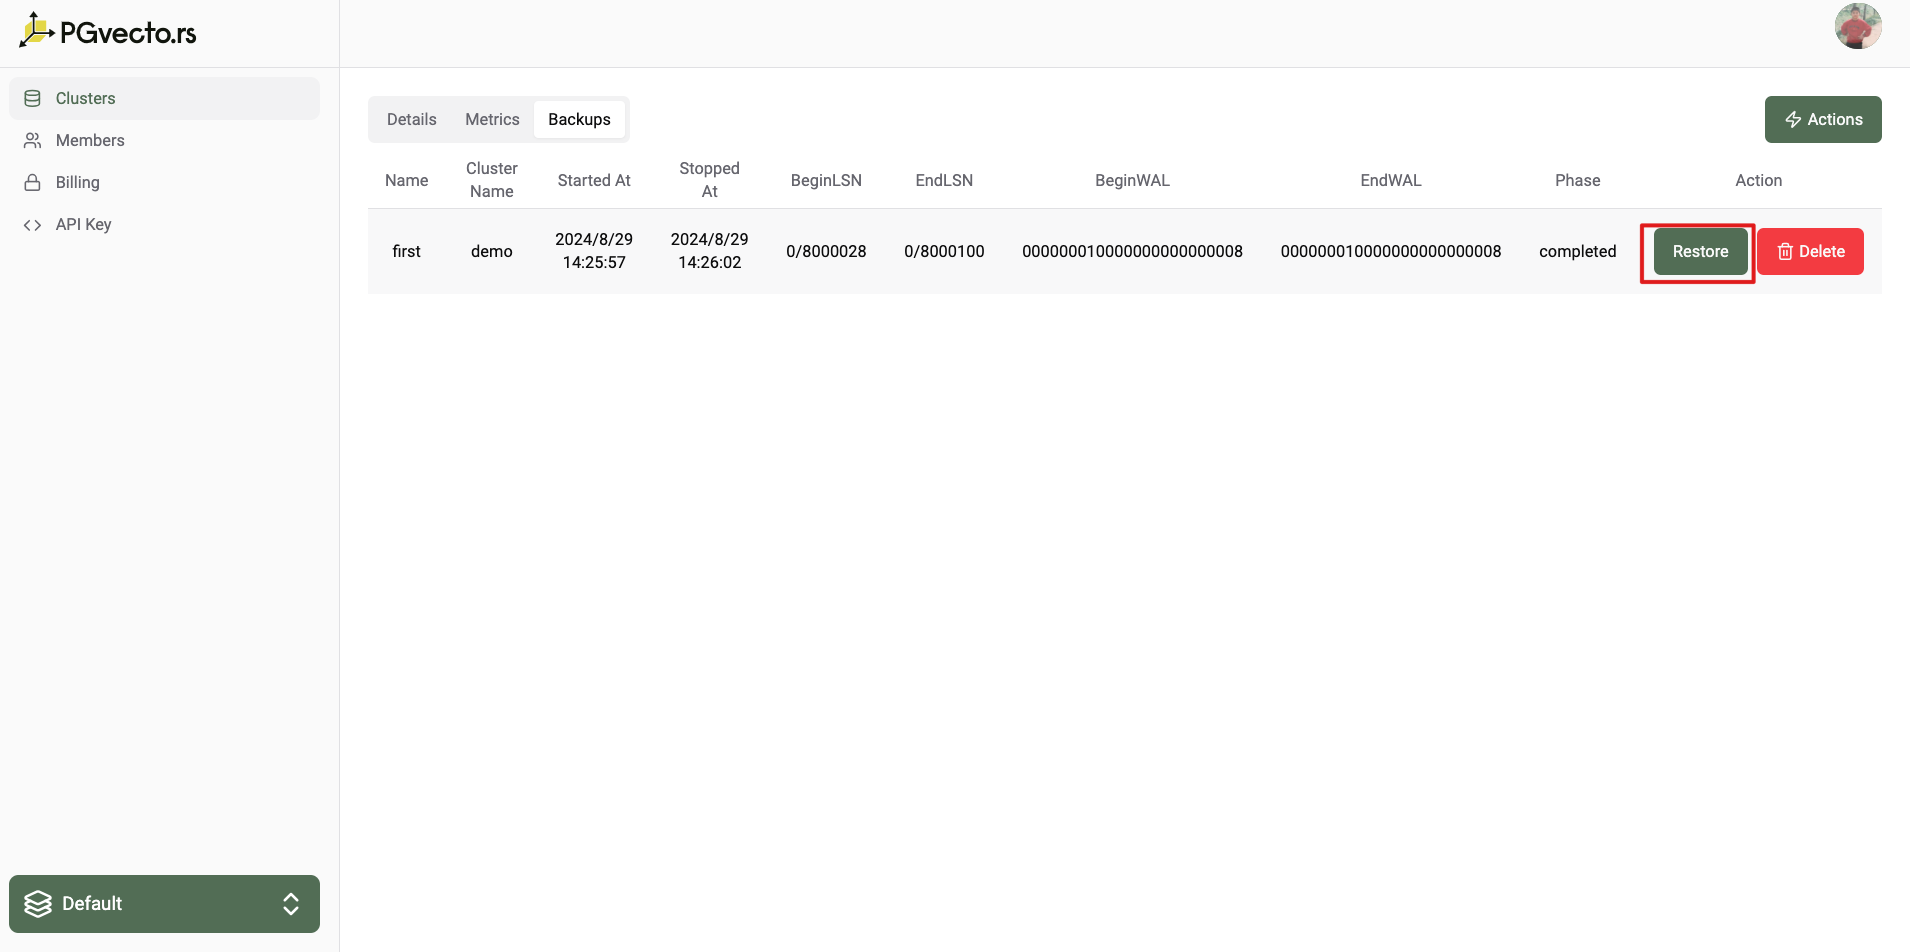
Enter the backups details page of a cluster.
Click the Actions button and select Restore
Select the server resource that you want to restore to.
Warning
The cluster you are restoring to should have the same image,database name and region as the backup, but recovery from the cluster can cross regions.
4.6 - Upgrade
You may need to upgrade your cluster and do not want to lose any data. You can upgrade the server resource like CPU, memory. Or you only want to upgrade the sto
You may need to upgrade your cluster and do not want to lose any data. You can upgrade the server resource like CPU, memory. Or you only want to upgrade the storage. The following sections will guide you through the process of upgrading your cluster.
Increasing server resource
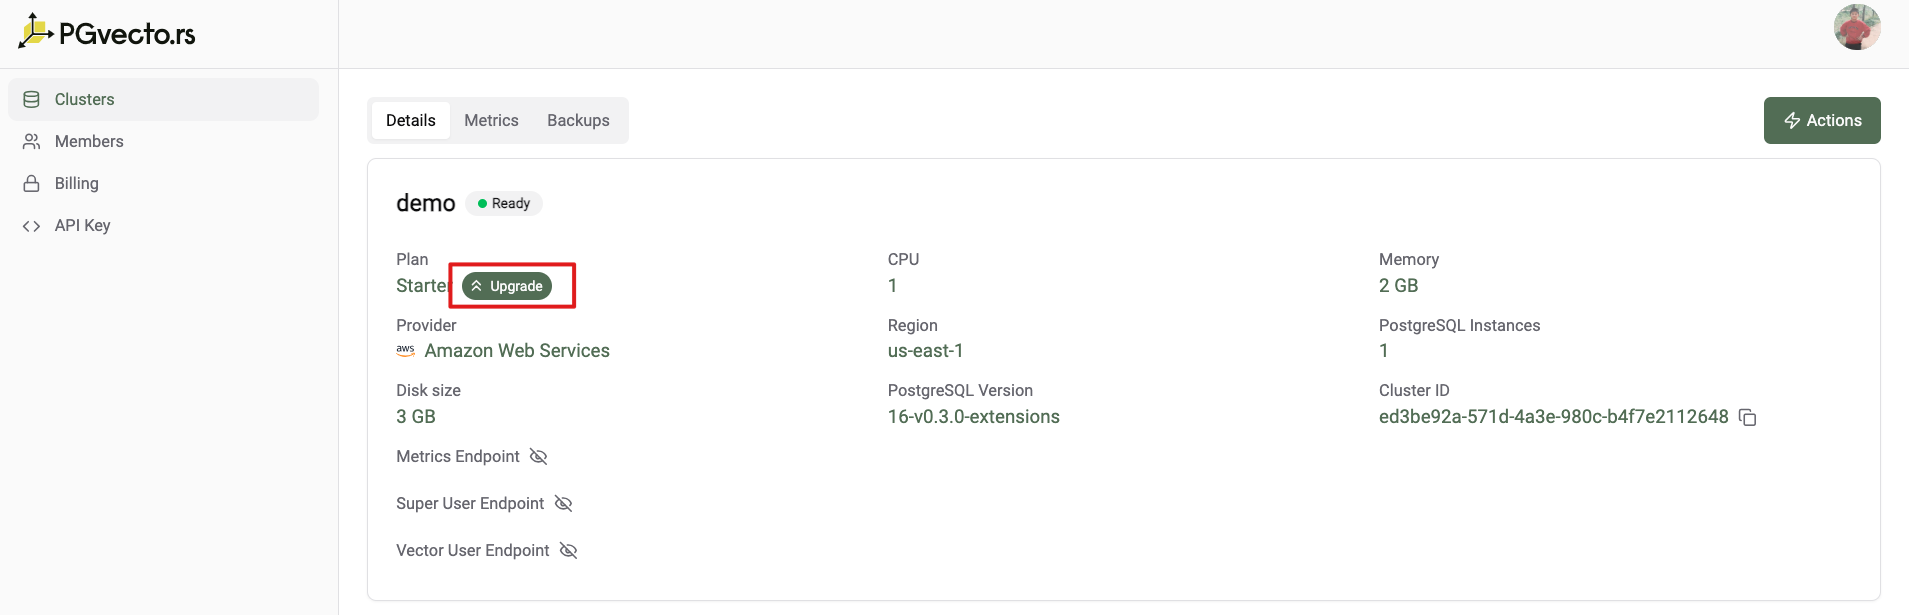
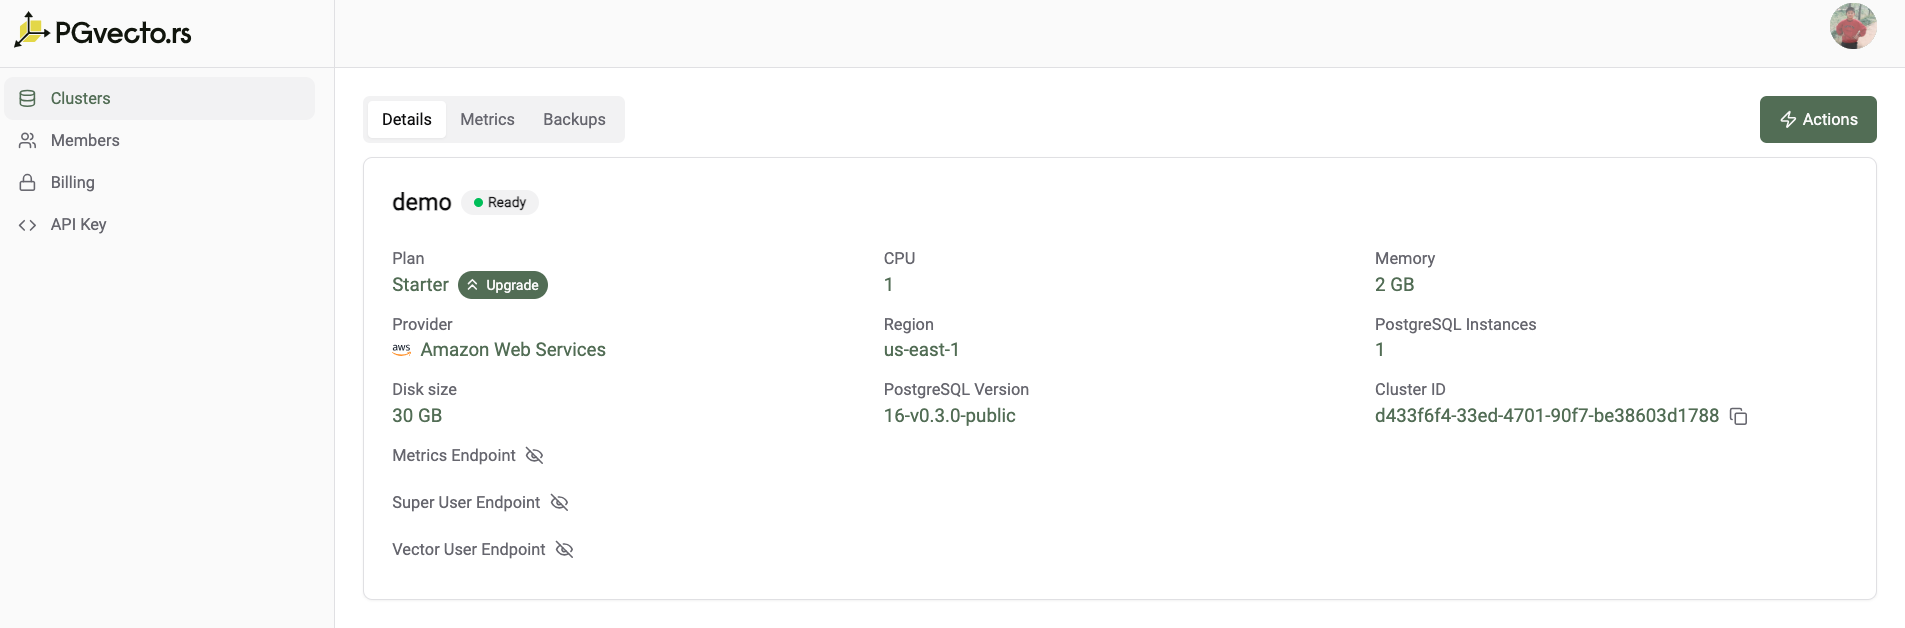
If you want to increase the server resource like CPU and memory, the status of the cluster need to be Ready. And click the Upgrade button in the cluster detail page.
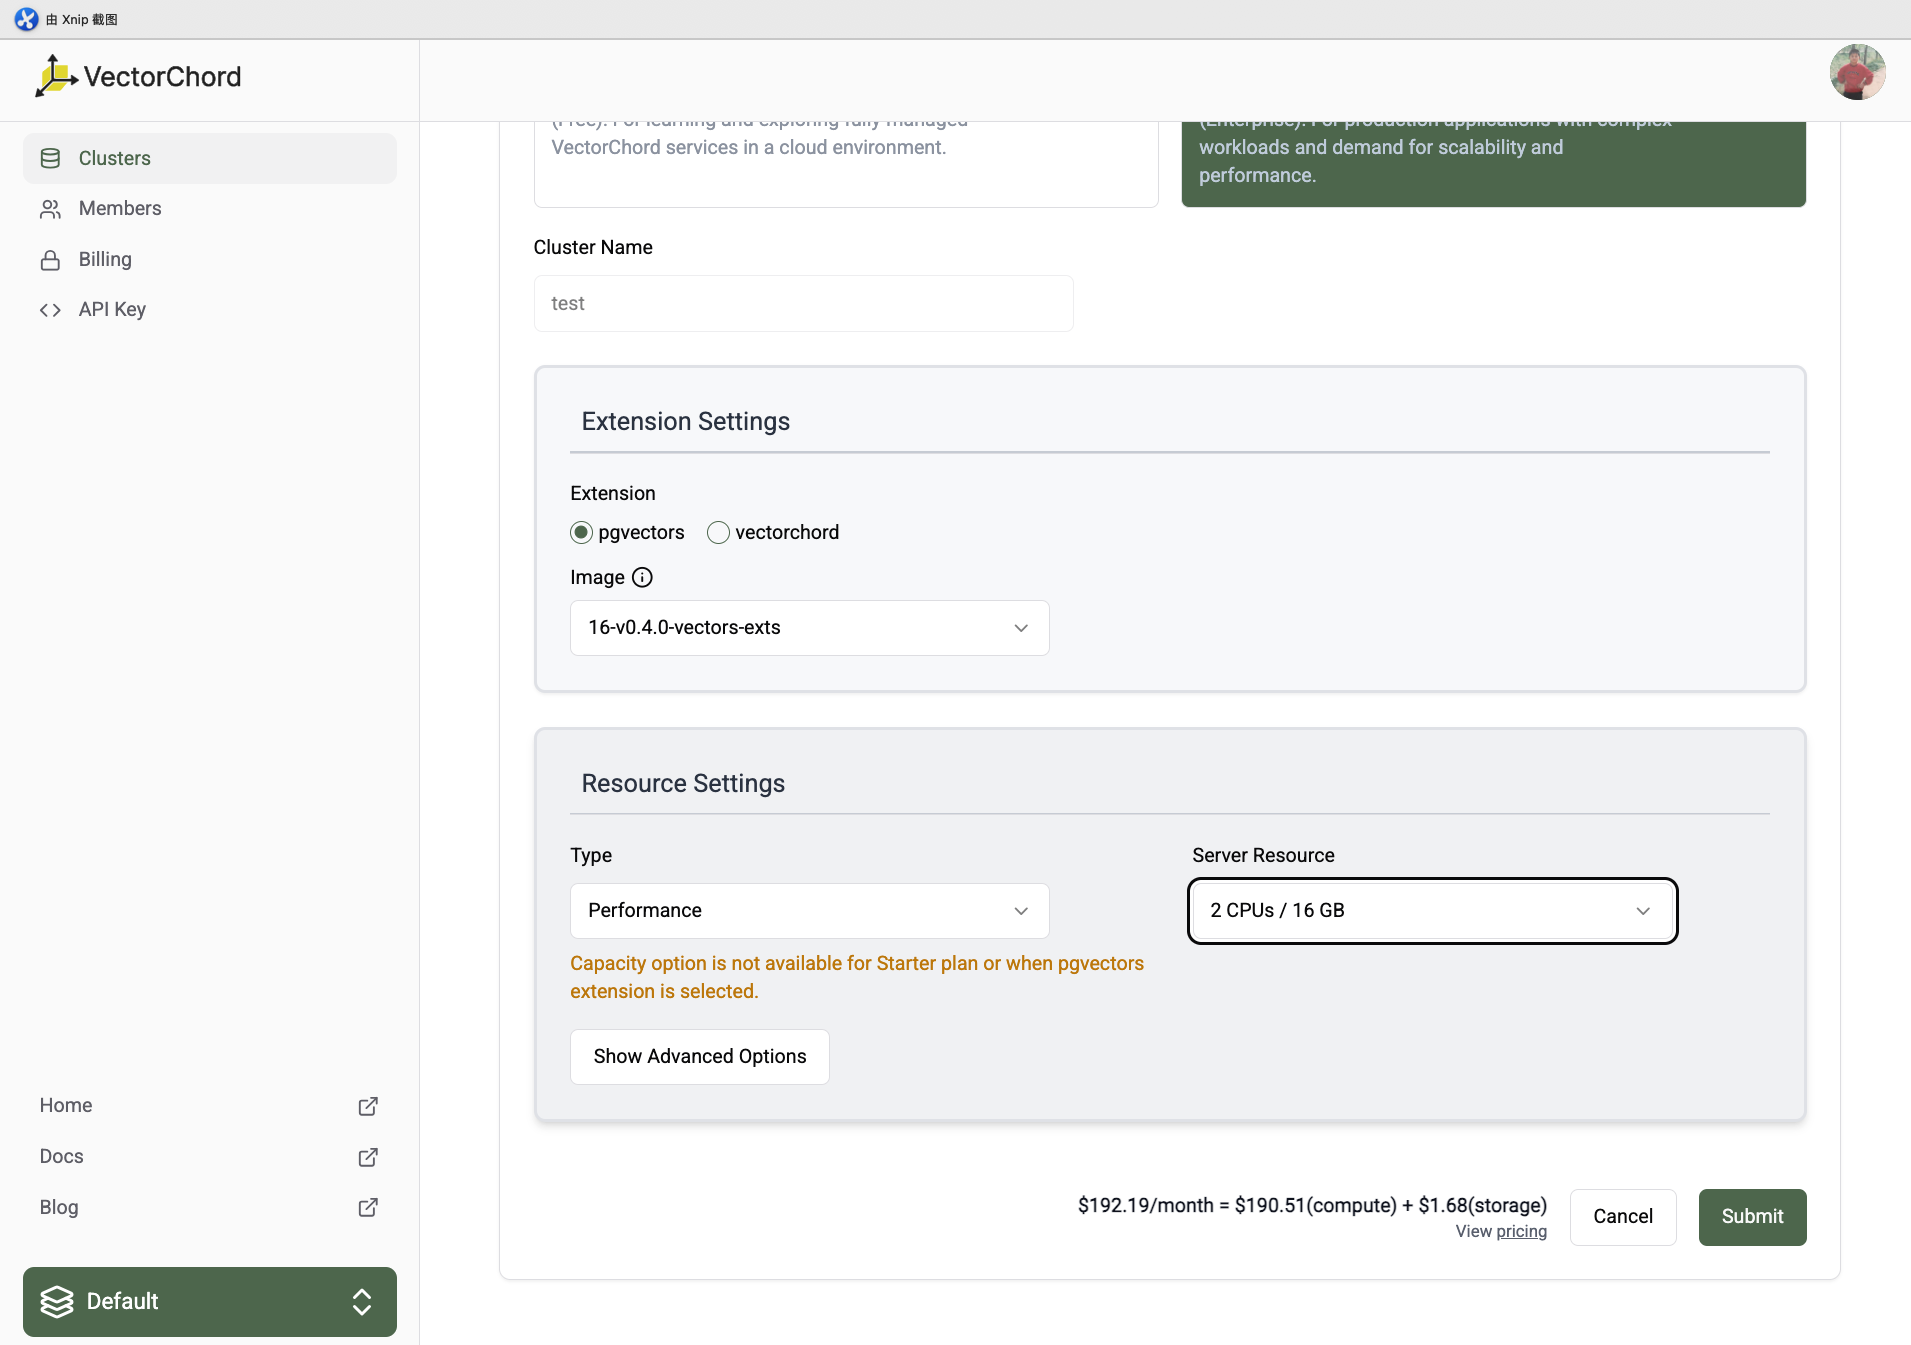
In the upgrade page, you can select the new plan and server resource. The price will be calculated based on the new server resource. Click the Submit button to upgrade the cluster.
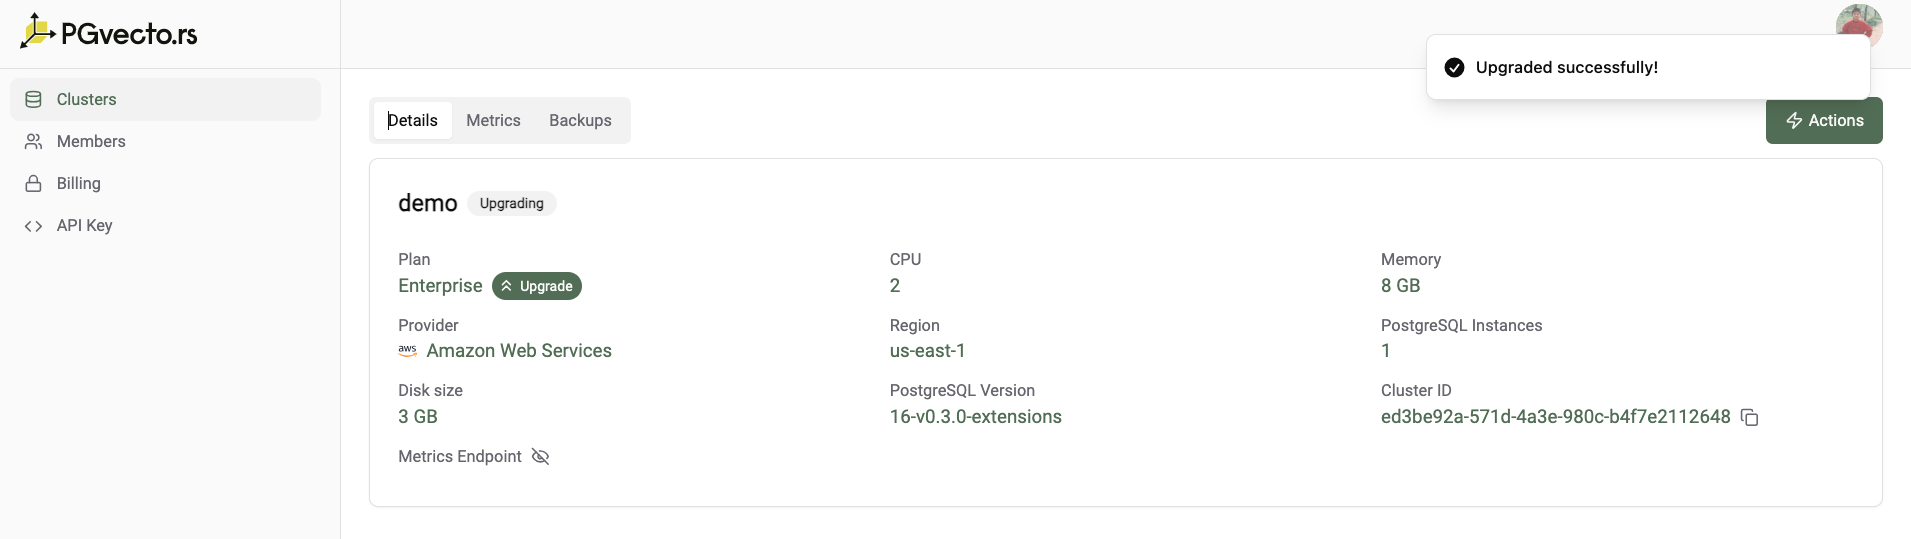
After submitting the upgrade request, the cluster will be in the Upgrading status. The cluster will be unavailable during the upgrade process. The upgrade process may take a few minutes to complete. After the upgrade process is completed, the cluster will be in the Ready status. And the cpu, memory will be updated to the new server resource, and the storage will remain the same.
Increasing only storage
If you only want to increase the storage, the status of the cluster need to be Ready. And click the Upgrade button in the cluster detail page.
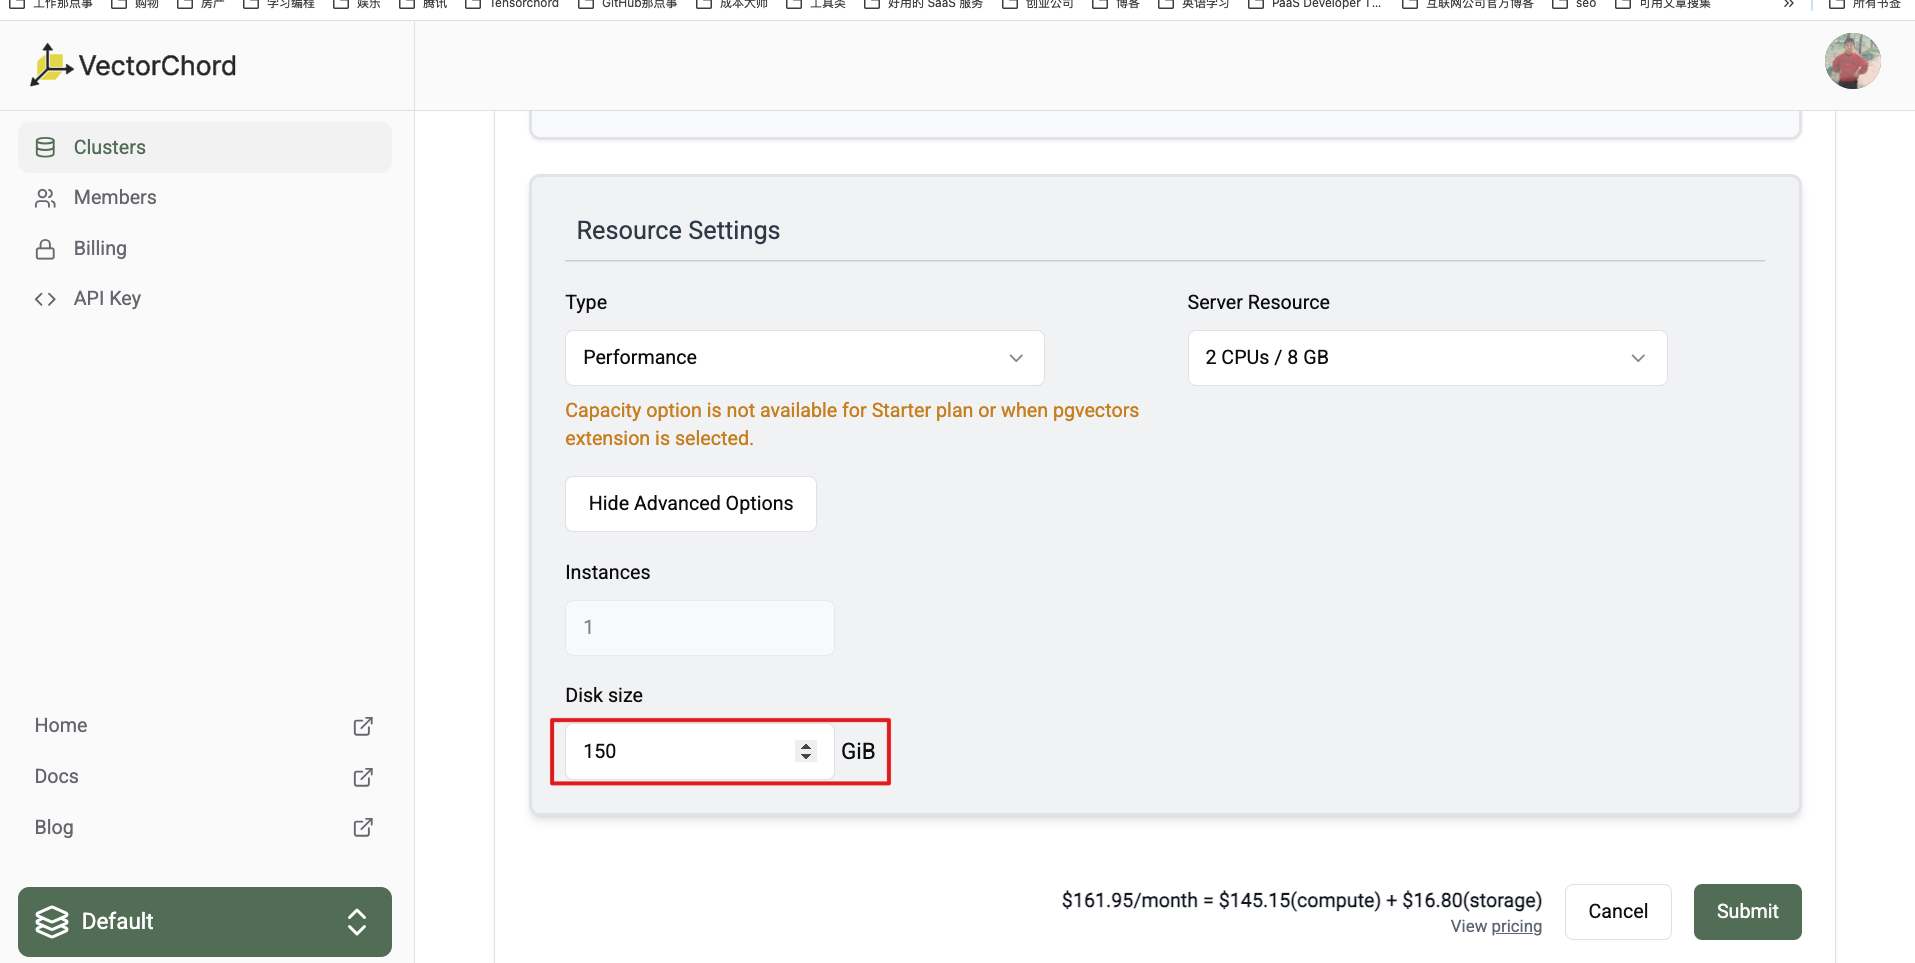
In the upgrade page, you can insert the new disk size in advanced options. The price will be calculated based on the new storage size. Click the Submit button to upgrade the cluster.
After a few minutes, the status of cluster will change from Upgrading to Ready. And the storage will be updated to the new storage size, and the cpu, memory will remain the same.
If you want to upgrade the server resource and storage at the same time, you can directly select the server resource and disk size in the upgrade page. The price will be calculated based on the new server resource and storage size. Currently, we not support downgrade the server resource and storage size. If you want to downgrade the server resource and storage size, you can contact us to help you.
4.7 - API Keys
On VectorChord Cloud, every project comes with a set of API keys. These keys are essential authentication tokens required for initiating terraform operations.
On VectorChord Cloud, every project comes with a set of API keys. These keys are essential authentication tokens required for initiating terraform operations.
Role-based Access Control (RBAC)
Role-based Access Control (RBAC) is a crucial security mechanism in VectorChord Cloud, applicable to managing API calls. This system allows for fine-grained control over access to resources by assigning roles with specific permissions to users within the projects.
For more information on access levels of each role, see Authorization.
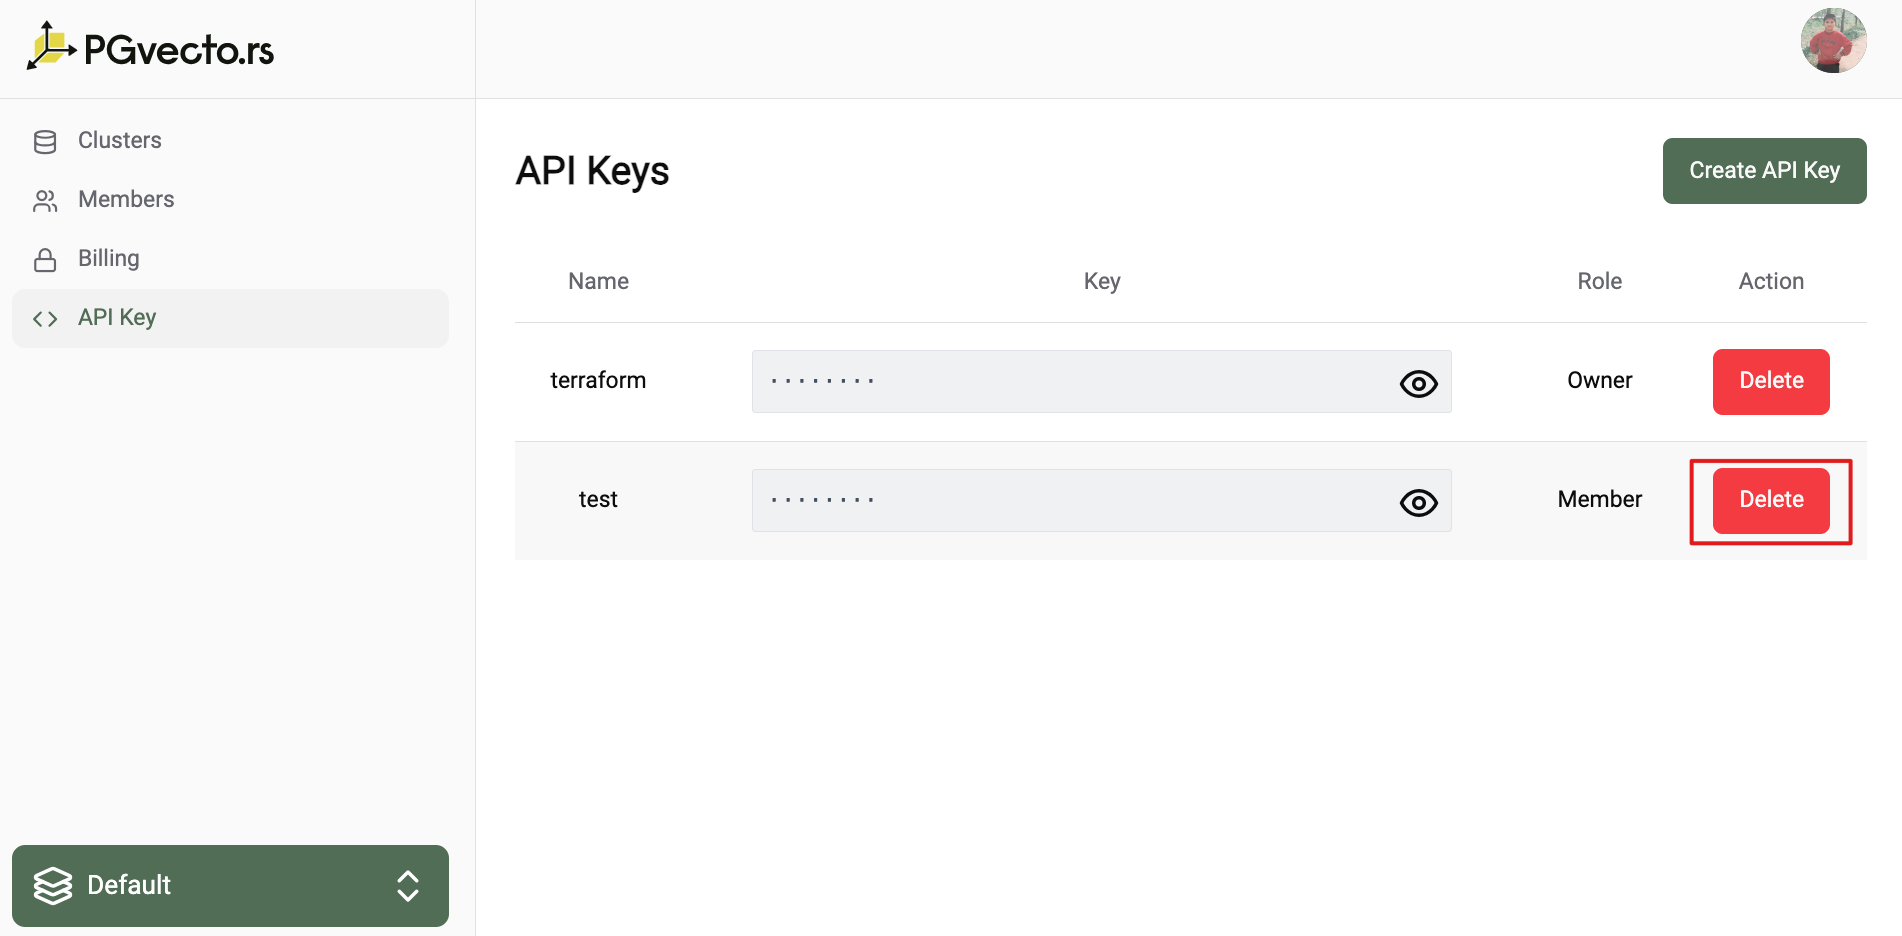
Create an API Key
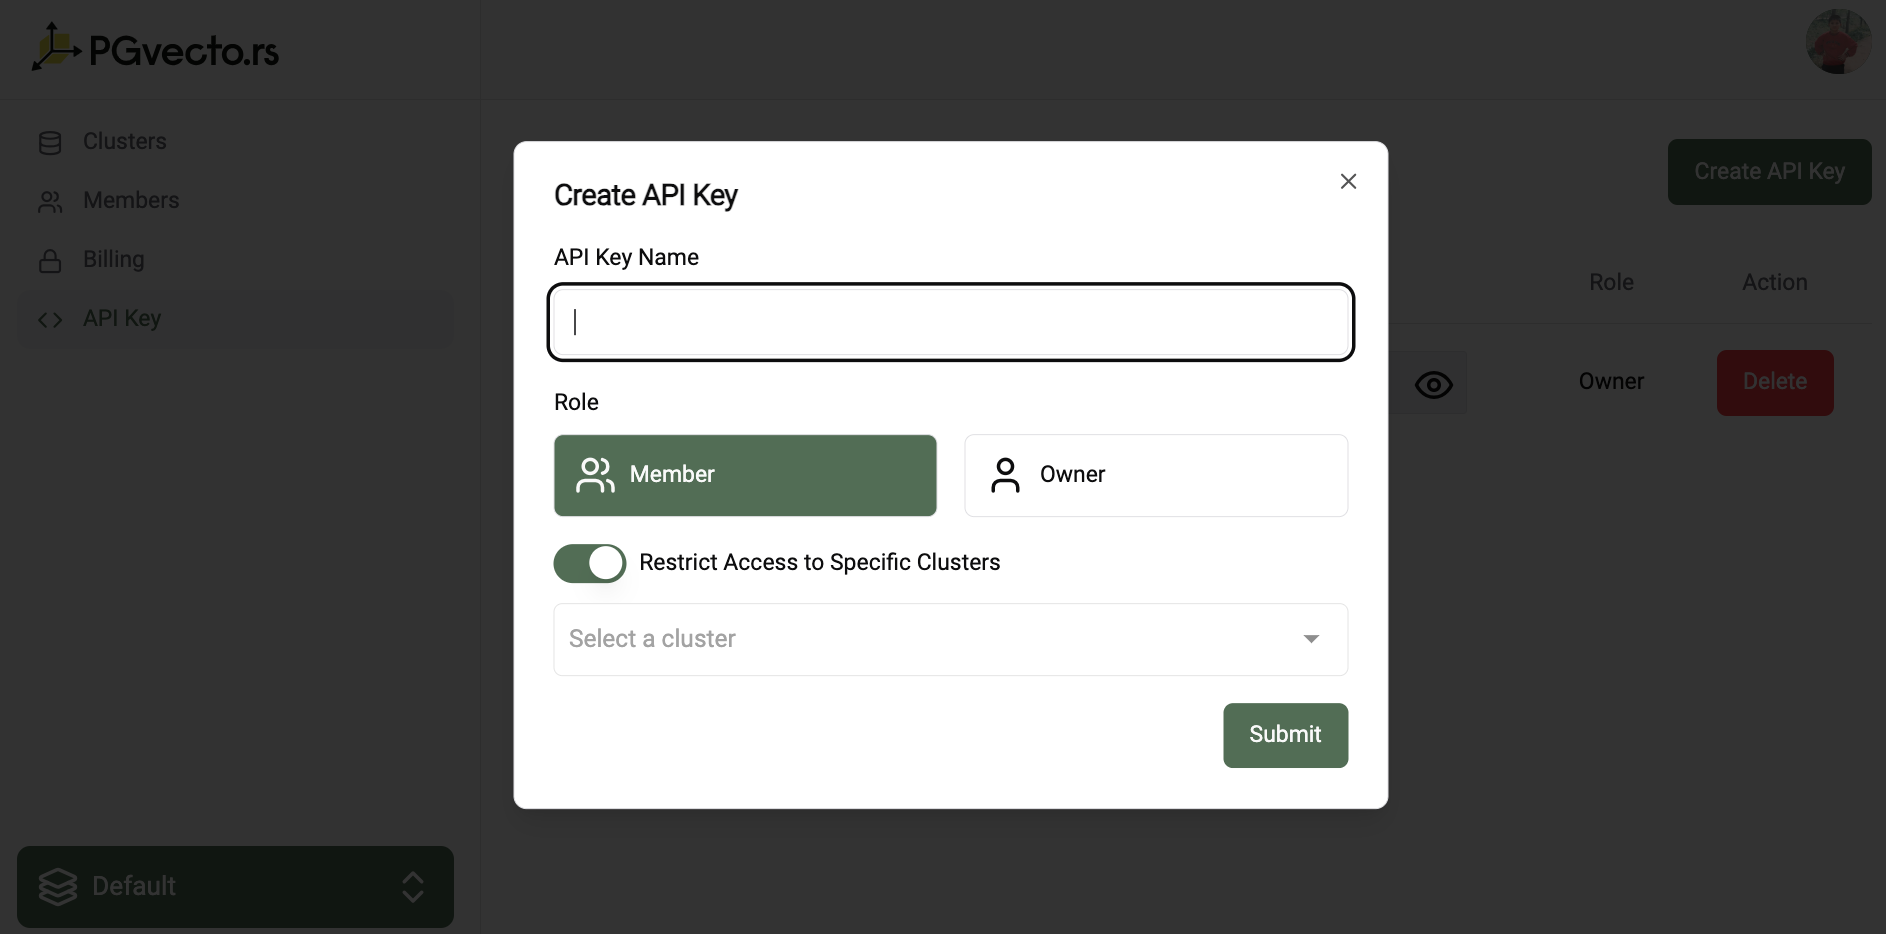
To create an API key, follow these steps:
Navigate to the API Key section in the left-hand menu.
Click the Create API Key button.
Enter a name for the API key.
Select the role for the API key.
Owner: The owner has full access to the project cluster.
Member: The member has read-only access to the project cluster. However, you can specify clusters to which the member has full access.
Click the Create button.
Delete an API Key
To delete an API key, follow these steps:
Navigate to the API Key section in the left-hand menu.
Click the Delete button next to the API key you want to delete.
Warning
Notice that once you delete an API key, you cannot recover it.
List of API Keys
To view the list of API keys, follow these steps:
Navigate to the API Key section in the left-hand menu.
You can view the list of API keys with their respective roles.
Warning
If you are not the project owner, you will not have access to the list of API keys.
4.8 - Terraform Integration Overview with VectorChord Cloud
This guide walks you through the process of installing and configuring the PGVecto.rs Cloud provider.
This guide walks you through the process of installing and configuring the PGVecto.rs Cloud provider.
1. Prerequisites
Before you begin, ensure you have the following:
Terraform Installed: Download and install Terraform from here by following the provided instructions.
VectorChord Cloud Account: Access to VectorChord Cloud and your API Key are essential. Go to the VectorChord Cloud Console and create an API key. The API key must have the ProjectOwner permissions. For more information, see API Key.
2. Download VectorChord Cloud Terraform Provider
Start by configuring the VectorChord Cloud provider within your Terraform configuration file (main.tf). Follow these steps:
Initialize the Terraform configuration by running:
$ terraform init

Initializing the backend...

Initializing provider plugins...
- Reusing previous version of tensorchord/pgvecto-rs-cloud from the dependency lock file
- Using previously-installed tensorchord/pgvecto-rs-cloud v0.0.2

Terraform has been successfully initialized!

You may now begin working with Terraform. Try running "terraform plan" to see
any changes that are required for your infrastructure. All Terraform commands
should now work.

If you ever set or change modules or backend configuration for Terraform,
rerun this command to reinitialize your working directory. If you forget, other
commands will detect it and remind you to do so if necessary.
Terraform will download the pgvecto-rs-cloud provider and install it in a hidden subdirectory of your current working directory, named .terraform.
Replace <your-api-key> with your VectorChord Cloud API Key.
Option 2: Use Environment Variable
Set the API key as an environment variable:
exportPGVECTORS_CLOUD_API_KEY="<your-api-key>"
Then the provider declaration in your main.tf file is simply:
provider"pgvecto-rs-cloud" {
}
By following these steps, you should have the VectorChord Cloud Terraform provider configured and ready to move on to the next steps.
4. Manage VectorChord Cloud Cluster
Create a Enterprise Plan
The following example demonstrates how to create a PostgreSQL cluster with the Enterprise plan. For more information about the options, refer to the Resource Schema.
$ terraform validate && terraform plan && terraform output
Success! The configuration is valid.
Terraform used the selected providers to generate the following execution plan. Resource actions are
indicated with the following symbols:
+ create
Terraform will perform the following actions:
# pgvecto-rs-cloud_cluster.enterprise_plan_cluster will be created + resource "pgvecto-rs-cloud_cluster""enterprise_plan_cluster"{ + account_id="8364ded2-5580-45c4-a394-edfa582e35a0" + cluster_name="enterprise-plan-cluster" + cluster_provider="aws" + connect_endpoint=(known after apply) + database_name="test" + first_recoverability_point=(known after apply) + id=(known after apply) + image="15-v0.3.0-public" + last_archived_wal_time=(known after apply) + last_updated=(known after apply) + pg_data_disk_size="10" + plan="Enterprise" + region="eu-west-1" + server_resource="aws-m7i-large-2c-8g" + status=(known after apply)}Plan: 1 to add, 0 to change, 0 to destroy.
Changes to Outputs:
+ psql_endpoint_enterprise=(known after apply)─────────────────────────────────────────────────────────────────────────────────────────────────────────
Note: You didn't use the -out option to save this plan, so Terraform can't guarantee to take exactly
these actions if you run "terraform apply" now.
╷
│ Warning: No outputs found
│
│ The state file either has no outputs defined, or all the defined outputs are empty. Please define an
│ output in your configuration with the `output` keyword and run `terraform refresh`for it to become
│ available. If you are using interpolation, please verify the interpolated value is not empty. You can
│ use the `terraform console`command to assist.
$ terraform apply
Terraform used the selected providers to generate the following execution plan. Resource actions are
indicated with the following symbols:
+ create
Terraform will perform the following actions:
# pgvecto-rs-cloud_cluster.enterprise_plan_cluster will be created + resource "pgvecto-rs-cloud_cluster""enterprise_plan_cluster"{ + account_id="8364ded2-5580-45c4-a394-edfa582e35a0" + cluster_name="enterprise-plan-cluster" + cluster_provider="aws" + connect_endpoint=(known after apply) + database_name="test" + first_recoverability_point=(known after apply) + id=(known after apply) + image="15-v0.3.0-public" + last_archived_wal_time=(known after apply) + last_updated=(known after apply) + pg_data_disk_size="10" + plan="Enterprise" + region="eu-west-1" + server_resource="aws-m7i-large-2c-8g" + status=(known after apply)}Plan: 1 to add, 0 to change, 0 to destroy.
Changes to Outputs:
+ psql_endpoint_enterprise=(known after apply)Do you want to perform these actions?
Terraform will perform the actions described above.
Only 'yes' will be accepted to approve.
Enter a value: yes
pgvecto-rs-cloud_cluster.enterprise_plan_cluster: Creating...
pgvecto-rs-cloud_cluster.enterprise_plan_cluster: Still creating... [10s elapsed]...[snip]...
pgvecto-rs-cloud_cluster.enterprise_plan_cluster: Still creating... [2m0s elapsed]pgvecto-rs-cloud_cluster.enterprise_plan_cluster: Creation complete after 2m9s [id=9986cfff-9758-4cbc-9433-084fe6e7936f]Apply complete! Resources: 1 added, 0 changed, 0 destroyed.
Outputs:
psql_endpoint_enterprise="postgres://test_user:plvpx1YvXmBu@enterprise-plan-cluster-hp2goemtvtd5q0ew.eu-west-1-dev.aws.vectorchord.com:5432/test?sslmode=require"
Connect to the cluster
$ psql "postgres://test_user:plvpx1YvXmBu@enterprise-plan-cluster-hp2goemtvtd5q0ew.eu-west-1-dev.aws.vectorchord.com:5432/test?sslmode=require"psql (15.3, server 15.8 (Debian 15.8-1.pgdg120+1))SSL connection (protocol: TLSv1.3, cipher: TLS_AES_256_GCM_SHA384, compression: off)Type "help"for help.
test=> \dx
List of installed extensions
Name | Version | Schema | Description
---------+---------+------------+----------------------------------------------------------------------------------------------
pgaudit | 1.7 | public | provides auditing functionality
plpgsql | 1.0 | pg_catalog | PL/pgSQL procedural language
vectors | 0.3.0 | public | vectors: Vector database plugin for Postgres, written in Rust, specifically designed for LLM
(3 rows)test=> CREATE TABLE test(id integer PRIMARY KEY, embedding vector(3) NOT NULL);CREATE TABLE
test=> INSERT INTO test SELECT i, ARRAY[random(), random(), random()]::real[] FROM generate_series(1, 100) i;INSERT 0100test=> CREATE INDEX ON test USING vectors (embedding vector_l2_ops) WITH (options="[indexing.hnsw]");CREATE INDEX
test=> SELECT * FROM test ORDER BY embedding <-> '[0.40671515, 0.24202824, 0.37059402]' LIMIT 10; id | embedding
----+---------------------------------------
10|[0.3603687, 0.2597973, 0.48529512]68|[0.341106, 0.36290976, 0.4206507]46|[0.29137495, 0.10839028, 0.2966823]56|[0.5840259, 0.3336522, 0.33045283]54|[0.2123173, 0.21955383, 0.2764878]97|[0.37704793, 0.45084634, 0.3079026]64|[0.33564404, 0.46575224, 0.33372045]8|[0.5397384, 0.41881782, 0.26093292]66|[0.42560518, 0.0136409905, 0.2709207]26|[0.37973955, 0.24594037, 0.61934566](10 rows)
Upgrade the cluster
Up to now, we only support upgrading the server resource, plan and disk size. There are some restrictions on the upgrade operation, such as the cpu and memory of the server resource must be greater or equal to the original one, the disk size must be greater or equal to the original one. And the plan upgrade must from the Starter to Enterprise.
$ terraform apply
pgvecto-rs-cloud_cluster.enterprise_plan_cluster: Refreshing state... [id=bbfb4ed2-b434-4e20-994f-6627e8f3785b]Terraform used the selected providers to generate the following execution plan. Resource actions are
indicated with the following symbols:
~ update in-place
Terraform will perform the following actions:
# pgvecto-rs-cloud_cluster.enterprise_plan_cluster will be updated in-place ~ resource "pgvecto-rs-cloud_cluster""enterprise_plan_cluster"{ ~ connect_endpoint="postgres://test_user:q7SdfHYVqkGB@enterprise-plan-cluster-tiqmlrllv36fmh4h.eu-west-1-dev.aws.vectorchord.com:5432/test?sslmode=require" -> (known after apply) ~ first_recoverability_point="2024-09-20T03:53:04Z" -> (known after apply)id="bbfb4ed2-b434-4e20-994f-6627e8f3785b" ~ last_archived_wal_time="2024-09-20T03:53:07Z" -> (known after apply) ~ last_updated="2024-09-20T03:52:38Z" -> (known after apply) ~ pg_data_disk_size="10" -> "20" ~ server_resource="aws-m7i-large-2c-8g" -> "aws-r7i-large-2c-16g" ~ status="Ready" -> (known after apply)# (7 unchanged attributes hidden)}Plan: 0 to add, 1 to change, 0 to destroy.
Changes to Outputs:
~ psql_endpoint_enterprise="postgres://test_user:q7SdfHYVqkGB@enterprise-plan-cluster-tiqmlrllv36fmh4h.eu-west-1-dev.aws.vectorchord.com:5432/test?sslmode=require" -> (known after apply)Do you want to perform these actions?
Terraform will perform the actions described above.
Only 'yes' will be accepted to approve.
Enter a value: yes
pgvecto-rs-cloud_cluster.enterprise_plan_cluster: Modifying... [id=bbfb4ed2-b434-4e20-994f-6627e8f3785b]pgvecto-rs-cloud_cluster.enterprise_plan_cluster: Still modifying... [id=bbfb4ed2-b434-4e20-994f-6627e8f3785b, 10s elapsed]pgvecto-rs-cloud_cluster.enterprise_plan_cluster: Still modifying... [id=bbfb4ed2-b434-4e20-994f-6627e8f3785b, 20s elapsed]pgvecto-rs-cloud_cluster.enterprise_plan_cluster: Still modifying... [id=bbfb4ed2-b434-4e20-994f-6627e8f3785b, 30s elapsed]pgvecto-rs-cloud_cluster.enterprise_plan_cluster: Still modifying... [id=bbfb4ed2-b434-4e20-994f-6627e8f3785b, 40s elapsed]pgvecto-rs-cloud_cluster.enterprise_plan_cluster: Still modifying... [id=bbfb4ed2-b434-4e20-994f-6627e8f3785b, 50s elapsed]pgvecto-rs-cloud_cluster.enterprise_plan_cluster: Modifications complete after 53s [id=bbfb4ed2-b434-4e20-994f-6627e8f3785b]Apply complete! Resources: 0 added, 1 changed, 0 destroyed.
Outputs:
psql_endpoint_enterprise="postgres://test_user:q7SdfHYVqkGB@enterprise-plan-cluster-tiqmlrllv36fmh4h.eu-west-1-dev.aws.vectorchord.com:5432/test?sslmode=require"
Destroy the cluster
$ terraform destroy
pgvecto-rs-cloud_cluster.enterprise_plan_cluster: Refreshing state... [id=bbfb4ed2-b434-4e20-994f-6627e8f3785b]Terraform used the selected providers to generate the following execution plan. Resource actions are
indicated with the following symbols:
- destroy
Terraform will perform the following actions:
# pgvecto-rs-cloud_cluster.enterprise_plan_cluster will be destroyed - resource "pgvecto-rs-cloud_cluster""enterprise_plan_cluster"{ - account_id="8364ded2-5580-45c4-a394-edfa582e35a0" -> null
- cluster_name="enterprise-plan-cluster" -> null
- cluster_provider="aws" -> null
- connect_endpoint="postgres://test_user:q7SdfHYVqkGB@enterprise-plan-cluster-tiqmlrllv36fmh4h.eu-west-1-dev.aws.vectorchord.com:5432/test?sslmode=require" -> null
- database_name="test" -> null
- first_recoverability_point="2024-09-20T03:53:04Z" -> null
- id="bbfb4ed2-b434-4e20-994f-6627e8f3785b" -> null
- image="15-v0.3.0-public" -> null
- last_archived_wal_time="2024-09-20T03:53:07Z" -> null
- last_updated="2024-09-20T03:55:04Z" -> null
- pg_data_disk_size="20" -> null
- plan="Enterprise" -> null
- region="eu-west-1" -> null
- server_resource="aws-r7i-large-2c-16g" -> null
- status="Ready" -> null
}Plan: 0 to add, 0 to change, 1 to destroy.
Changes to Outputs:
- psql_endpoint_enterprise="postgres://test_user:q7SdfHYVqkGB@enterprise-plan-cluster-tiqmlrllv36fmh4h.eu-west-1-dev.aws.vectorchord.com:5432/test?sslmode=require" -> null
Do you really want to destroy all resources?
Terraform will destroy all your managed infrastructure, as shown above.
There is no undo. Only 'yes' will be accepted to confirm.
Enter a value: yes
pgvecto-rs-cloud_cluster.enterprise_plan_cluster: Destroying... [id=bbfb4ed2-b434-4e20-994f-6627e8f3785b]pgvecto-rs-cloud_cluster.enterprise_plan_cluster: Destruction complete after 1s
Destroy complete! Resources: 1 destroyed.
5. Recovery
In this section, we will show you how to restore your PostgreSQL database from existing backup or point-in-time recovery (PITR).
Recovery from the backup
Warning
The cluster you are restoring to should have the same image,database name and region as the backup.
$ terraform apply
Terraform used the selected providers to generate the following execution plan. Resource actions are
indicated with the following symbols:
+ create
Terraform will perform the following actions:
# pgvecto-rs-cloud_cluster.enterprise_plan_cluster will be created + resource "pgvecto-rs-cloud_cluster""enterprise_plan_cluster"{ + account_id="8364ded2-5580-45c4-a394-edfa582e35a0" + backup_id="4f53b451-8e19-443c-bcd7-43420d105696" + cluster_name="enterprise-plan-cluster" + cluster_provider="aws" + connect_endpoint=(known after apply) + database_name="test" + enable_restore=true + first_recoverability_point=(known after apply) + id=(known after apply) + image="15-v0.3.0-public" + last_archived_wal_time=(known after apply) + last_updated=(known after apply) + pg_data_disk_size="20" + plan="Enterprise" + region="us-east-1" + server_resource="aws-r7i-large-2c-16g" + status=(known after apply)}Plan: 1 to add, 0 to change, 0 to destroy.
Changes to Outputs:
+ psql_endpoint_enterprise=(known after apply)Do you want to perform these actions?
Terraform will perform the actions described above.
Only 'yes' will be accepted to approve.
Enter a value: yes
pgvecto-rs-cloud_cluster.enterprise_plan_cluster: Creating...
pgvecto-rs-cloud_cluster.enterprise_plan_cluster: Still creating... [10s elapsed]...[snip]...
pgvecto-rs-cloud_cluster.enterprise_plan_cluster: Still creating... [2m10s elapsed]pgvecto-rs-cloud_cluster.enterprise_plan_cluster: Creation complete after 2m19s [id=8ba9e5b4-f06c-4ef0-8e10-b6663237a532]Apply complete! Resources: 1 added, 0 changed, 0 destroyed.
Outputs:
psql_endpoint_enterprise="postgres://test_user:j4Xu6TIstD1F@enterprise-plan-cluster-kxy2lovbc4crarmn.modelz.tech:5432/test?sslmode=require"
# you can check the table and index$ psql "postgres://test_user:j4Xu6TIstD1F@enterprise-plan-cluster-kxy2lovbc4crarmn.modelz.tech:5432/test?sslmode=require"psql (15.3, server 15.8 (Debian 15.8-1.pgdg120+1))SSL connection (protocol: TLSv1.3, cipher: TLS_AES_256_GCM_SHA384, compression: off)Type "help"for help.
test=> \dt
List of relations
Schema | Name | Type | Owner
--------+------+-------+-----------
public |test| table | test_user
(1 row)test=> SELECT * FROM test ORDER BY embedding <-> '[0.40671515, 0.24202824, 0.37059402]' LIMIT 10; id | embedding
----+--------------------------------------
34|[0.4047166, 0.2152912, 0.30516902]56|[0.39068437, 0.3153389, 0.40011033]42|[0.43917453, 0.22915891, 0.44726416]45|[0.47589824, 0.33998397, 0.39237767]43|[0.46702152, 0.09506769, 0.4343289]95|[0.4987348, 0.08346876, 0.28716254]60|[0.5421089, 0.3585022, 0.25259662]80|[0.61970145, 0.2186208, 0.36950335]53|[0.3399207, 0.3417044, 0.55435336]54|[0.3198571, 0.445044, 0.36041933](10 rows)
PITR
Warning
The cluster you are restoring to should have the same image,database name as the cluster.
Get cluster id from dashboard
Create a new cluster with the cluster id and target time
$ terraform apply
Terraform used the selected providers to generate the following execution plan. Resource actions are
indicated with the following symbols:
+ create
Terraform will perform the following actions:
# pgvecto-rs-cloud_cluster.enterprise_plan_cluster will be created + resource "pgvecto-rs-cloud_cluster""enterprise_plan_cluster"{ + account_id="8364ded2-5580-45c4-a394-edfa582e35a0" + cluster_name="enterprise-plan-cluster" + cluster_provider="aws" + connect_endpoint=(known after apply) + database_name="test" + enable_restore=true + first_recoverability_point=(known after apply) + id=(known after apply) + image="15-v0.3.0-public" + last_archived_wal_time=(known after apply) + last_updated=(known after apply) + pg_data_disk_size="20" + plan="Enterprise" + region="eu-west-1" + server_resource="aws-r7i-large-2c-16g" + status=(known after apply) + target_cluster_id="43f17a52-0d07-43d5-91b6-9fbe4641578c" + target_time="2024-09-20T12:00:00+08:00"}Plan: 1 to add, 0 to change, 0 to destroy.
Changes to Outputs:
+ psql_endpoint_enterprise=(known after apply)Do you want to perform these actions?
Terraform will perform the actions described above.
Only 'yes' will be accepted to approve.
Enter a value: yes
pgvecto-rs-cloud_cluster.enterprise_plan_cluster: Creating...
pgvecto-rs-cloud_cluster.enterprise_plan_cluster: Still creating... [10s elapsed]...[snip]...
pgvecto-rs-cloud_cluster.enterprise_plan_cluster: Still creating... [5m20s elapsed]# you can check the table and index$ psql 'postgres://test_user:RKC4wr7MRcwm@enterprise-plan-cluster-4paxqvbzwxudmvja.eu-west-1-dev.aws.vectorchord.com:5432/test?sslmode=require'psql (15.3, server 15.8 (Debian 15.8-1.pgdg120+1))SSL connection (protocol: TLSv1.3, cipher: TLS_AES_256_GCM_SHA384, compression: off)Type "help"for help.
test=> \dt
List of relations
Schema | Name | Type | Owner
--------+------+-------+-----------
public |test| table | test_user
(1 row)test=> SELECT * FROM test ORDER BY embedding <-> '[0.40671515, 0.24202824, 0.37059402]' LIMIT 10; id | embedding
----+--------------------------------------
34|[0.4047166, 0.2152912, 0.30516902]56|[0.39068437, 0.3153389, 0.40011033]42|[0.43917453, 0.22915891, 0.44726416]45|[0.47589824, 0.33998397, 0.39237767]43|[0.46702152, 0.09506769, 0.4343289]95|[0.4987348, 0.08346876, 0.28716254]60|[0.5421089, 0.3585022, 0.25259662]80|[0.61970145, 0.2186208, 0.36950335]53|[0.3399207, 0.3417044, 0.55435336]54|[0.3198571, 0.445044, 0.36041933](10 rows)
4.9 - Regions
With VectorChord Cloud, you can deploy clusters to different Regions. When creating an cluster, pick a Region using the drop-down selector.
Deploying to Regions
With VectorChord Cloud, you can deploy clusters to different Regions. When creating an cluster, pick a Region using the drop-down selector.
Tip
Don’t see the Region or Provider that you want? Please contact us at Discord, we are happy to help.
4.10 - Workflow
Workflow is a feature that allow you can use some pre-defined functions to complete some tasks. For example, you can use ExternalBuildIndex workflow to build in
Overview
Workflow is a feature that allow you can use some pre-defined functions to complete some tasks. For example, you can use ExternalBuildIndex workflow to build index externally for your Postgres cluster. There are some advantages of using workflow:
Out Of Box: You can use the pre-defined functions to complete some tasks without writing any code.
Accelerate Tasks: You can use a server with a higher resource configuration than the PostgreSQL cluster to accelerate the task.
Cluster Stability: The workflow is executed in a separate server, which will not affect the stability of the PostgreSQL cluster.
Low Cost: You do not need to pay continuously like a database for high configuration resources for short-term tasks.
The ExternalBuildIndex workflow is used to build vchord index externally for your Postgres cluster, details can be found here.
In dashboard, you can click the Create Workflow button to create a new workflow.
You need to specify the following information:
Workflow Name: A unique name for your workflow.
Option: The option for ExternalBuildIndex workflow
Table: The table where the vector is located
Column: Vector column name
Dimension: The dimension of the vector
Lists: KMeans n list
DistanceMetric: The distance metric for the vector
DistanceMetricCosine: Cosine distance
DistanceMetricL2: Euclidean distance
DistanceMetricDot: Dot product distance
After submitting the workflow, the workflow will be in the Running status. The workflow will be unavailable during the running process. The running process may take a few minutes to complete. After the running process is completed, the workflow will be in the Succeeded status. You can list all the workflows in the dashboard.
You can check the detail of every step in the workflow detail page.
When the workflow is in the Succeeded status, you can validate the index is ready to use.
$ psql 'postgres://vectorchord_user:C8bTXXFi2vxA@vectorchord-oews3hvirnsq3vi7.us-east-1-dev.aws.vectorchord.com:5432/vectorchord?sslmode=require'psql (15.3, server 16.5)WARNING: psql major version 15, server major version 16.
Some psql features might not work.
SSL connection (protocol: TLSv1.3, cipher: TLS_AES_256_GCM_SHA384, compression: off)Type "help"for help.
vectorchord=# EXPLAIN ANALYZE SELECT * FROM sift ORDER BY embedding <-> '[12,47,14,25,2,3,4,7,14,122,90,7,0,0,6,14,0,24,122,22,2,4,6,0,0,10,93,10,6,6,0,0,122,31,9,23,19,9,8,56,122,100,29,19,3,0,0,25,3,9,43,59,76,32,0,0,8,6,10,7,24,58,1,1,81,23,32,68,14,19,10,23,122,13,2,1,4,9,86,122,3,0,0,8,122,95,68,30,9,2,0,2,26,50,44,13,0,0,0,3,12,82,18,7,6,0,0,0,2,20,112,122,6,5,1,0,3,69,122,43,15,1,0,0,0,27,29,21]' LIMIT 5;------------------------------------------------------------------------------------------------------------------------------------------------------------------------------------------------------------------------------------------------------------------------------------------------------------------------------------------------------------------------------------------
Limit (cost=0.00..1.85 rows=5width=532)(actual time=0.644..0.683 rows=5loops=1) -> Index Scan using sift_embedding_idx on sift (cost=0.00..73962.25 rows=200012width=532)(actual time=0.643..0.681 rows=5loops=1) Order By: (embedding <-> '[12,47,14,25,2,3,4,7,14,122,90,7,0,0,6,14,0,24,122,22,2,4,6,0,0,10,93,10,6,6,0,0,122,31,9,23,19,9,8,56,122,100,29,19,3,0,0,25,3,9,43,59,76,32,0,0,8,6,10,7,24,58,1,1,81,23,32,68,14,19,10,23,122,13,2,1,4,9,86,122,3,0,0,8,122,95,68,30,9,2,0,2,26,50,44,13,0,0,0,3,12,82,18,7,6,0,0,0,2,20,112,122,6,5,1,0,3,69,122,43,15,1,0,0,0,27,29,21]'::vector) Planning Time: 0.069 ms
Execution Time: 0.710 ms
(5 rows)
5 - Pricing
VectorChord Cloud free tier and enterprise compute/storage pricing plans.
5.1 - Cloud Pricing
In VectorChord Cloud, we provide a free tier that allows you learn and explore fully-managed VectorChord services in a cloud environment. Every user can use the
Free Tier
In VectorChord Cloud, we provide a free tier that allows you learn and explore fully-managed VectorChord services in a cloud environment. Every user can use the free tier to create only one cluster and store vector data in it. There are some limitations in the free tier:
Shared resources
Limited storage for WAL(Write-Ahead Log) and PGData (5Gi)
Only support AWS T3 XLarge instance type
Capacity of 100k vectors with 1024 dimensions, this is an estimate, and you can also insert 25k vectors with 4096 dimensions.
Enterprise
For enterprise plan, you can own a dedicated cluster with the following features:
Dedicated resources
Larger storage for WAL and PGData
Support for more instance types
Different capacity options
Server Resources
Free Tier
Enterprise
Performance: Optimized for query performance.
Capacity: Optimized for storage capacity.
6 - Billing & Payment
Manage credit card payment methods and billing invoices.
6.1 - Subscribe by Adding Credit Card
VectorChord Cloud supports credit card payments. You can add multiple credit cards or remove some of them by clicking Delete. Already added credit cards will be
Tip
Billing is for the project, not the user. There are separate invoices for each project, and you must add the payment method separately.
VectorChord Cloud supports credit card payments. You can add multiple credit cards or remove some of them by clicking Delete. Already added credit cards will be displayed on the billing page.
The Add Payment Method button will take you to Stripe’s Add Credit Card page where we will initiate a credit card pre-authorization request. There is no charge for this request. Once the add request is complete, the new credit card will be available and displayed on the Billing page.
Warning
The last credit card for each project cannot be deleted.
6.2 - View Invoice
Currently, the VectorChord Cloud has Orb as its billing provider. From the Billing page, you can click View invoices in Orb to go to the Orb Customer Portal. On
Currently, the VectorChord Cloud has Orb as its billing provider. From the Billing page, you can click View invoices in Orb to go to the Orb Customer Portal. On this external page you can do the following:
Review your compute resource and storage usage
Review your invoices, both paid, issued, and draft
Pay invoices that have been unsuccessfully charged
Review the amount of usage
On the Overview page of the Customer Portal, the Current Billing Period section allows you to check your recent usage:
Histogram titles beginning with AWS indicate compute resources in hours (h).
Histogram titles beginning with EBS show disk space in gigabyte-hours (Gi*h)
Review your invoices
On the Invoice History page of the Customer Portal, you can view all historical invoices along with their usage over time.
Each row can be clicked on to view the details of the invoice.
Manually pay uncharged invoices
For each invoice that is due, VectorChord Cloud will automatically try to charge 3 times within a week. If all attempts fail, your project will be suspended:
You will receive an email informing you that the project has been suspended
You will not be able to create new clusters of the project
Existing clusters in the project will be suspended
The data in the suspended clusters will be kept for 7 days
These invoices are displayed in the Unpaid Invoices section of the Overview page with a status of failed or issued, and you can pay these invoices manually.
7 - Limits & Restrictions
Resource limits and operational restrictions on VectorChord Cloud.
7.1 - Cloud Limits
Learn about the limits and restrictions you should know about your operations on VectorChord Cloud:
Learn about the limits and restrictions you should know about your operations on VectorChord Cloud:
Free Tier: One account can create only one free tier cluster.
Project: One account can belong to maximum five projects.
Does not support HA (High Availability) mode yet.
8 - Troubleshooting
Diagnose and resolve common VectorChord Cloud operational issues.
8.1 - Troubleshooting
If the status of the cluster, if it is NotReady, you can check the metrics of the cluster to see if there are free space for PGData.
Connectivity
1. Cluster is not reachable, you can check the following:
If the status of the cluster, if it is NotReady, you can check the metrics of the cluster to see if there are free space for PGData.
Warning
Do not delete your cluster, it will cause data loss.
Solution:
You can upgrade your cluster to a larger size to solve the problem, you can refer to the upgrade cluster storage for more information. After the upgrade is completed, the cluster will be in the Ready status, and the cluster will be reachable.
If above solution does not work, you can contact us at Discord, we are happy to help.
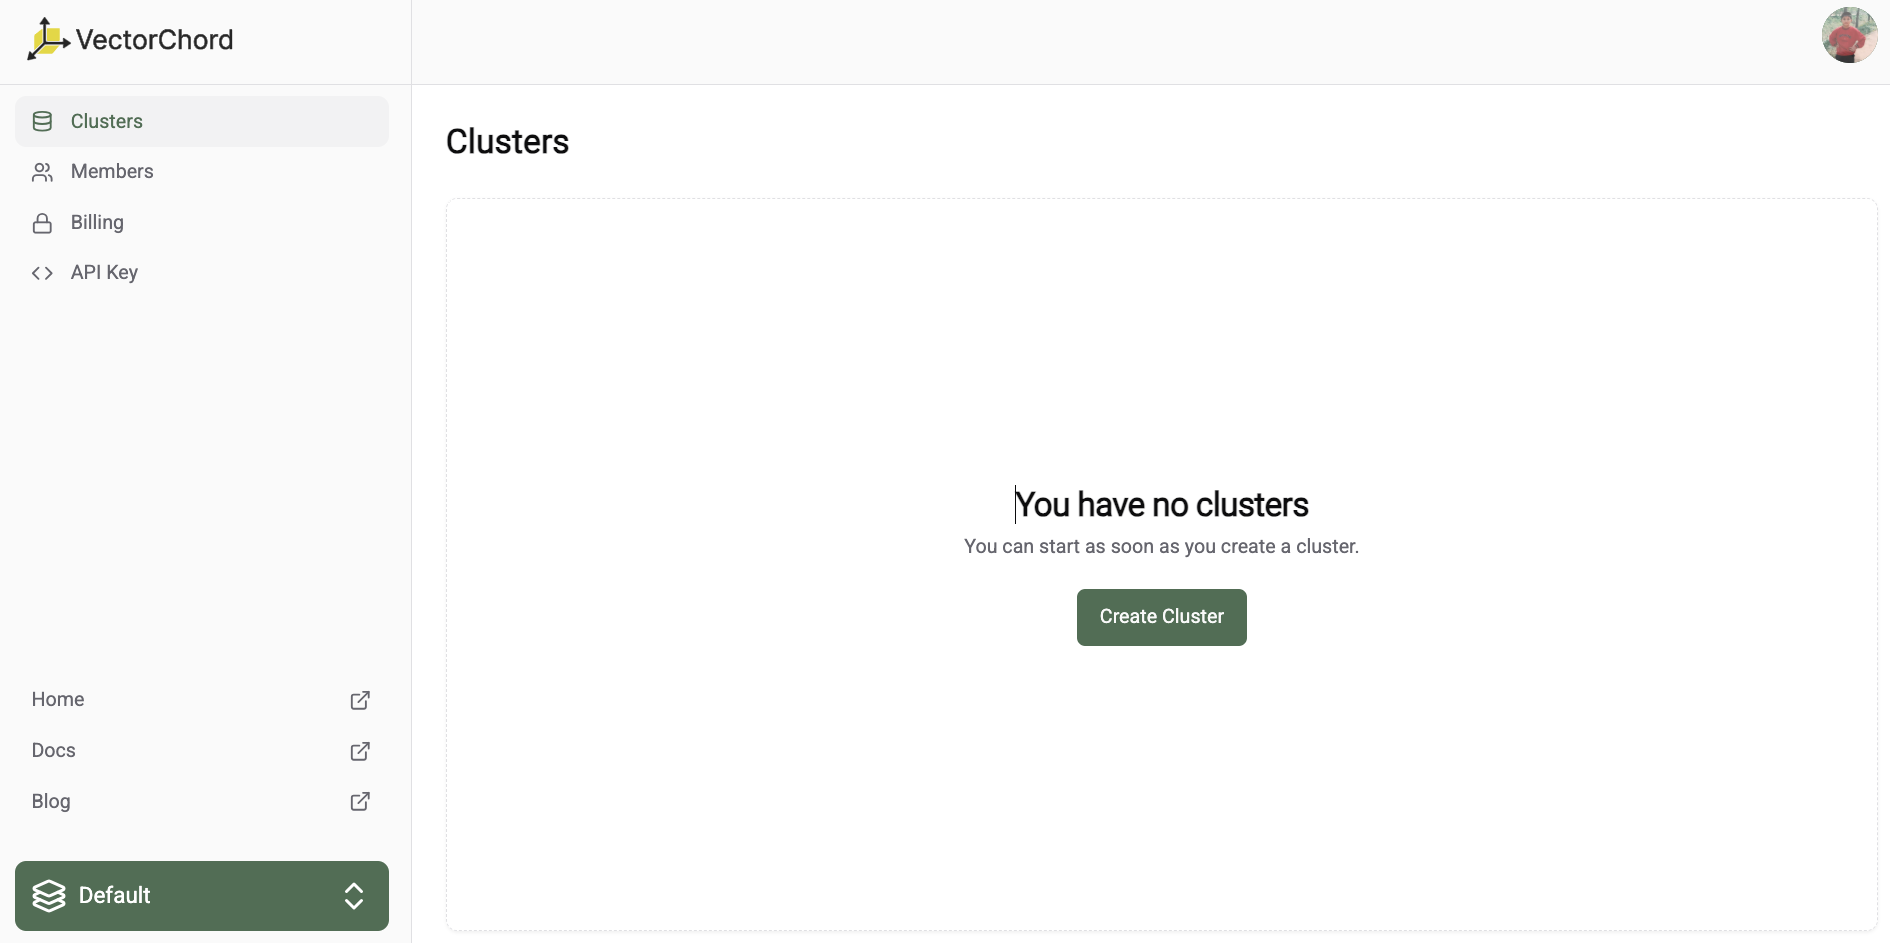
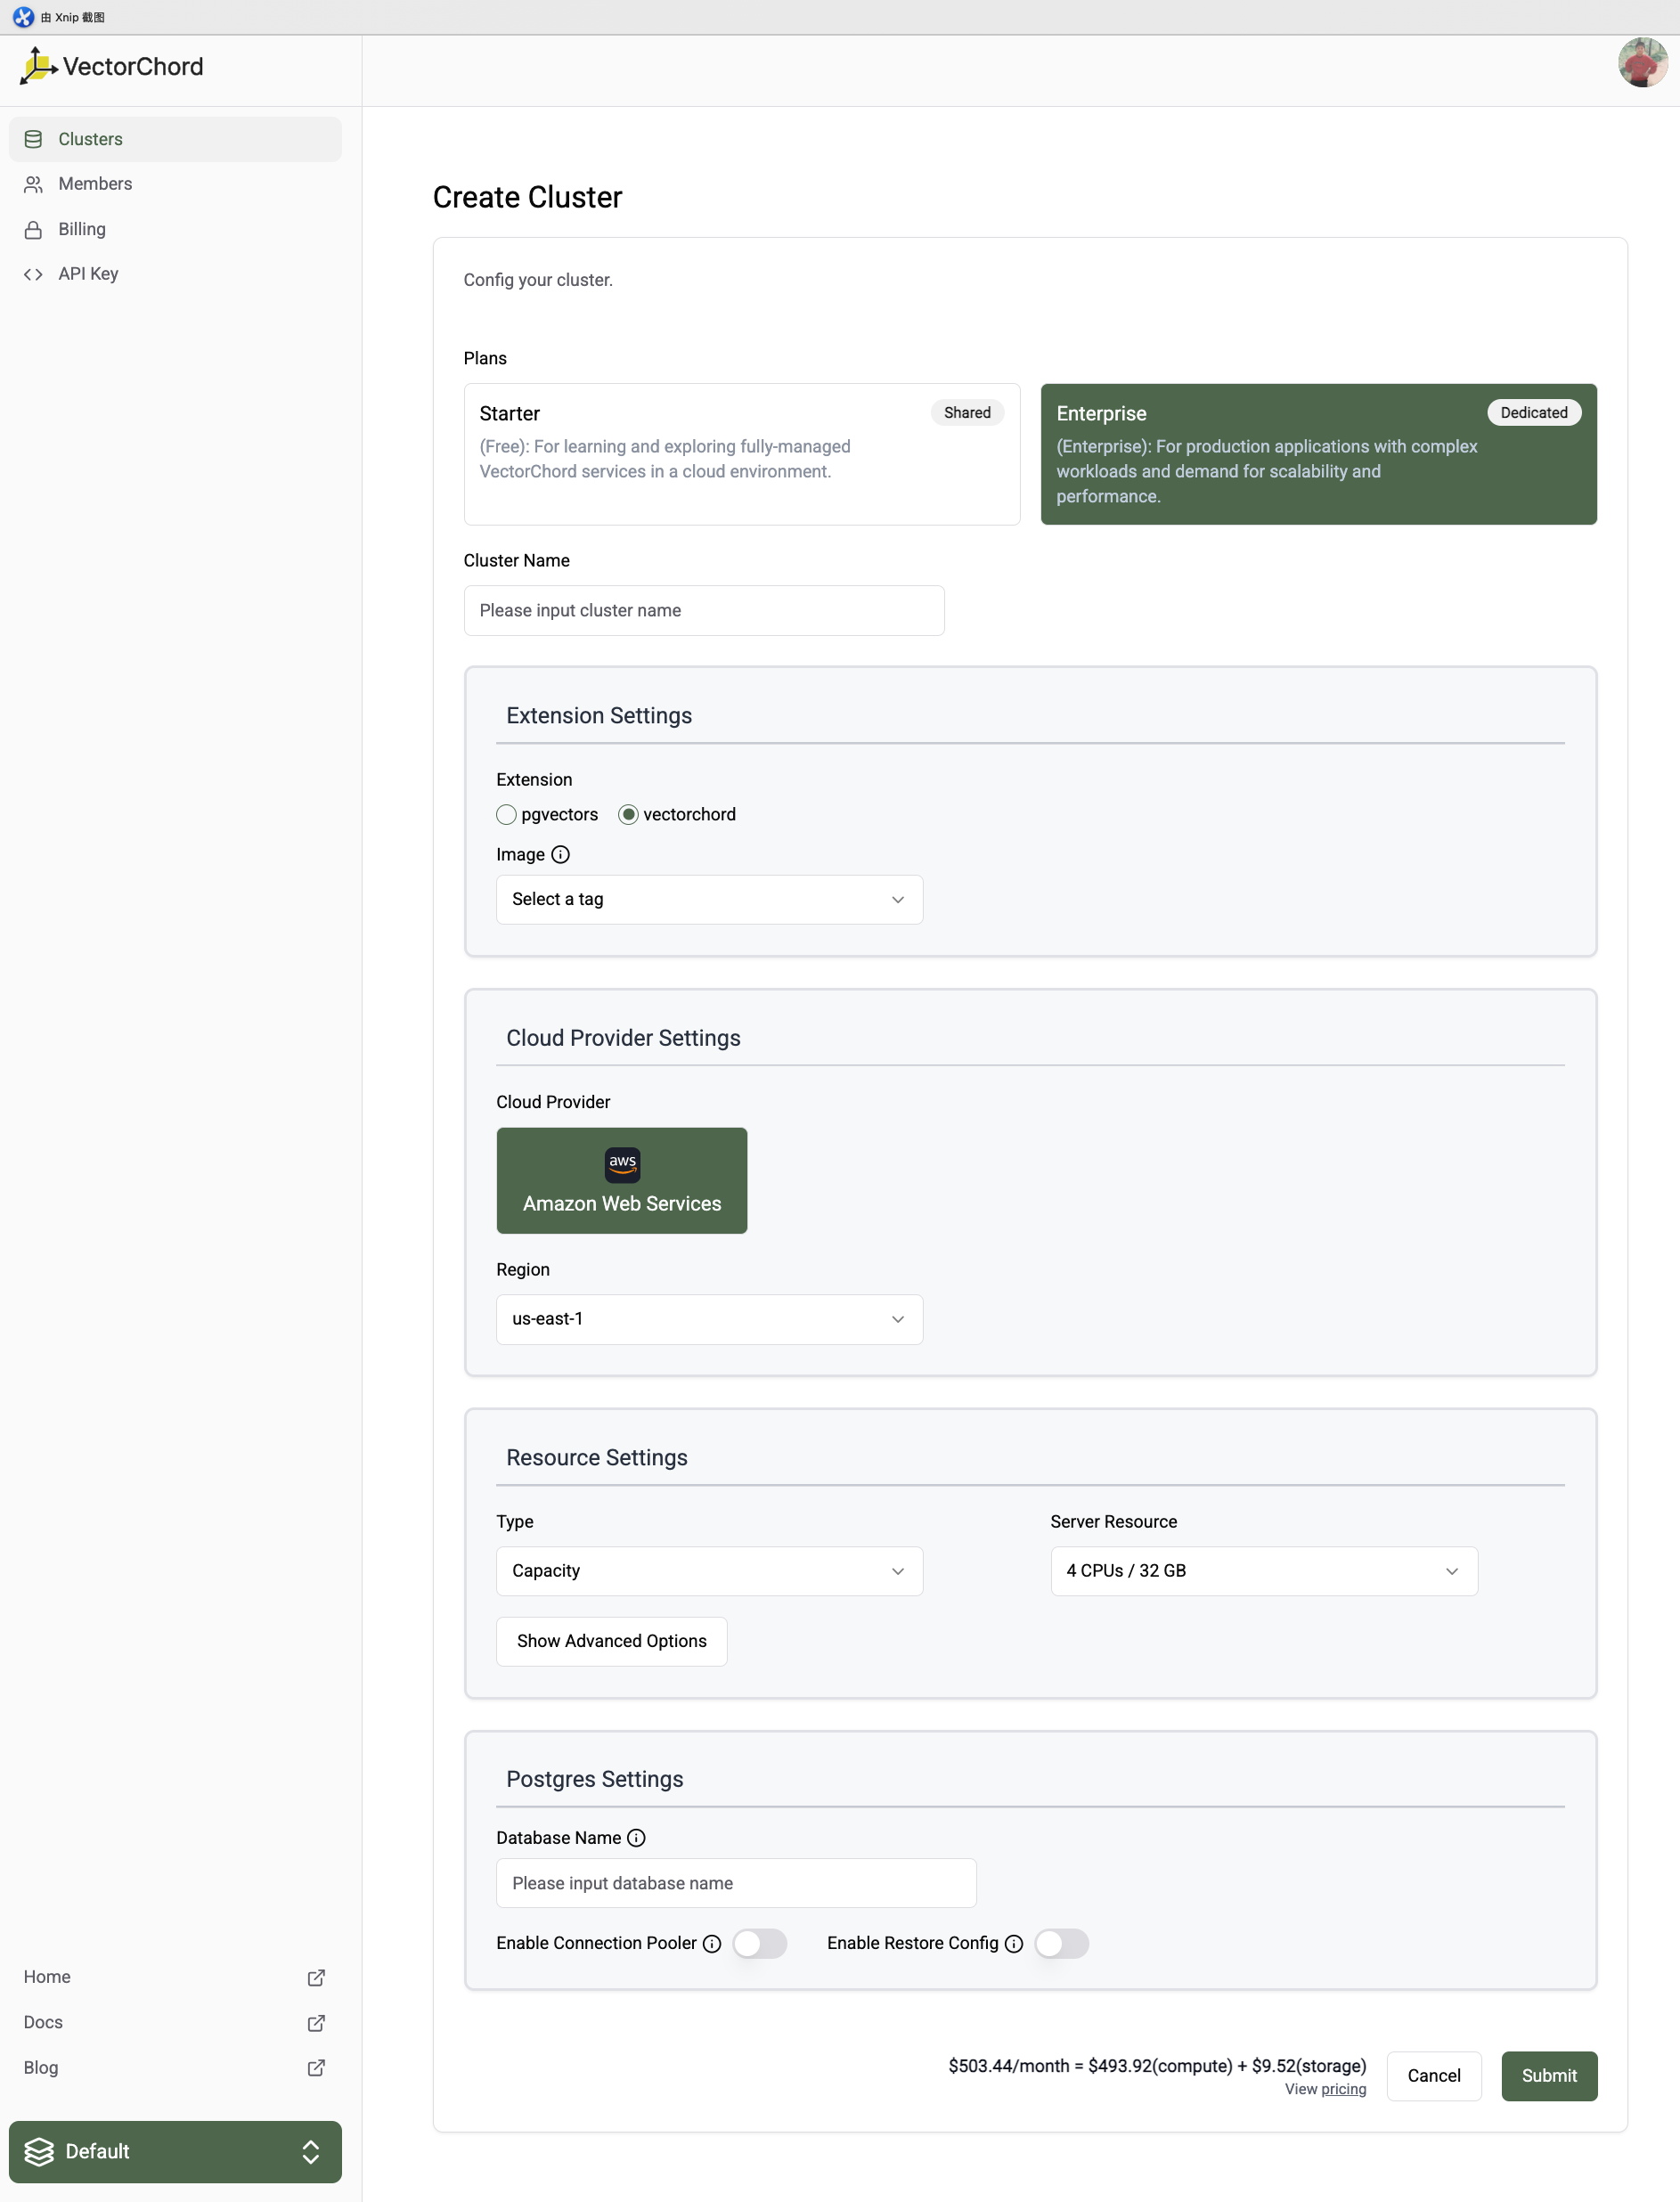
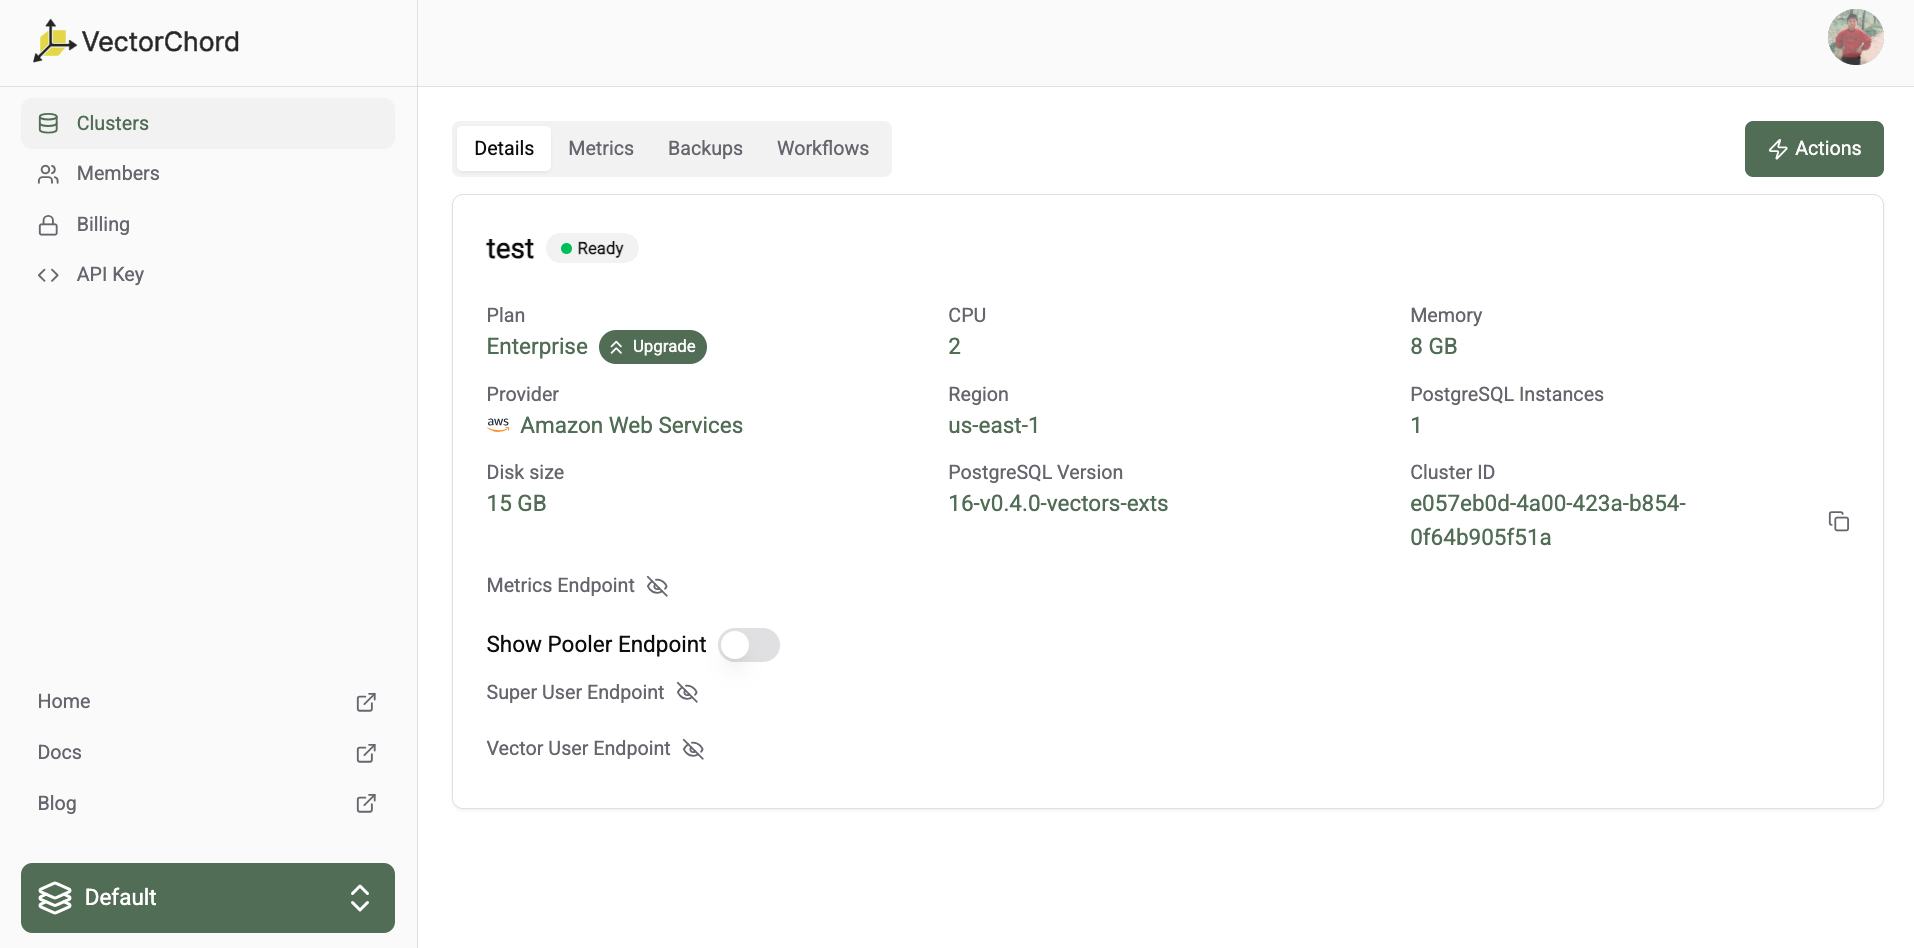
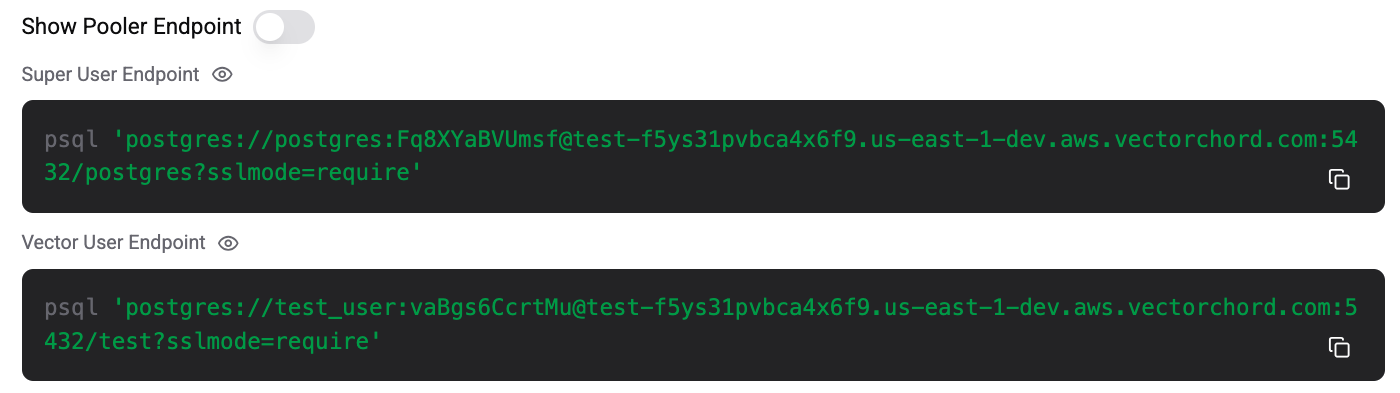
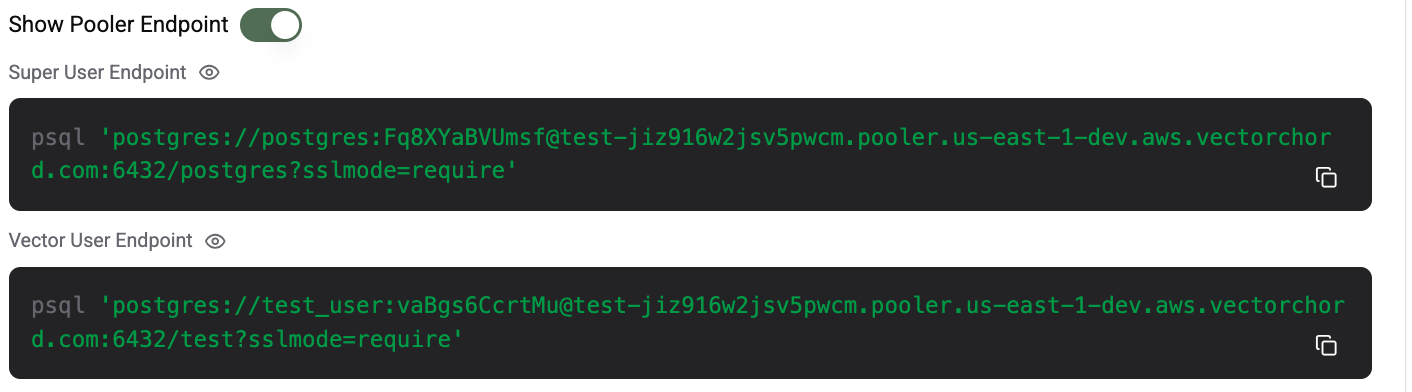
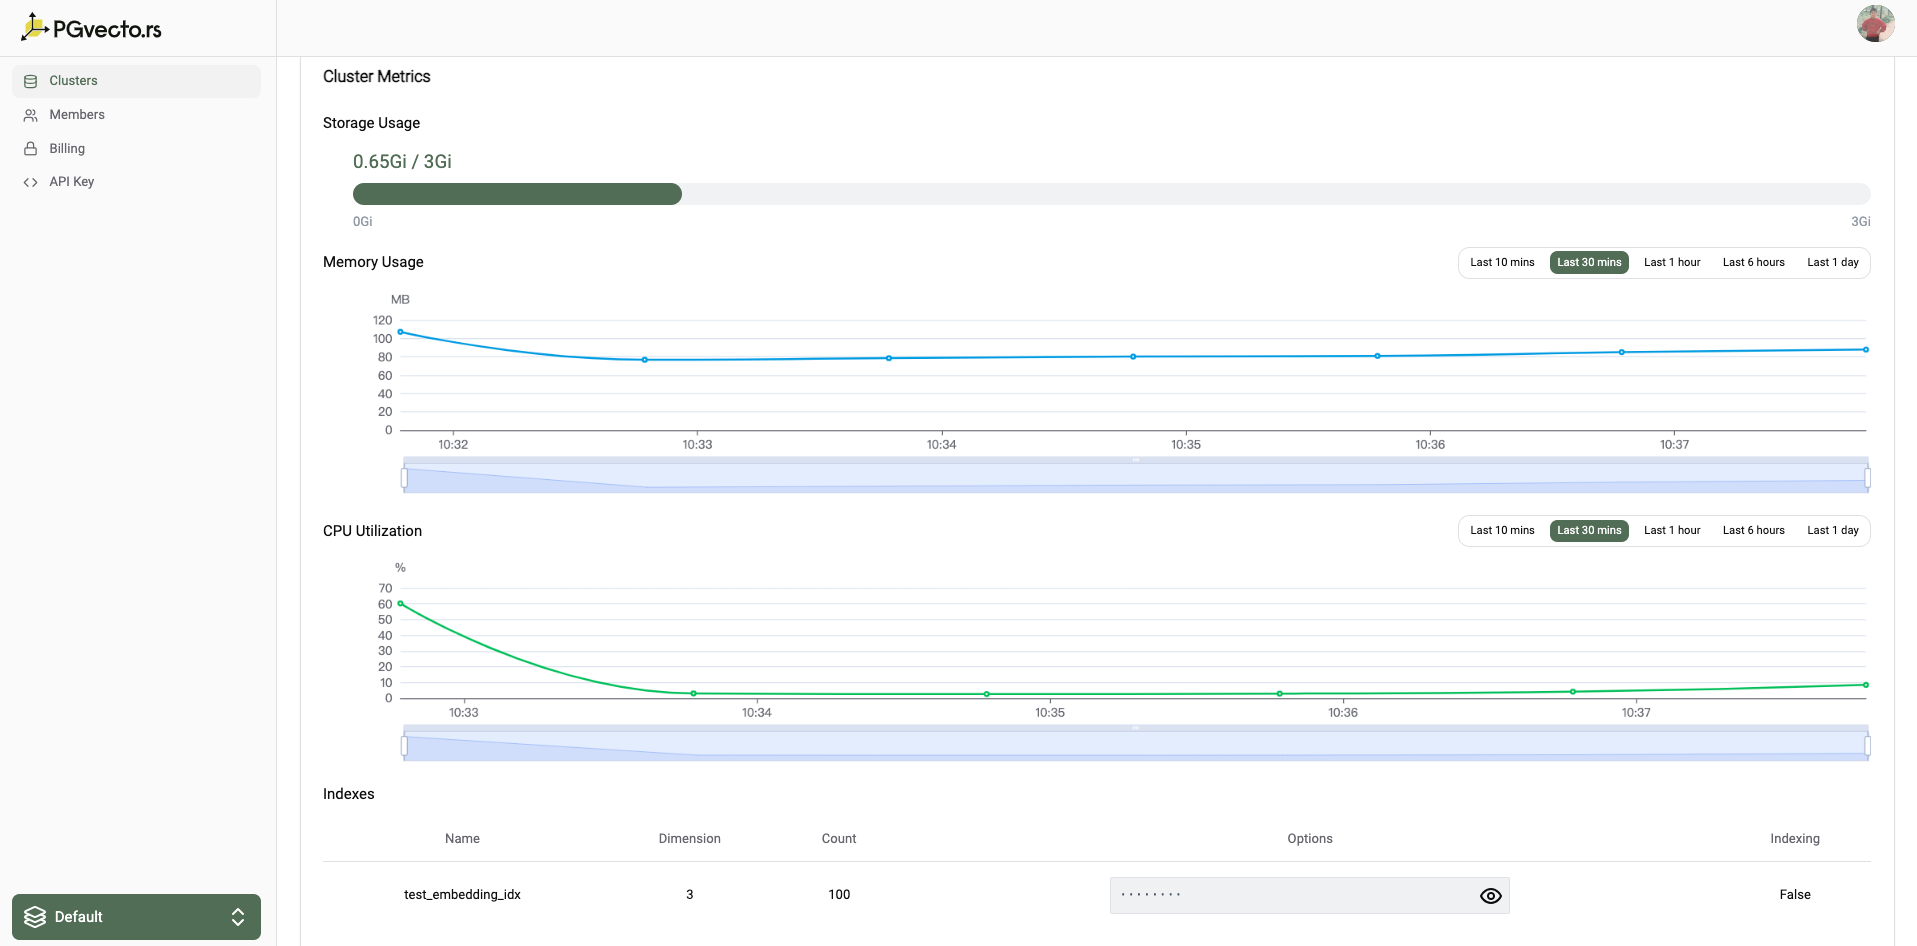
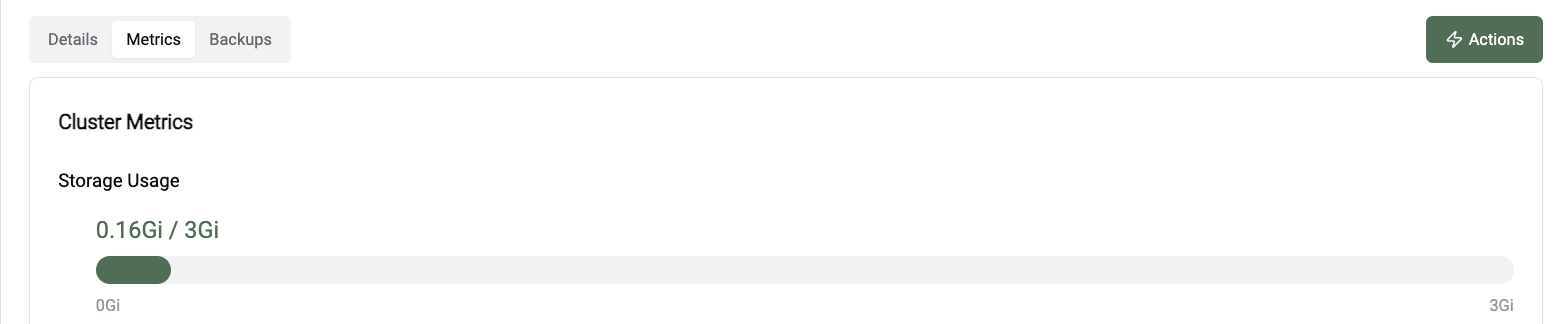
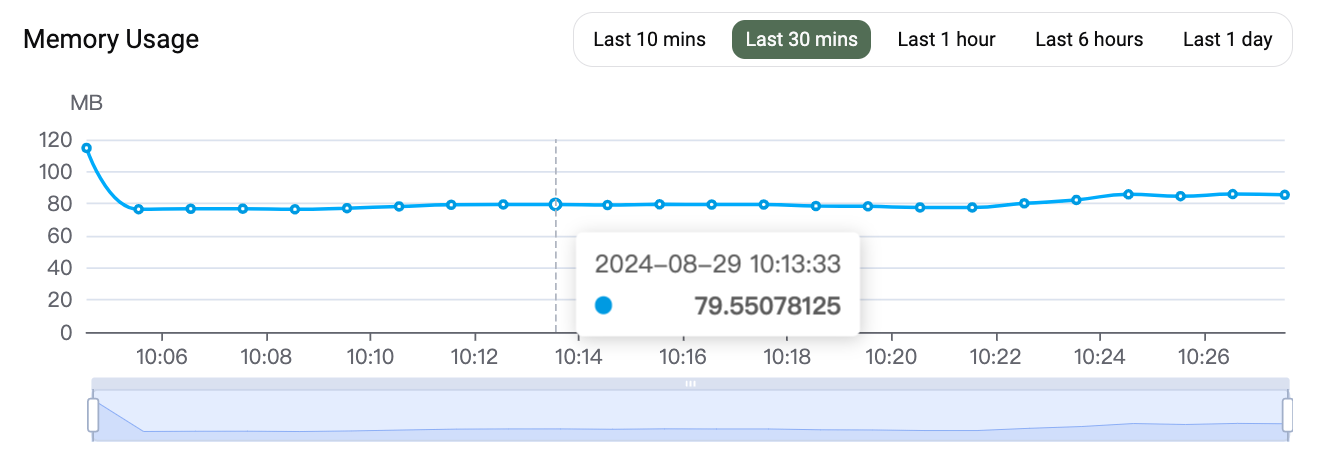
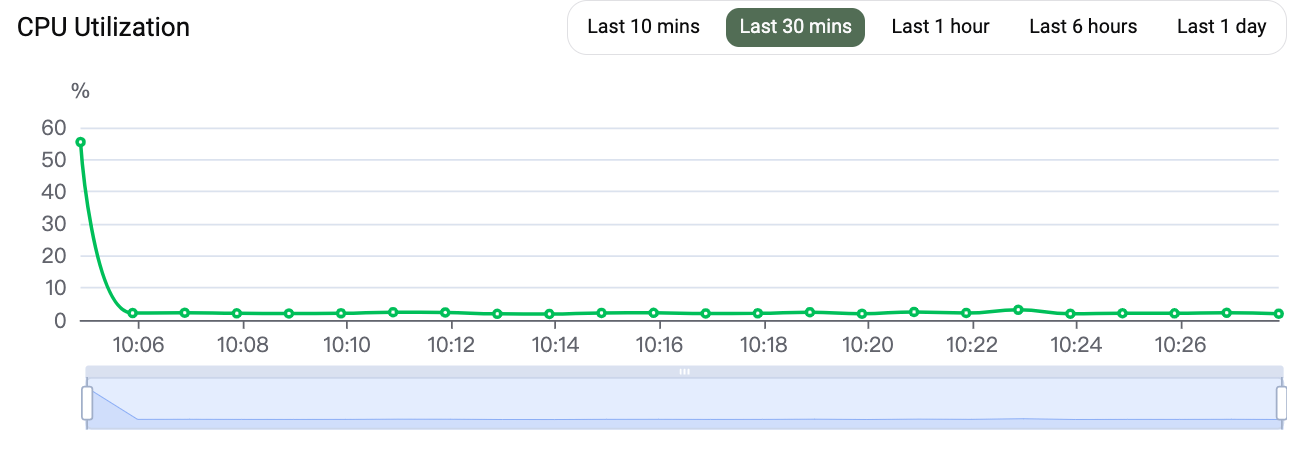
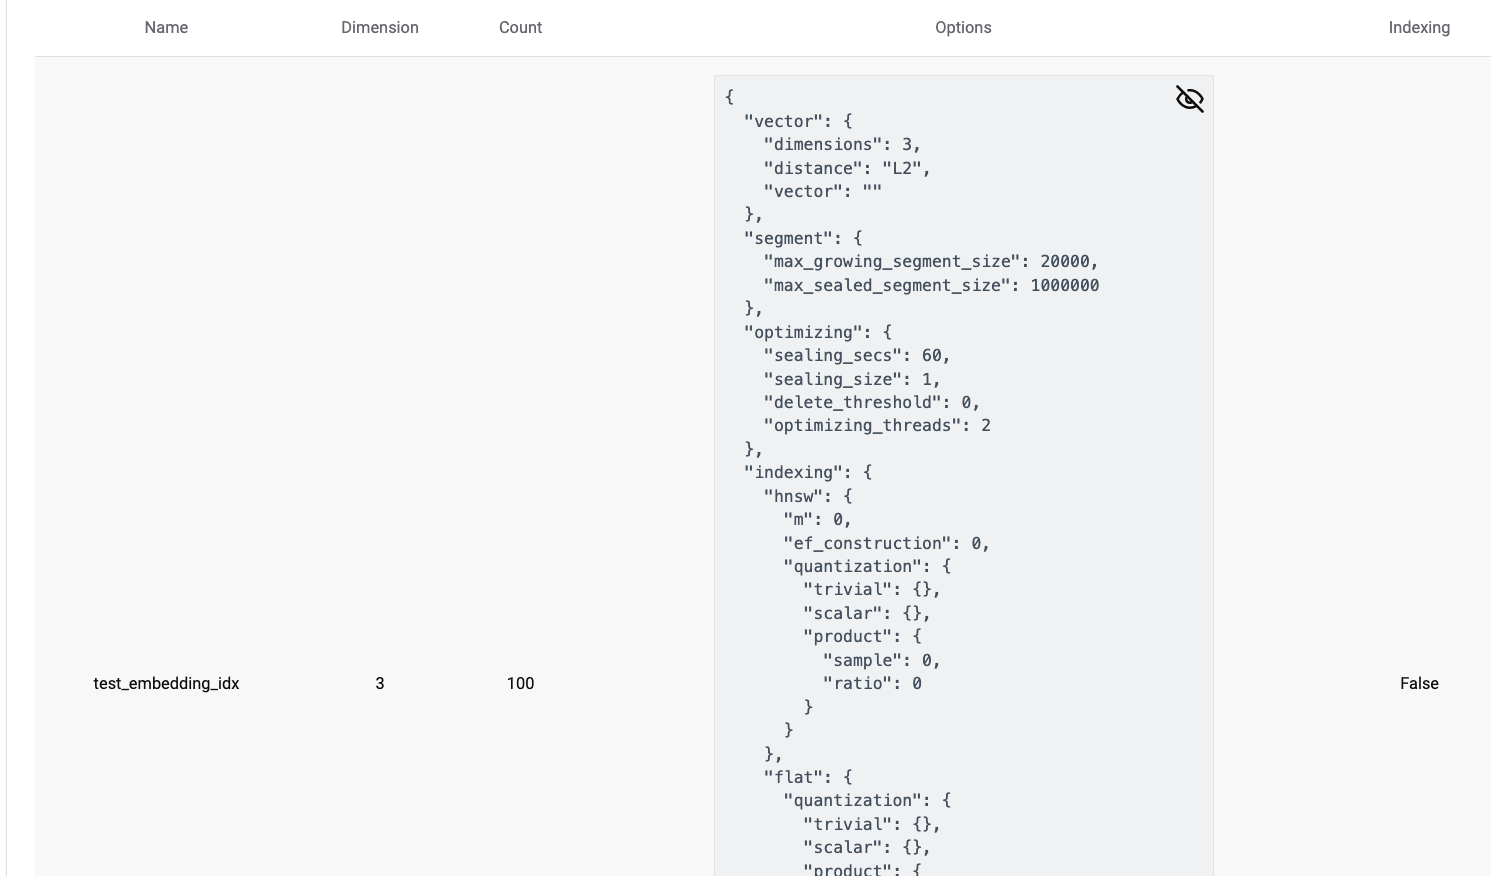

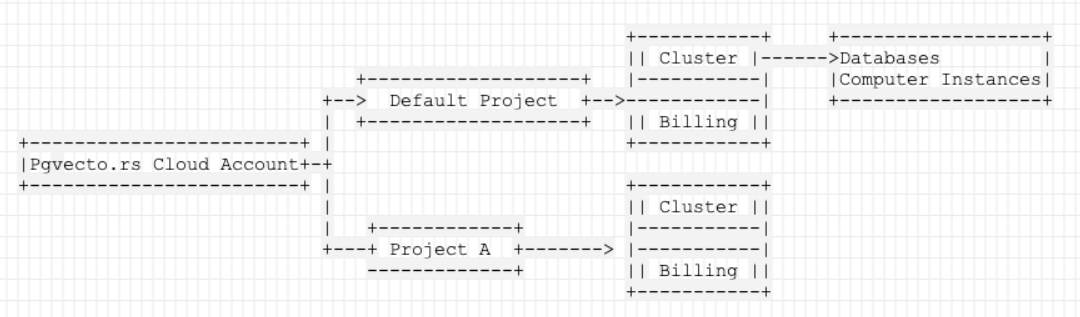
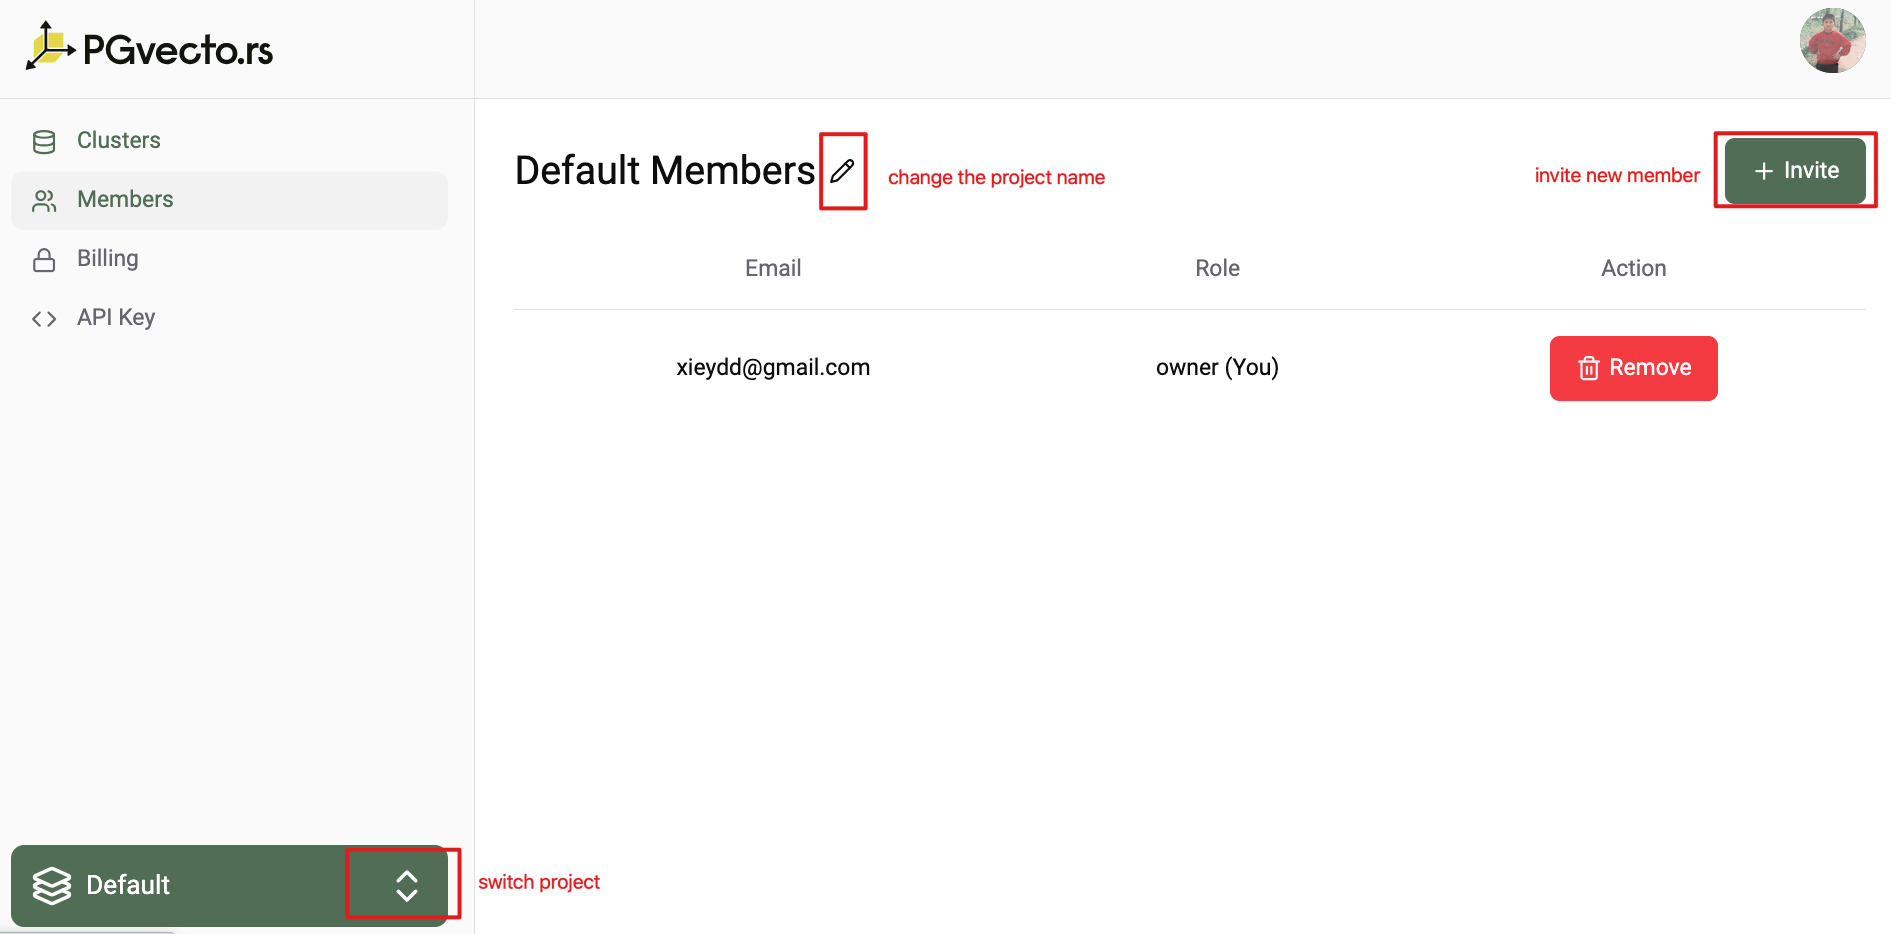
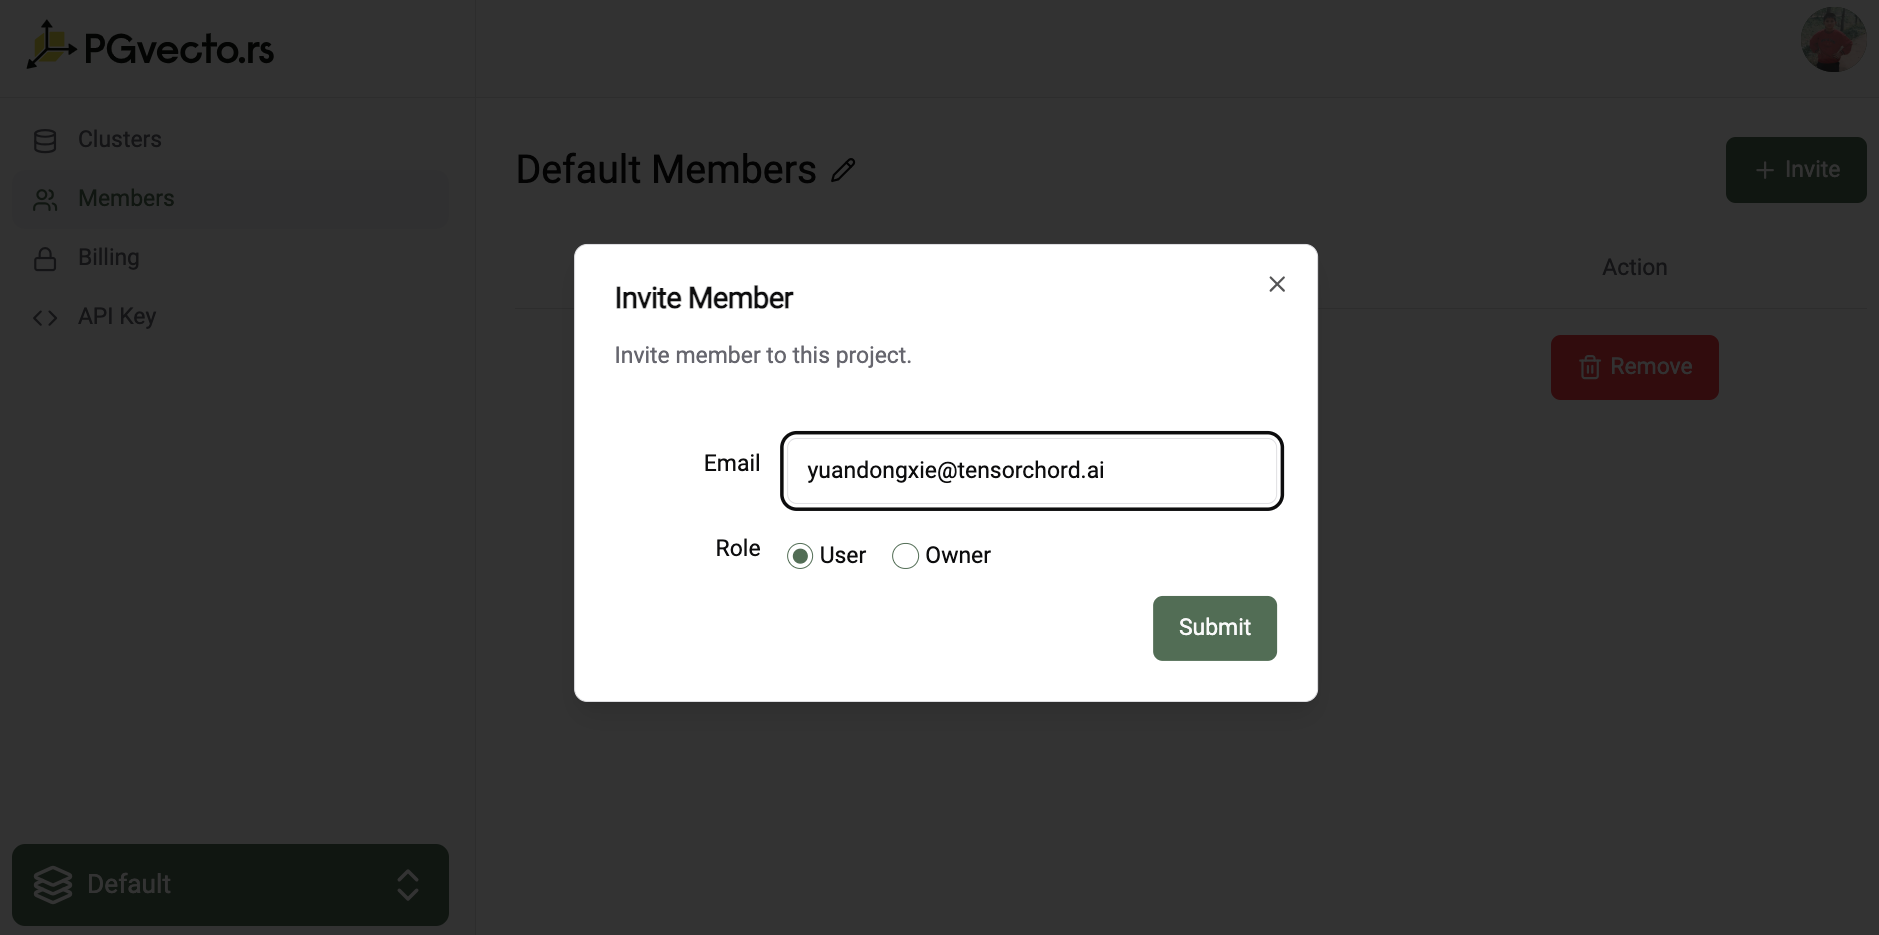
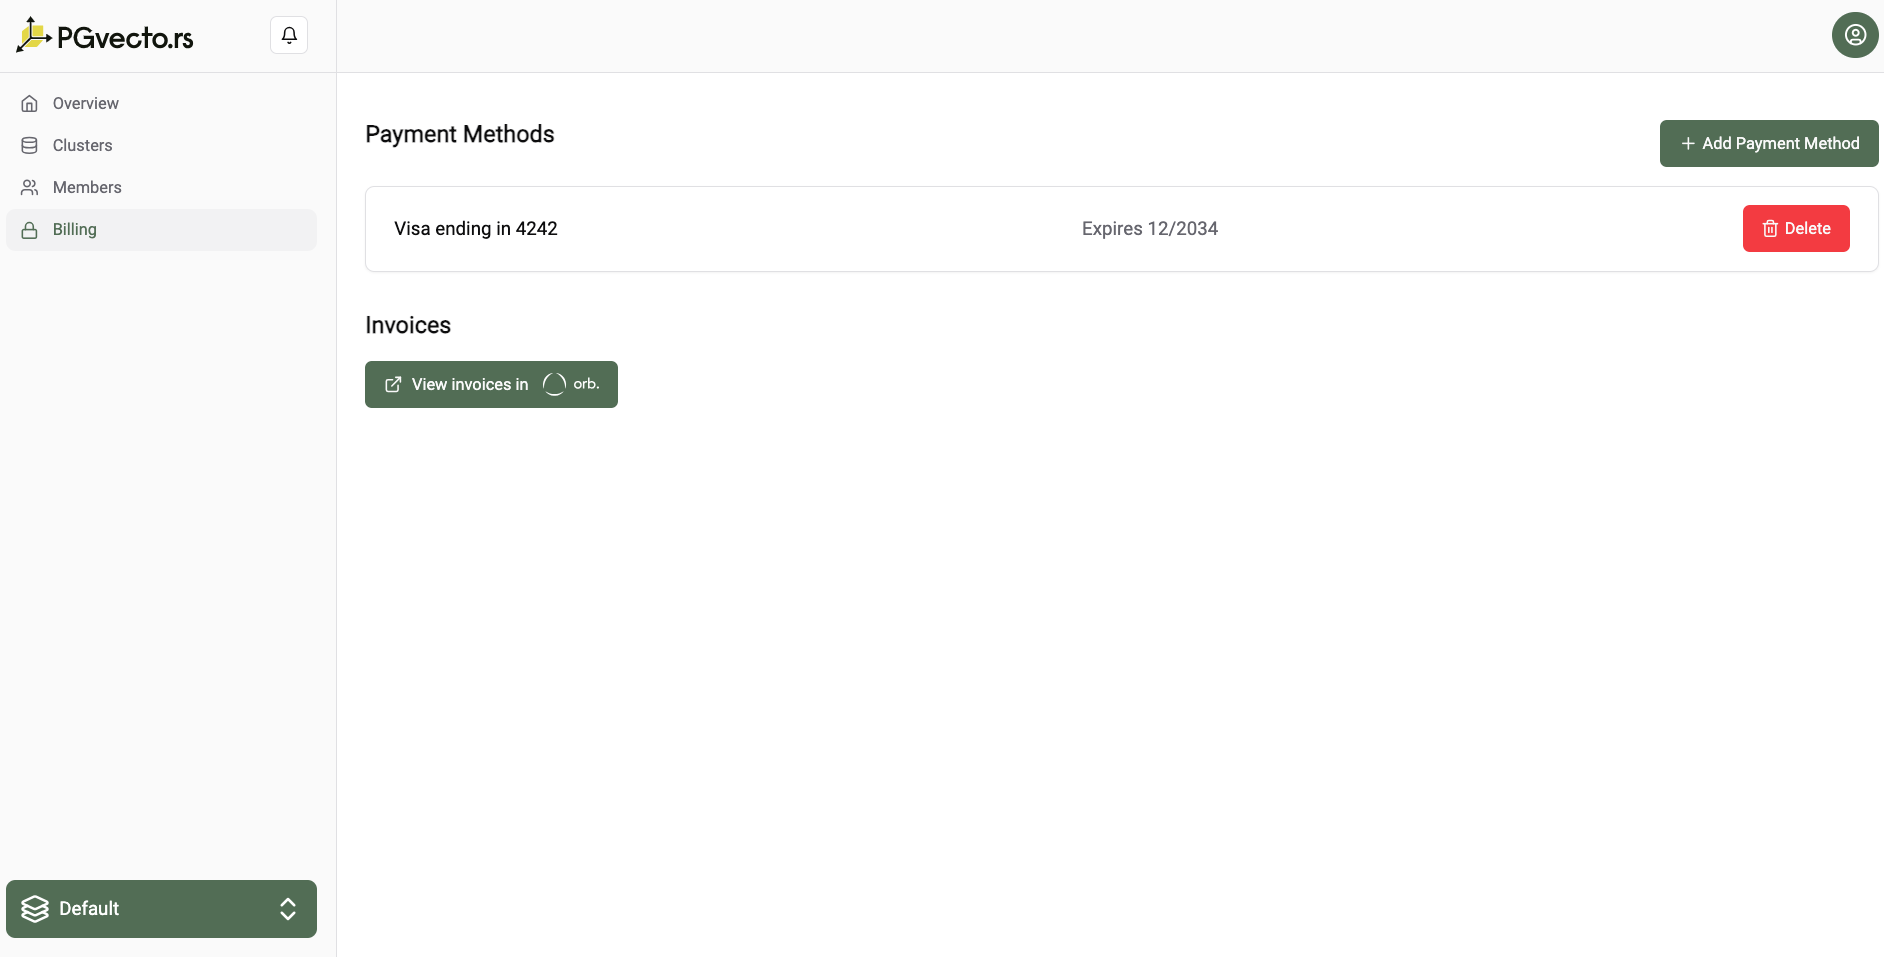
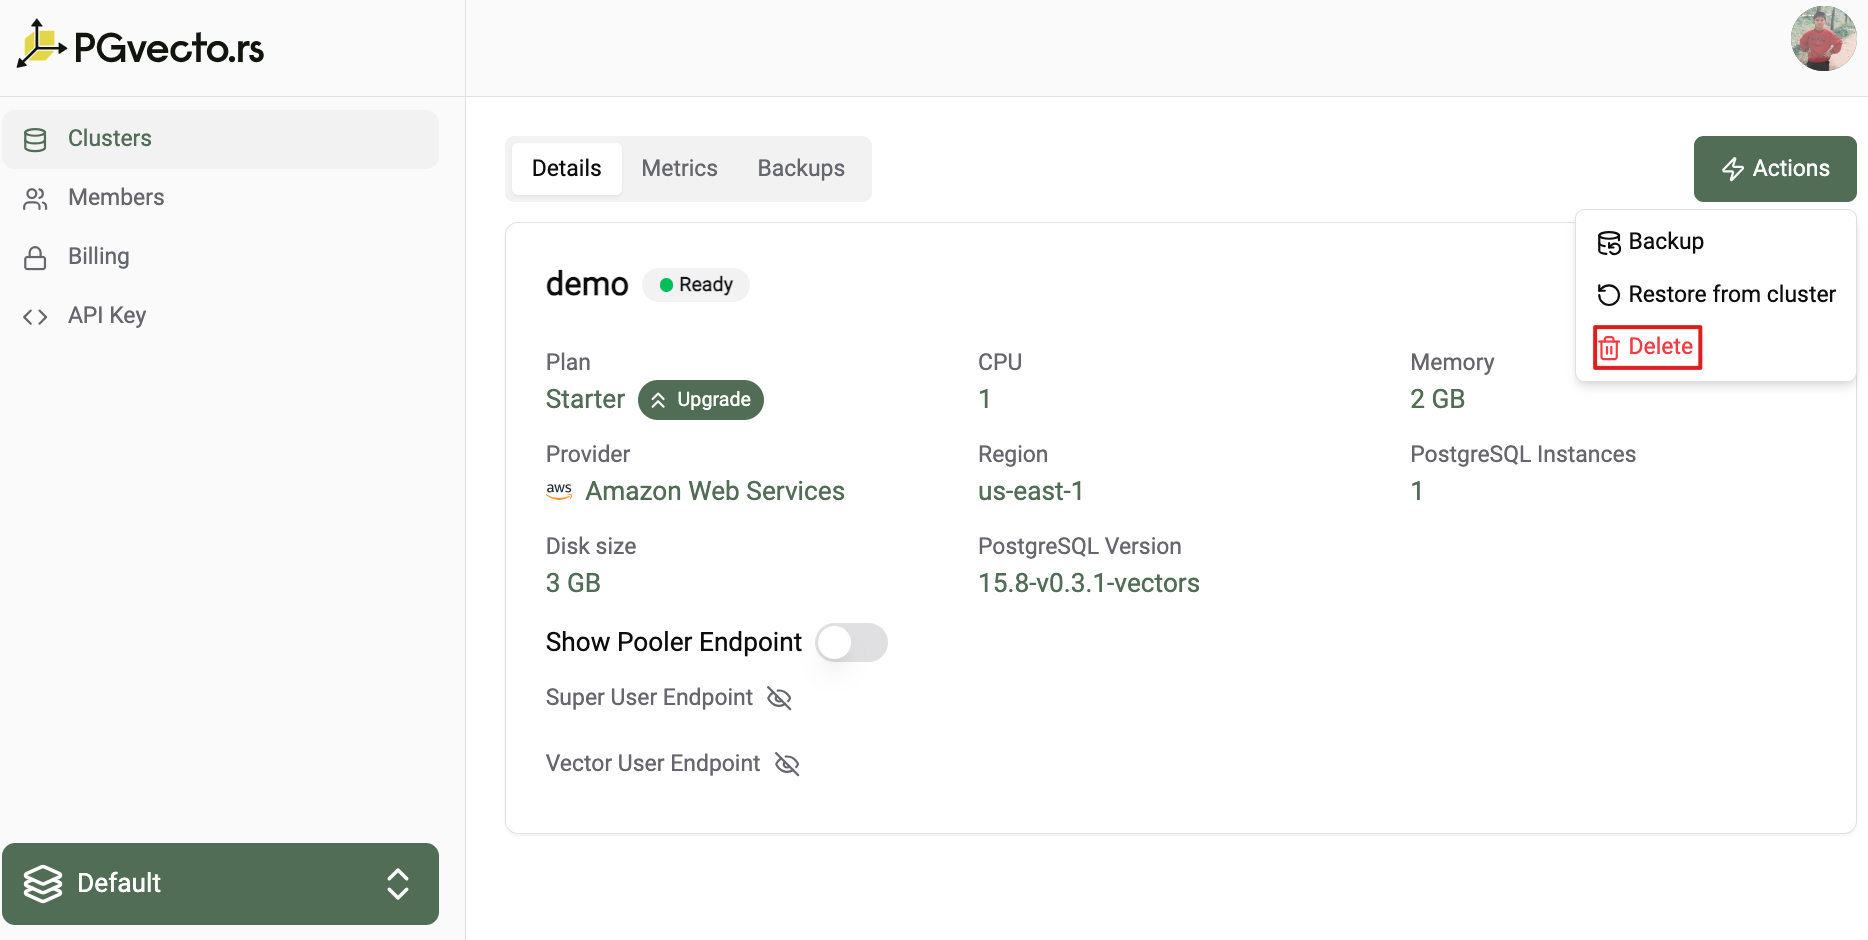
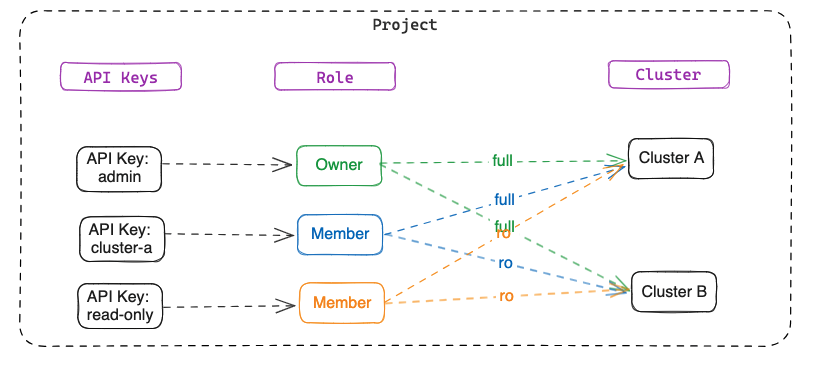
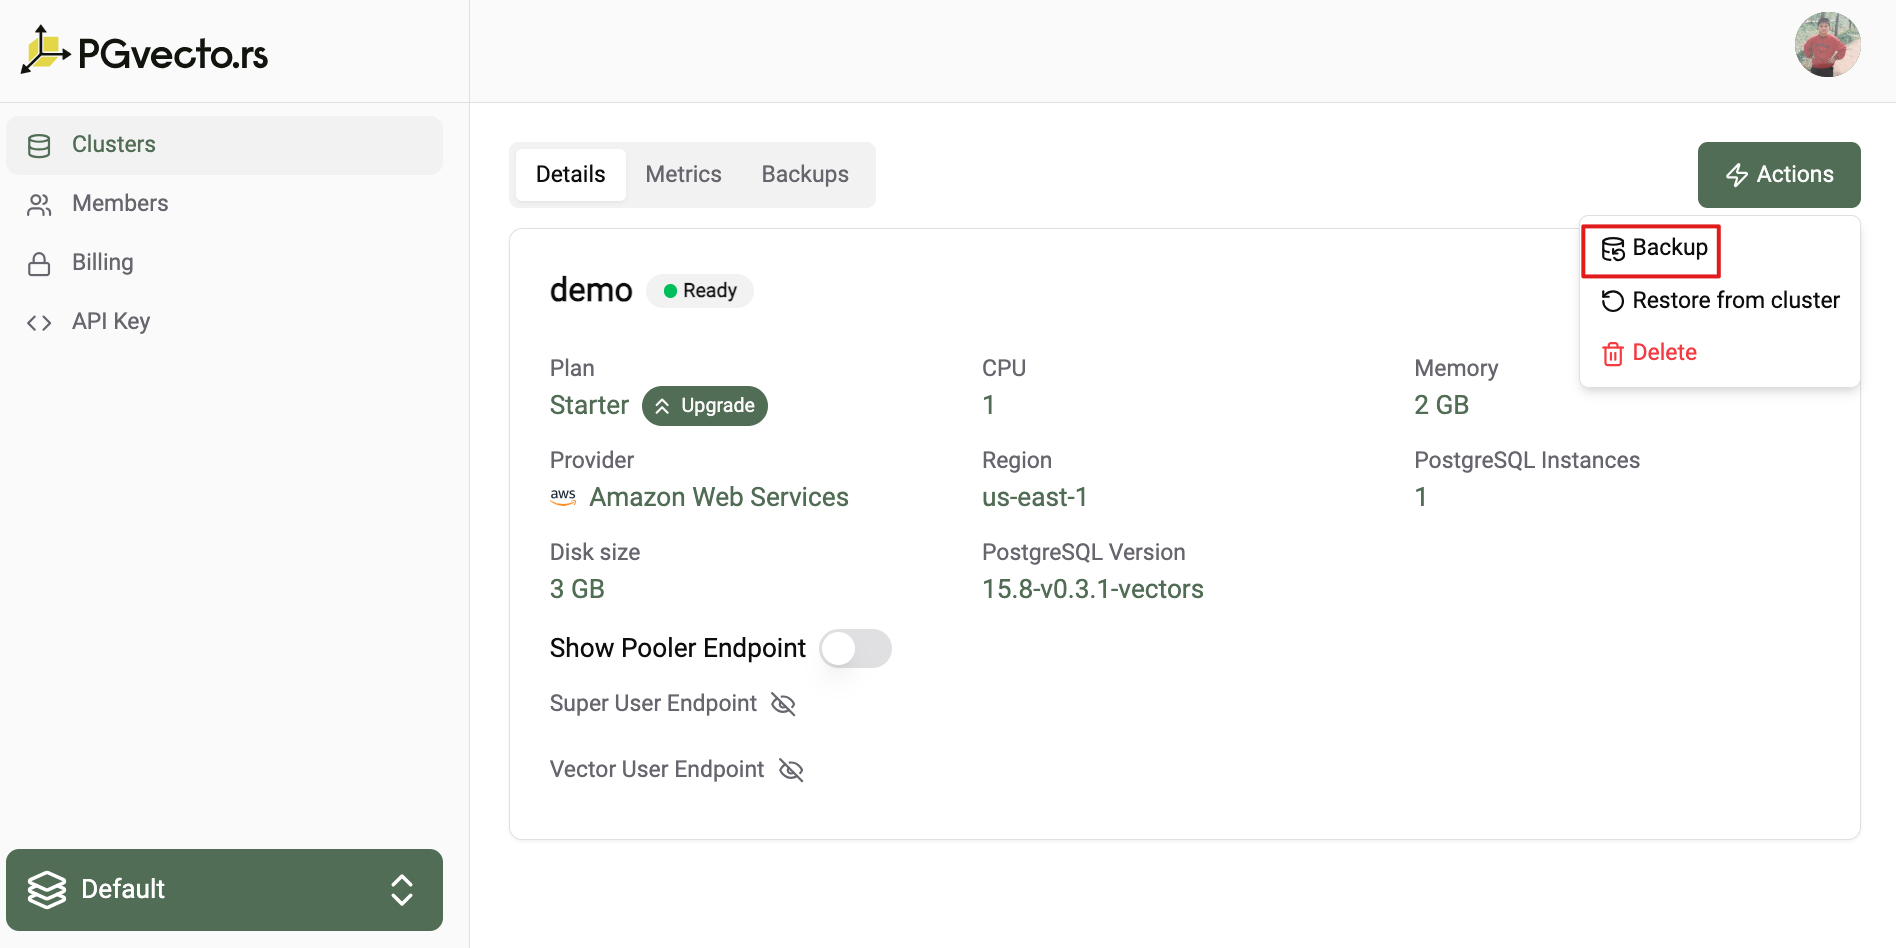
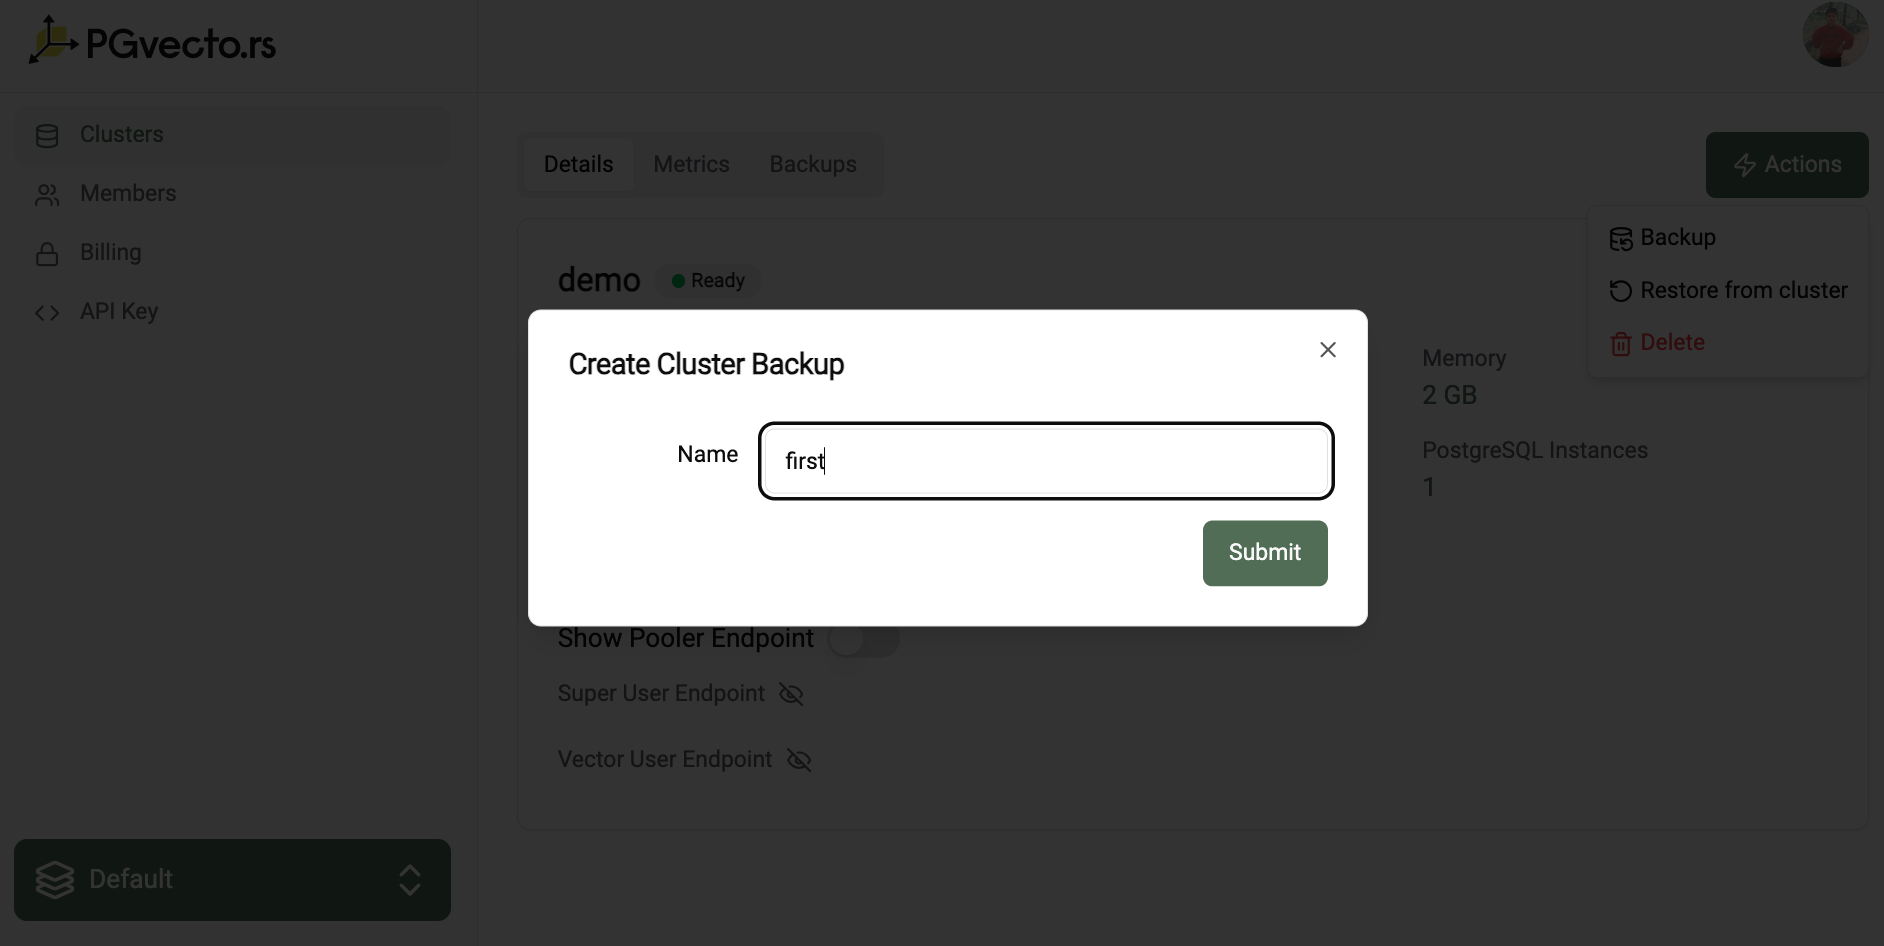
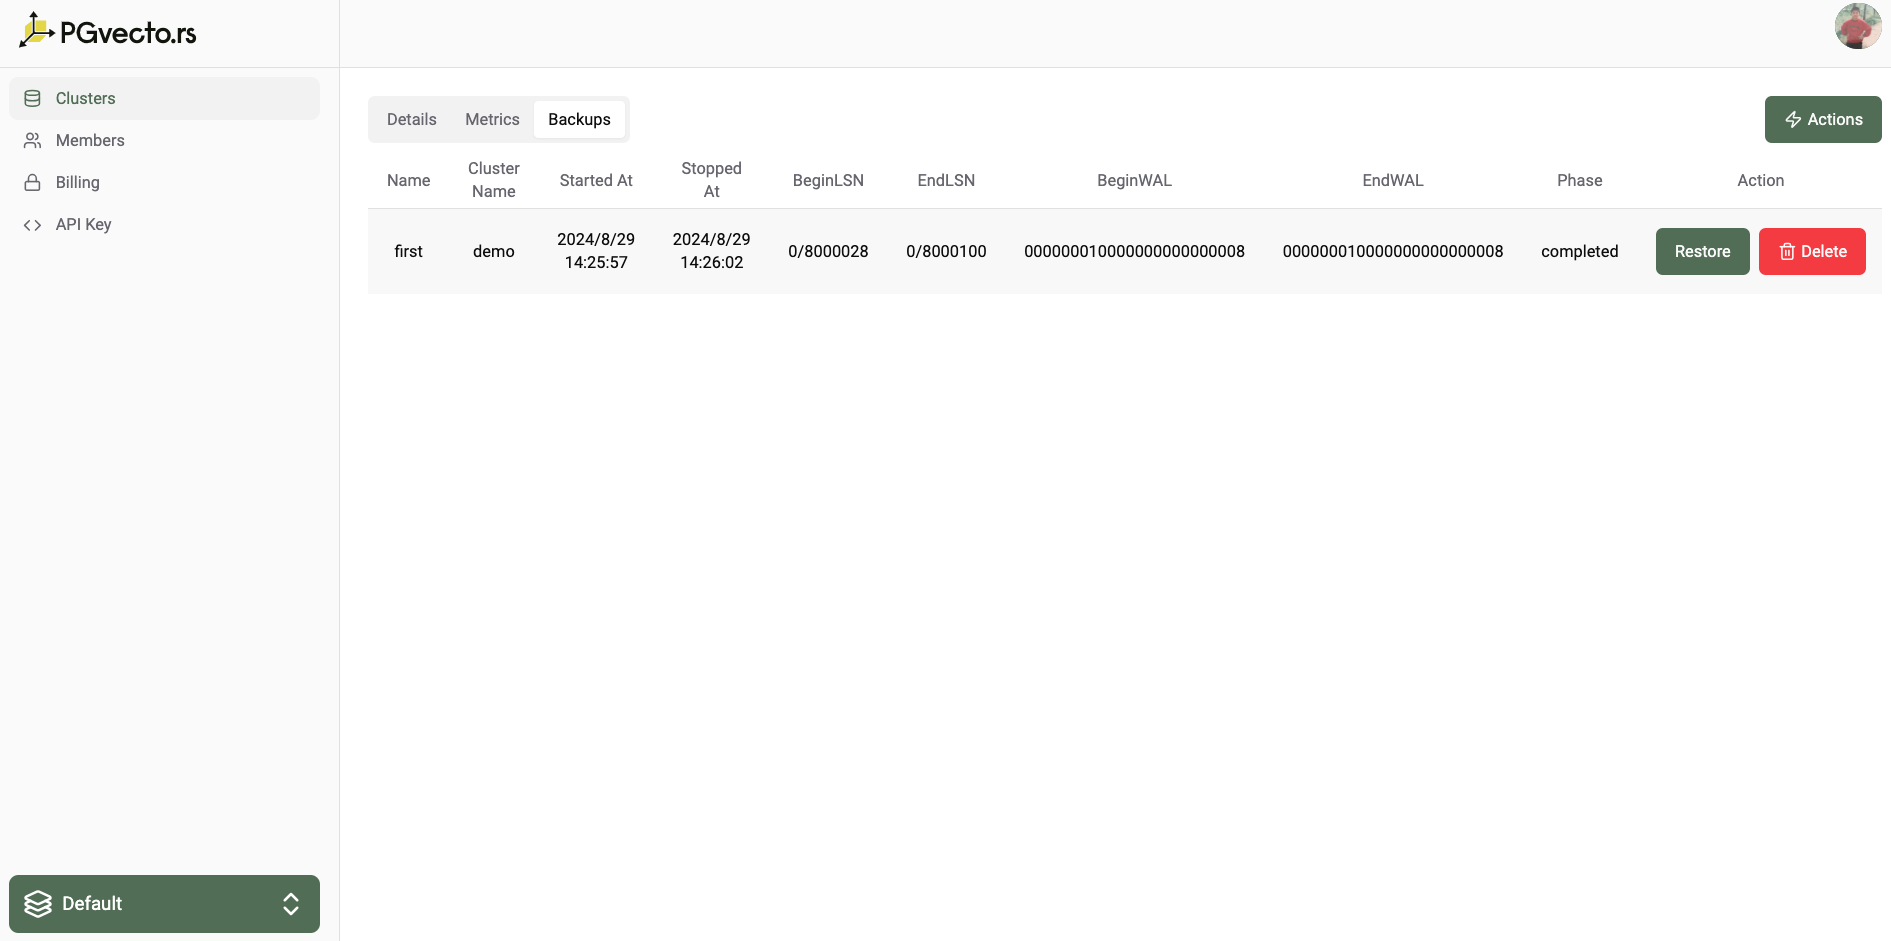
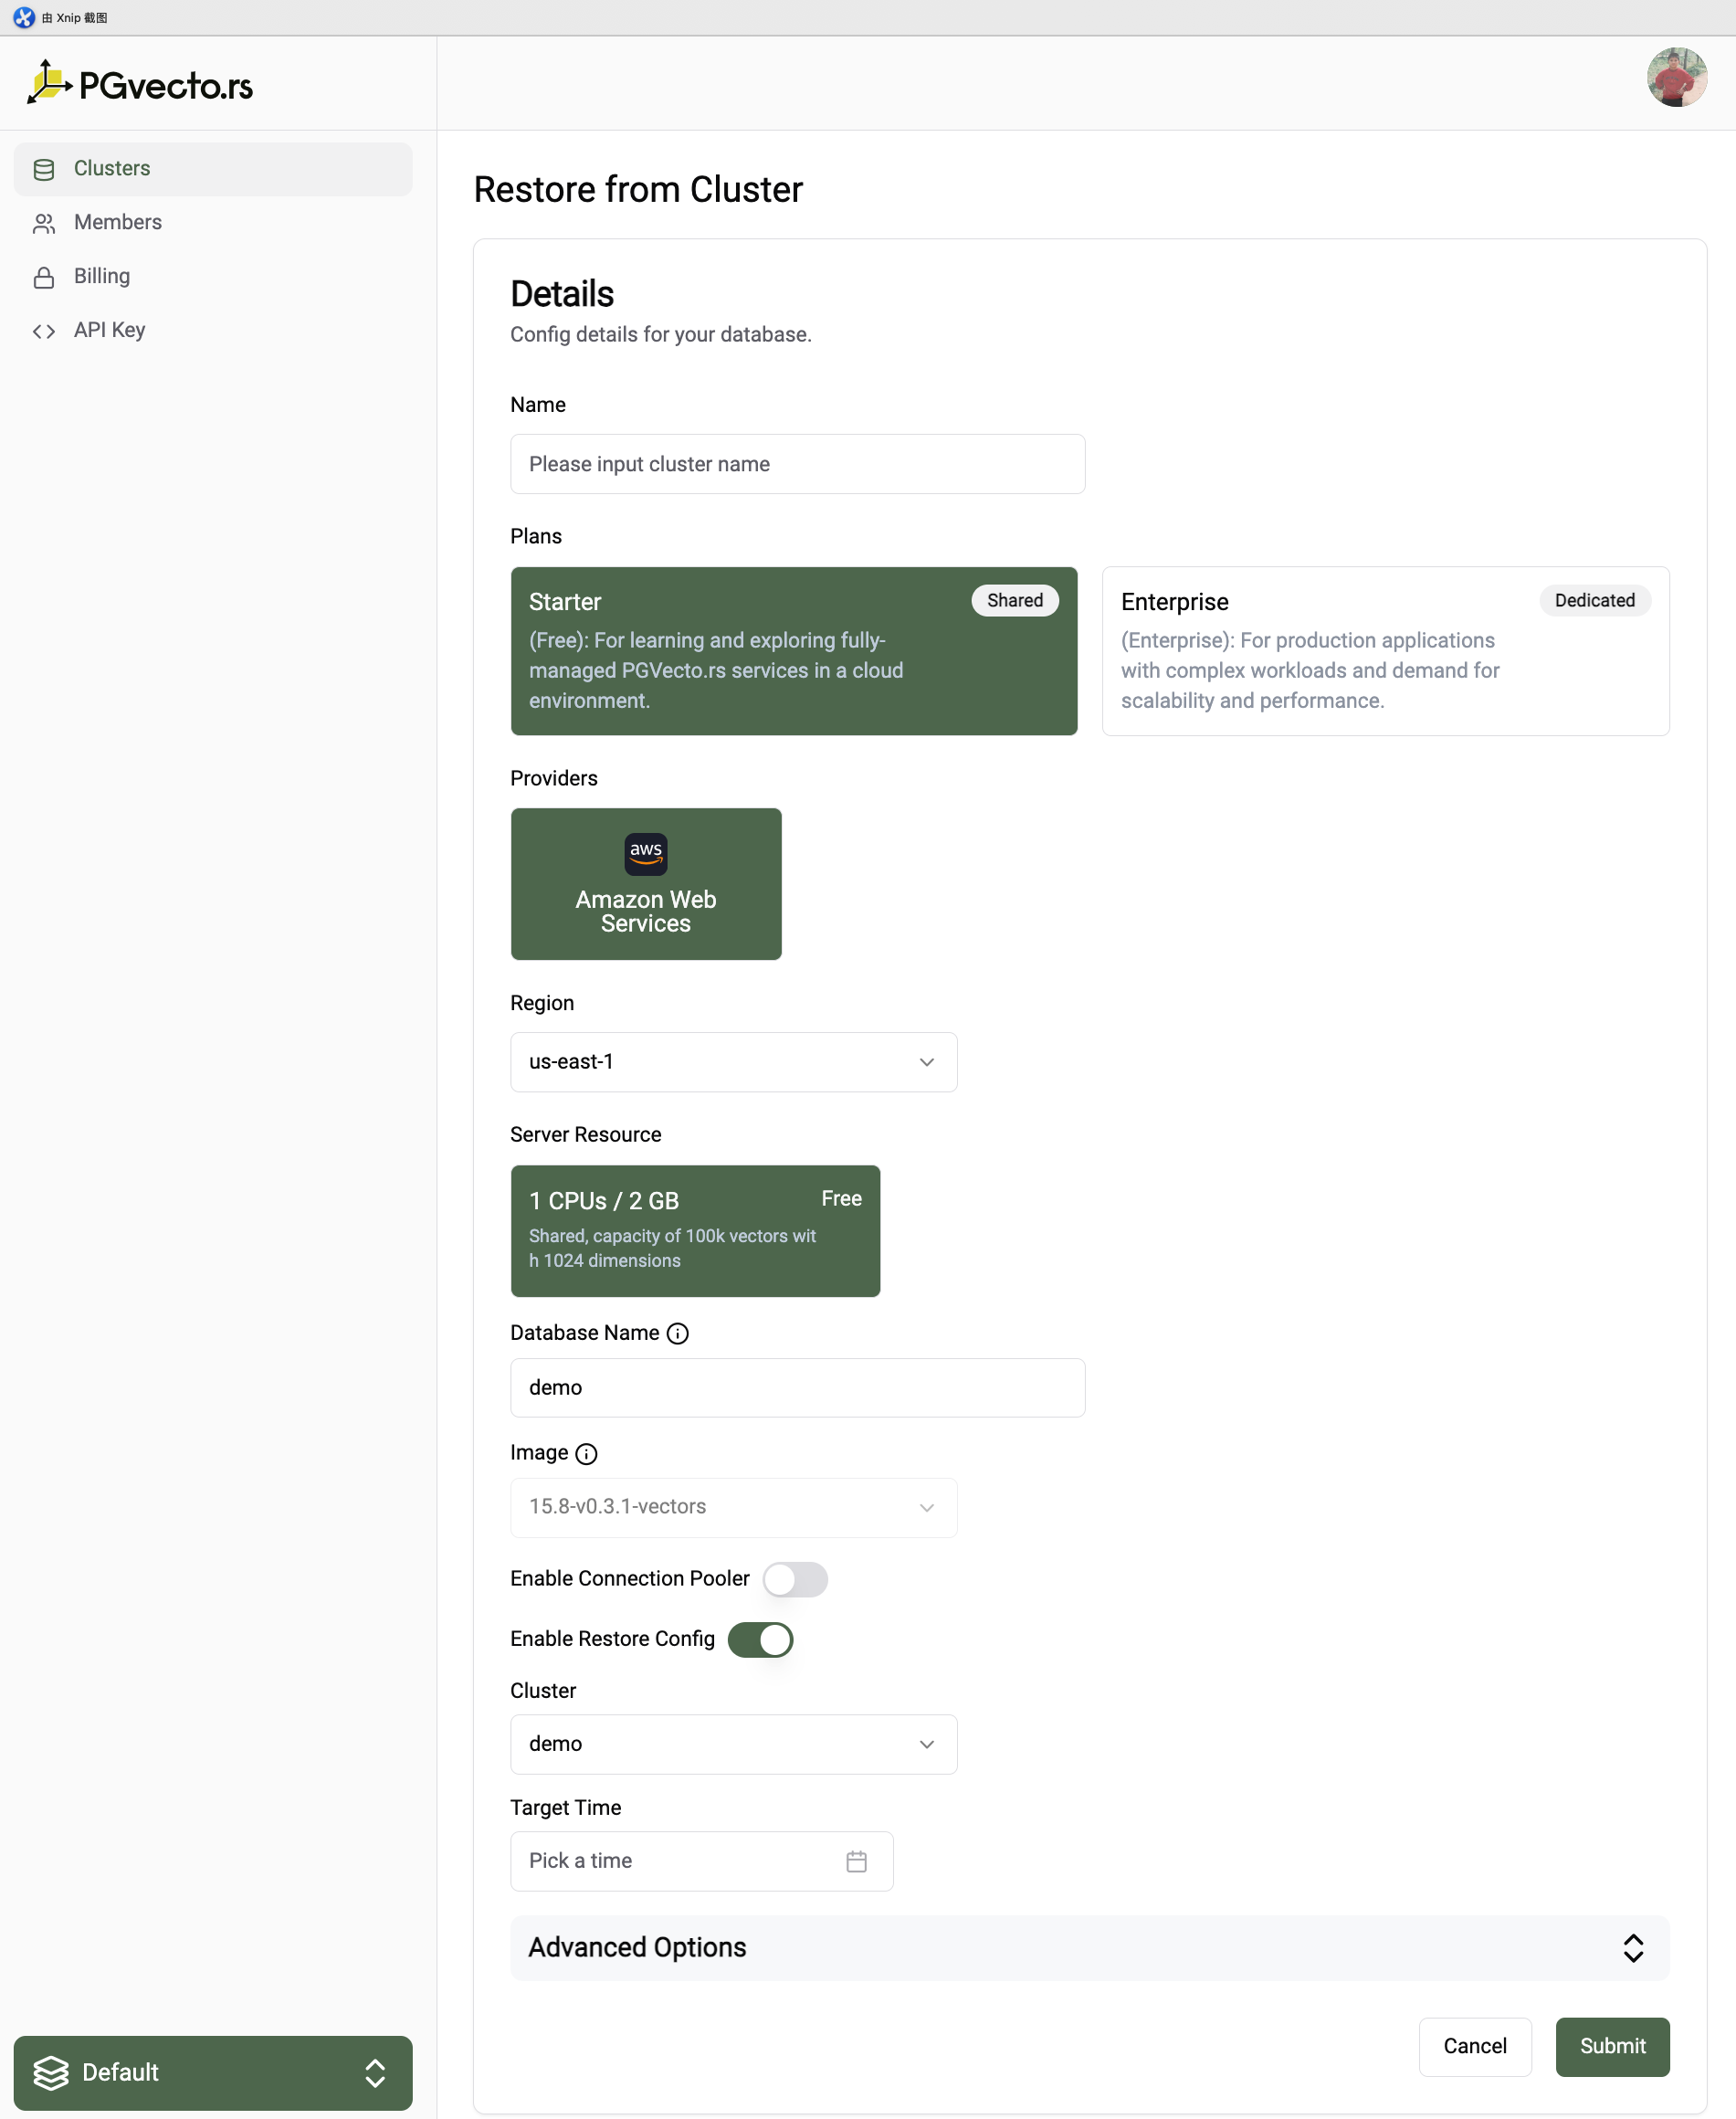
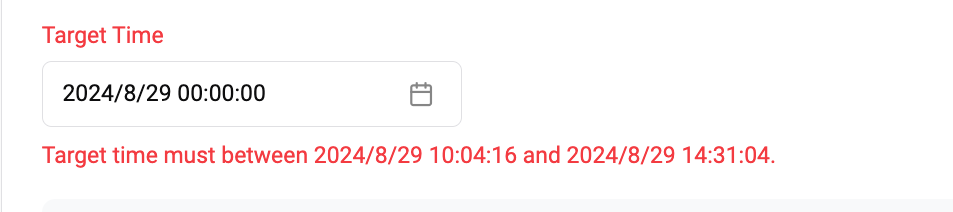 Warning